I don’t know about you, but getting back into the swing of things has been tough this week.
We returned from vacation, had another Christmas at home, entertained family, Happy New Year, undecorated, reorganized, and now back to school and after-school activities! It’s a lot to jump into after a couple of weeks off!
The last thing I always want to do when we return from vacation, is go to the dreaded grocery store. This means a lot of experimenting and improvisation in our house because my crew expects three hot meals a day out of me, and Mom is pooped right now.
What to do? The freezer! This is a word I rarely use because really, all we use our freezer for is ice and meat. We purchased a half of a grass-fed cow in August, and we still have quite a bit left. We always crave red meat when we have been traveling which was obviously the case, because I went to the freezer and pulled out stew meat, a roast, and some steaks. The steaks we grilled right away, but the others required a little more effort. Not much though. On undecorating day, I knew I would be busy so I pulled out an old recipe, made a few changes, and prayed we would have something tummy warming good for dinner.
It was amazing! In fact, my ten year old has asked for stew in his thermos for lunch every day since that he has needed a lunch. We have had some moist bone-chilling days in South Texas recently, and there is nothing better than good, warm you up from within, home-cooked meals from the heart!
This takes a little forethought, but get it going, and forget about it all afternoon. Before you know it, it is dinner time and it’s ready to go. Perfect for those basketball practice nights when everyone is coming home at different times.
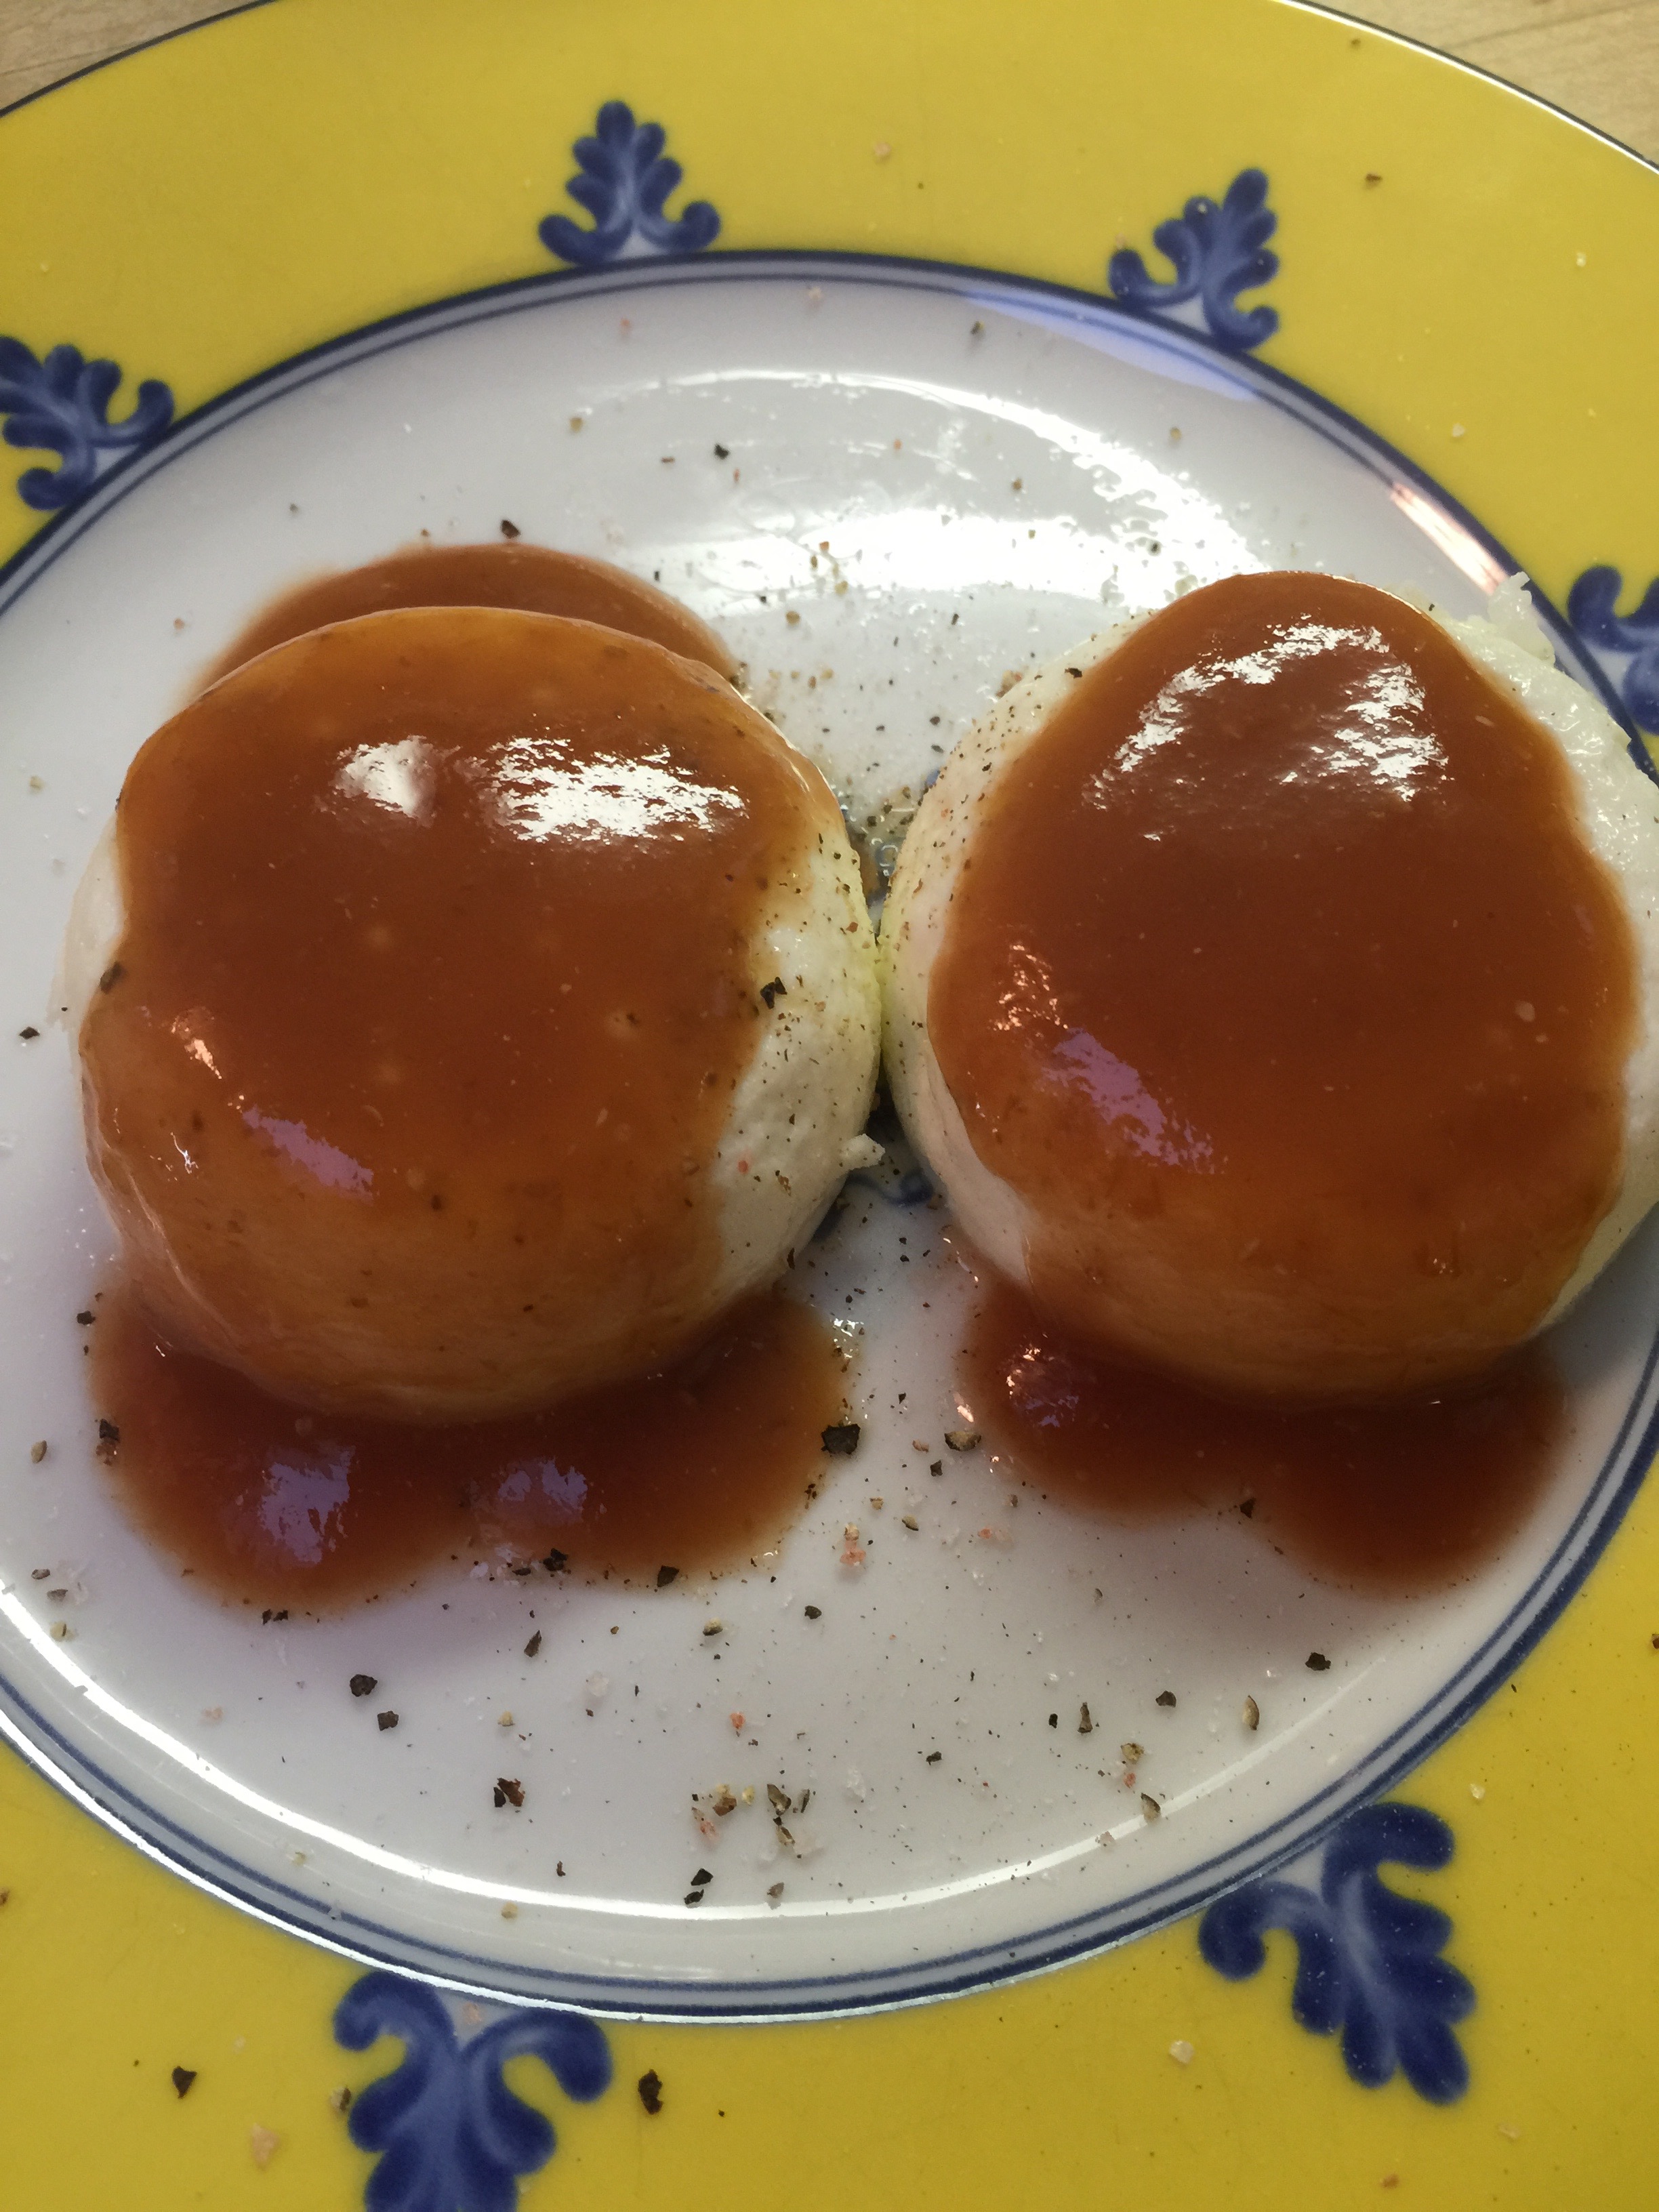
Hearty Beef Stew
3 lbs Stew Meat chopped
16 oz bacon
2 cups beef broth
14.5 oz can petite diced tomatoes, drained
1 green bell pepper
1 cup baby carrots
1 small onion
6 cloves garlic, minced
2 Tbsp tomato paste
2 Tbsp Worcestershire Sauce
2 tsp pink Himalayan salt
2 tsp black pepper
1 tsp garlic powder
1 tsp onion powder
1 tsp dried oregano
Instructions:
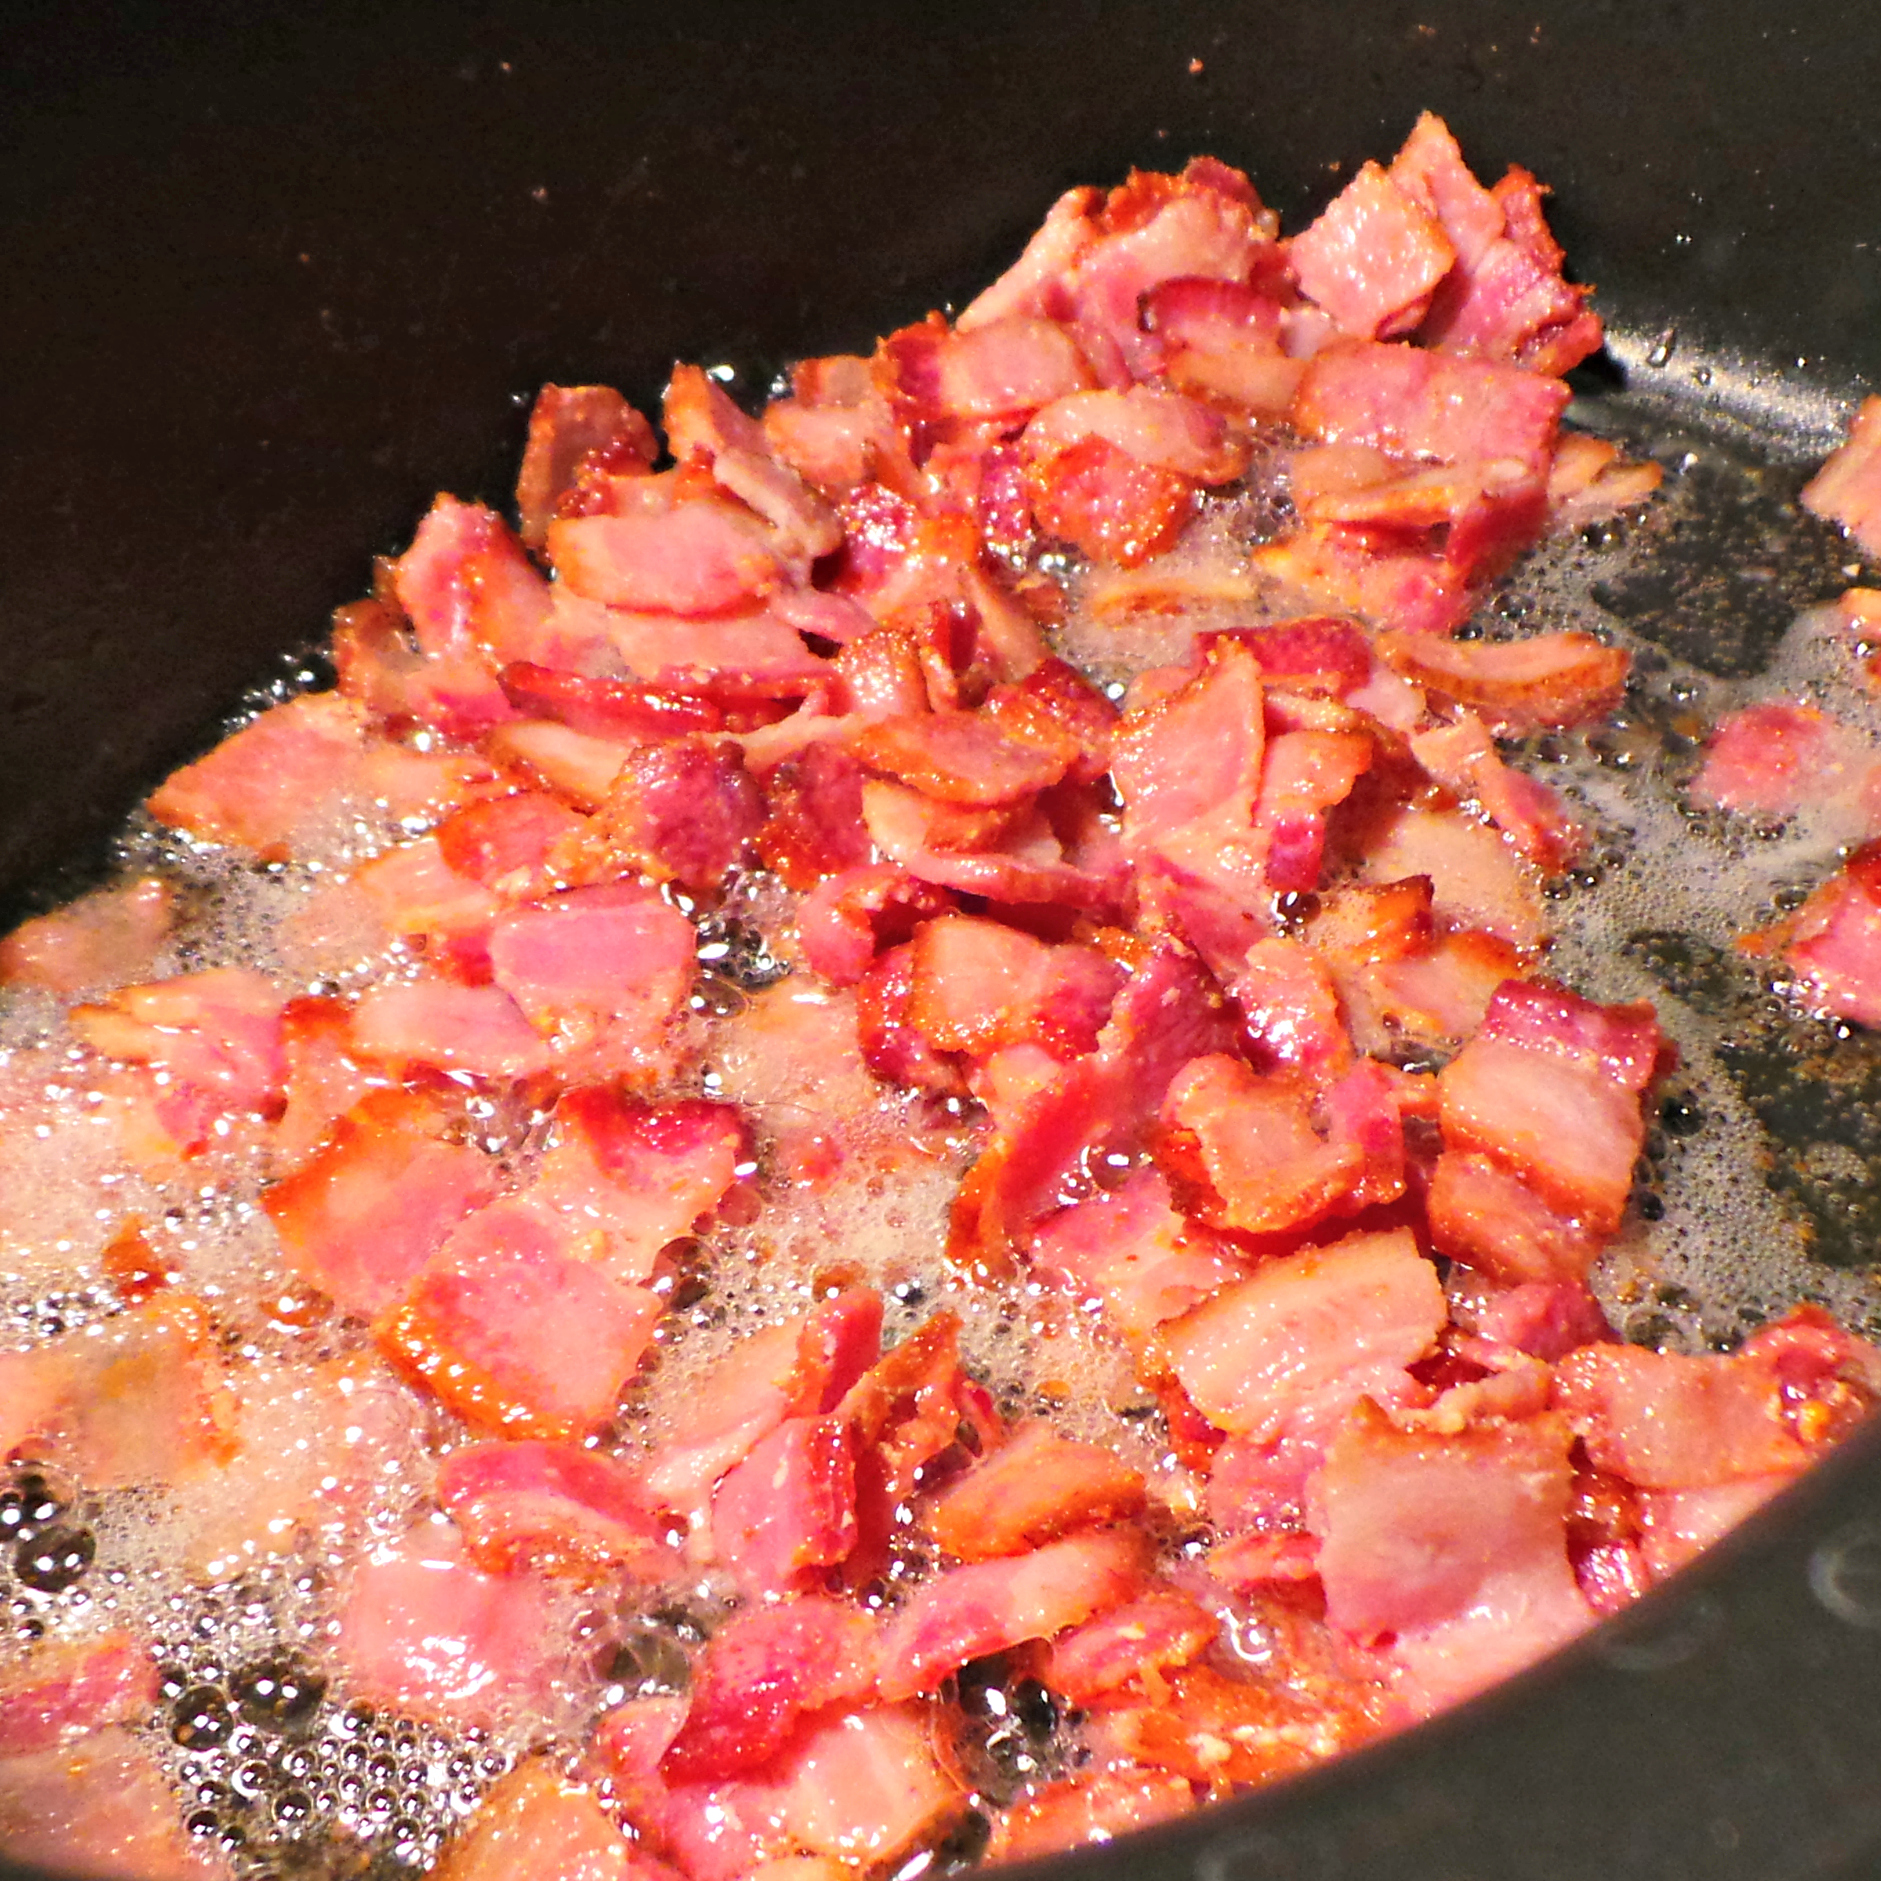
Slice your bacon into small pieces and cook in a large dutch oven.
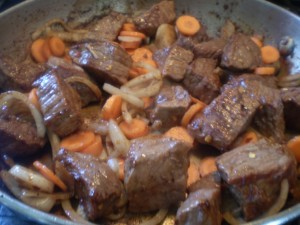
Once your bacon is cooking and you have a nice layer of grease, add your stew beef. Cook until browned, and then add your onion, pepper and garlic.
Cook these for about 5 minutes. Add your remaining ingredients, stir, and bring to a boil. Once boiling, reduce the heat to low. Cover and simmer for 3 hours or until you are ready to serve.
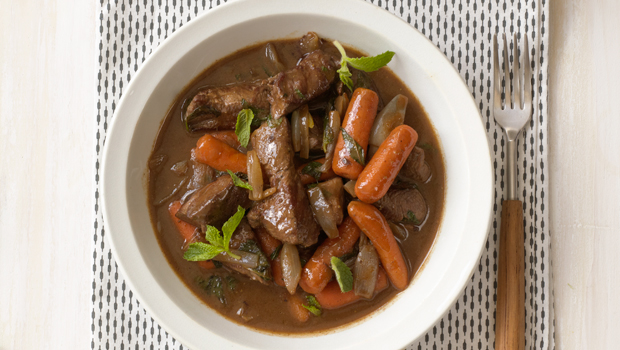
My family prefers their stew runny, almost like a beef soup.
If you are used to a stew with potatoes and a thicker sauce, this will not turn out like that. If your family likes the thicker stew, dust the top of your stew with just a pinch of xanthan gum. As it sits and you stir, it will slowly thicken. This will give you a more stew like consistency.
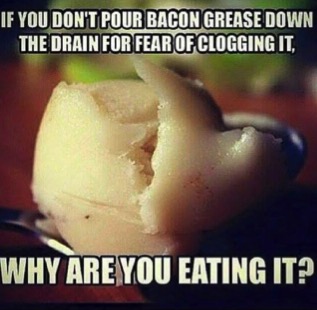
I saw this image and literally almost spit out my BPC(Bullet Proof Coffee)!!
It’s fairly astounding that people out there believe that the inside of our bodies is the same as the that of a household drain!
The only thing that I can solidly (HA!) agree with on this post is to not pour your grease down the sink.
I have recently seen the SAWS Grease Monster Truck in my neighborhood lately, so remember, if you have to dispose of your grease, please do it the right way!
Do you need a bunch of bacon? Or maybe just enough to feed the fam on a Saturday morning?
Have you thought about doing it the oven?
Here is a quick and easy way to get your bacon cooked, and you can do as much or as little as you would like. PLUS, you will also be able to get a good amount of bacon grease for any other dishes you may be working on later in the day.
Cookie Sheet Bacon
Preheat your oven to 375 degrees.
Line a cookie sheet with sides (jelly roll pan) with heavy duty aluminum foil.
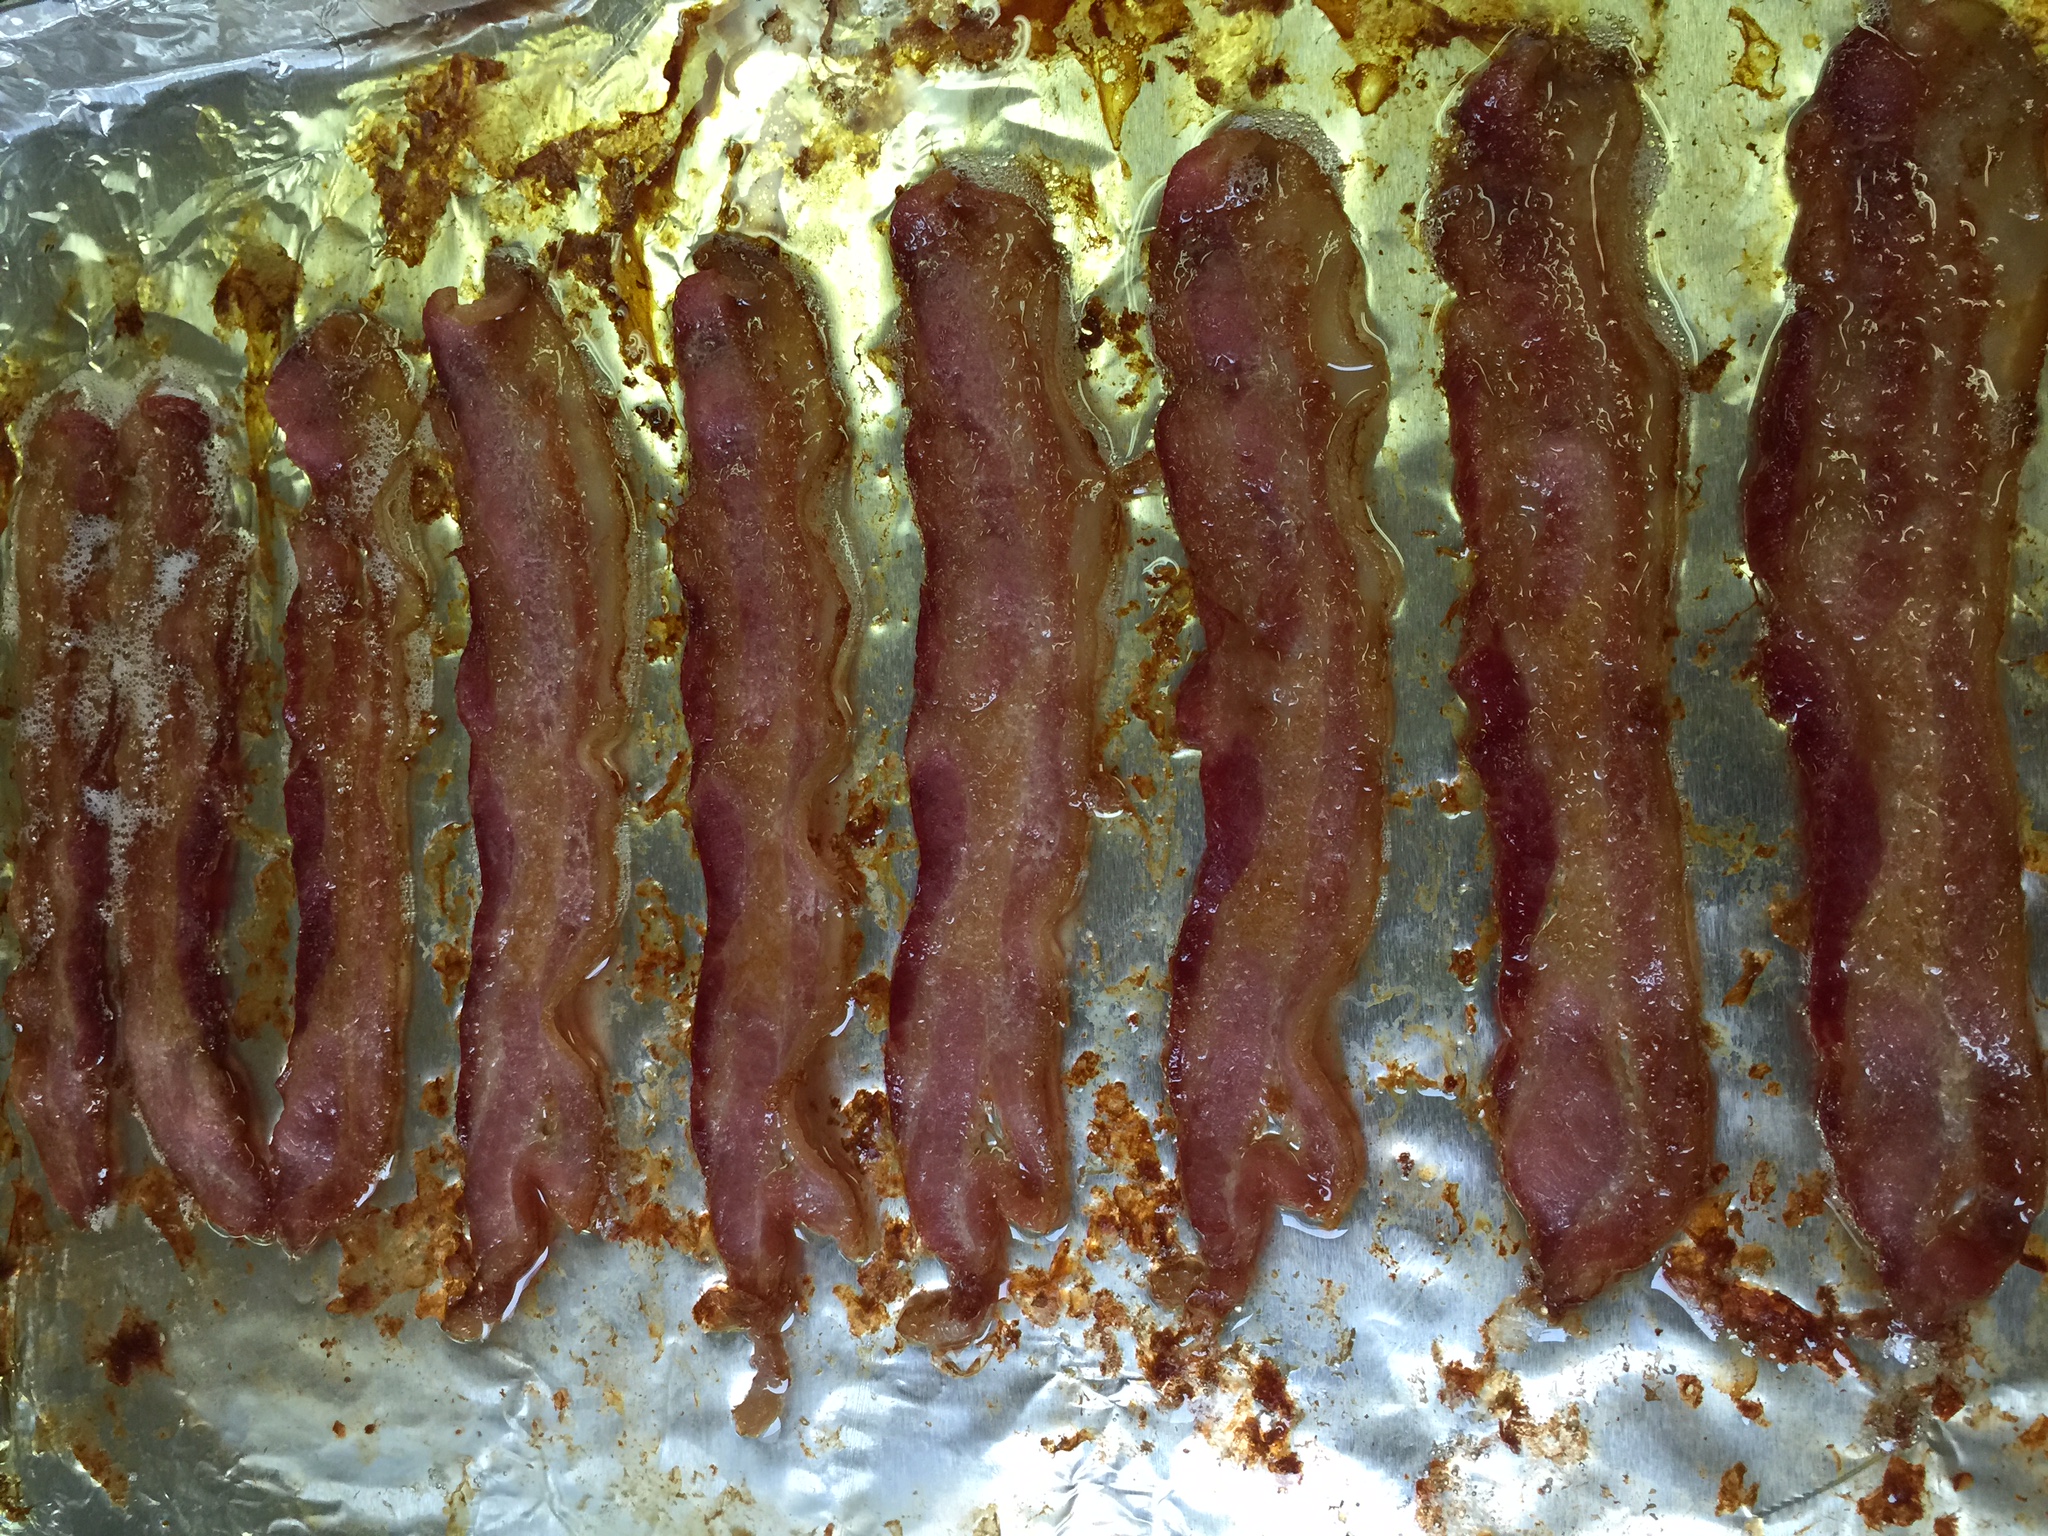
Lay your bacon out without the sides touching. I can usually get 10 to 12 pieces on a sheet.The cooking time really depends on how thick your bacon is, how you are going to use it, and how cooked you like it! If you are going to keep cooking it in another dish, I do it par-baked which just means I remove it before it is thoroughly cooked through.
I use pretty thick bacon and usually cook it about 20 minutes. For thinner bacon, start checking it at about 12 to 14 minutes.
This is about 20 minutes for thick bacon:
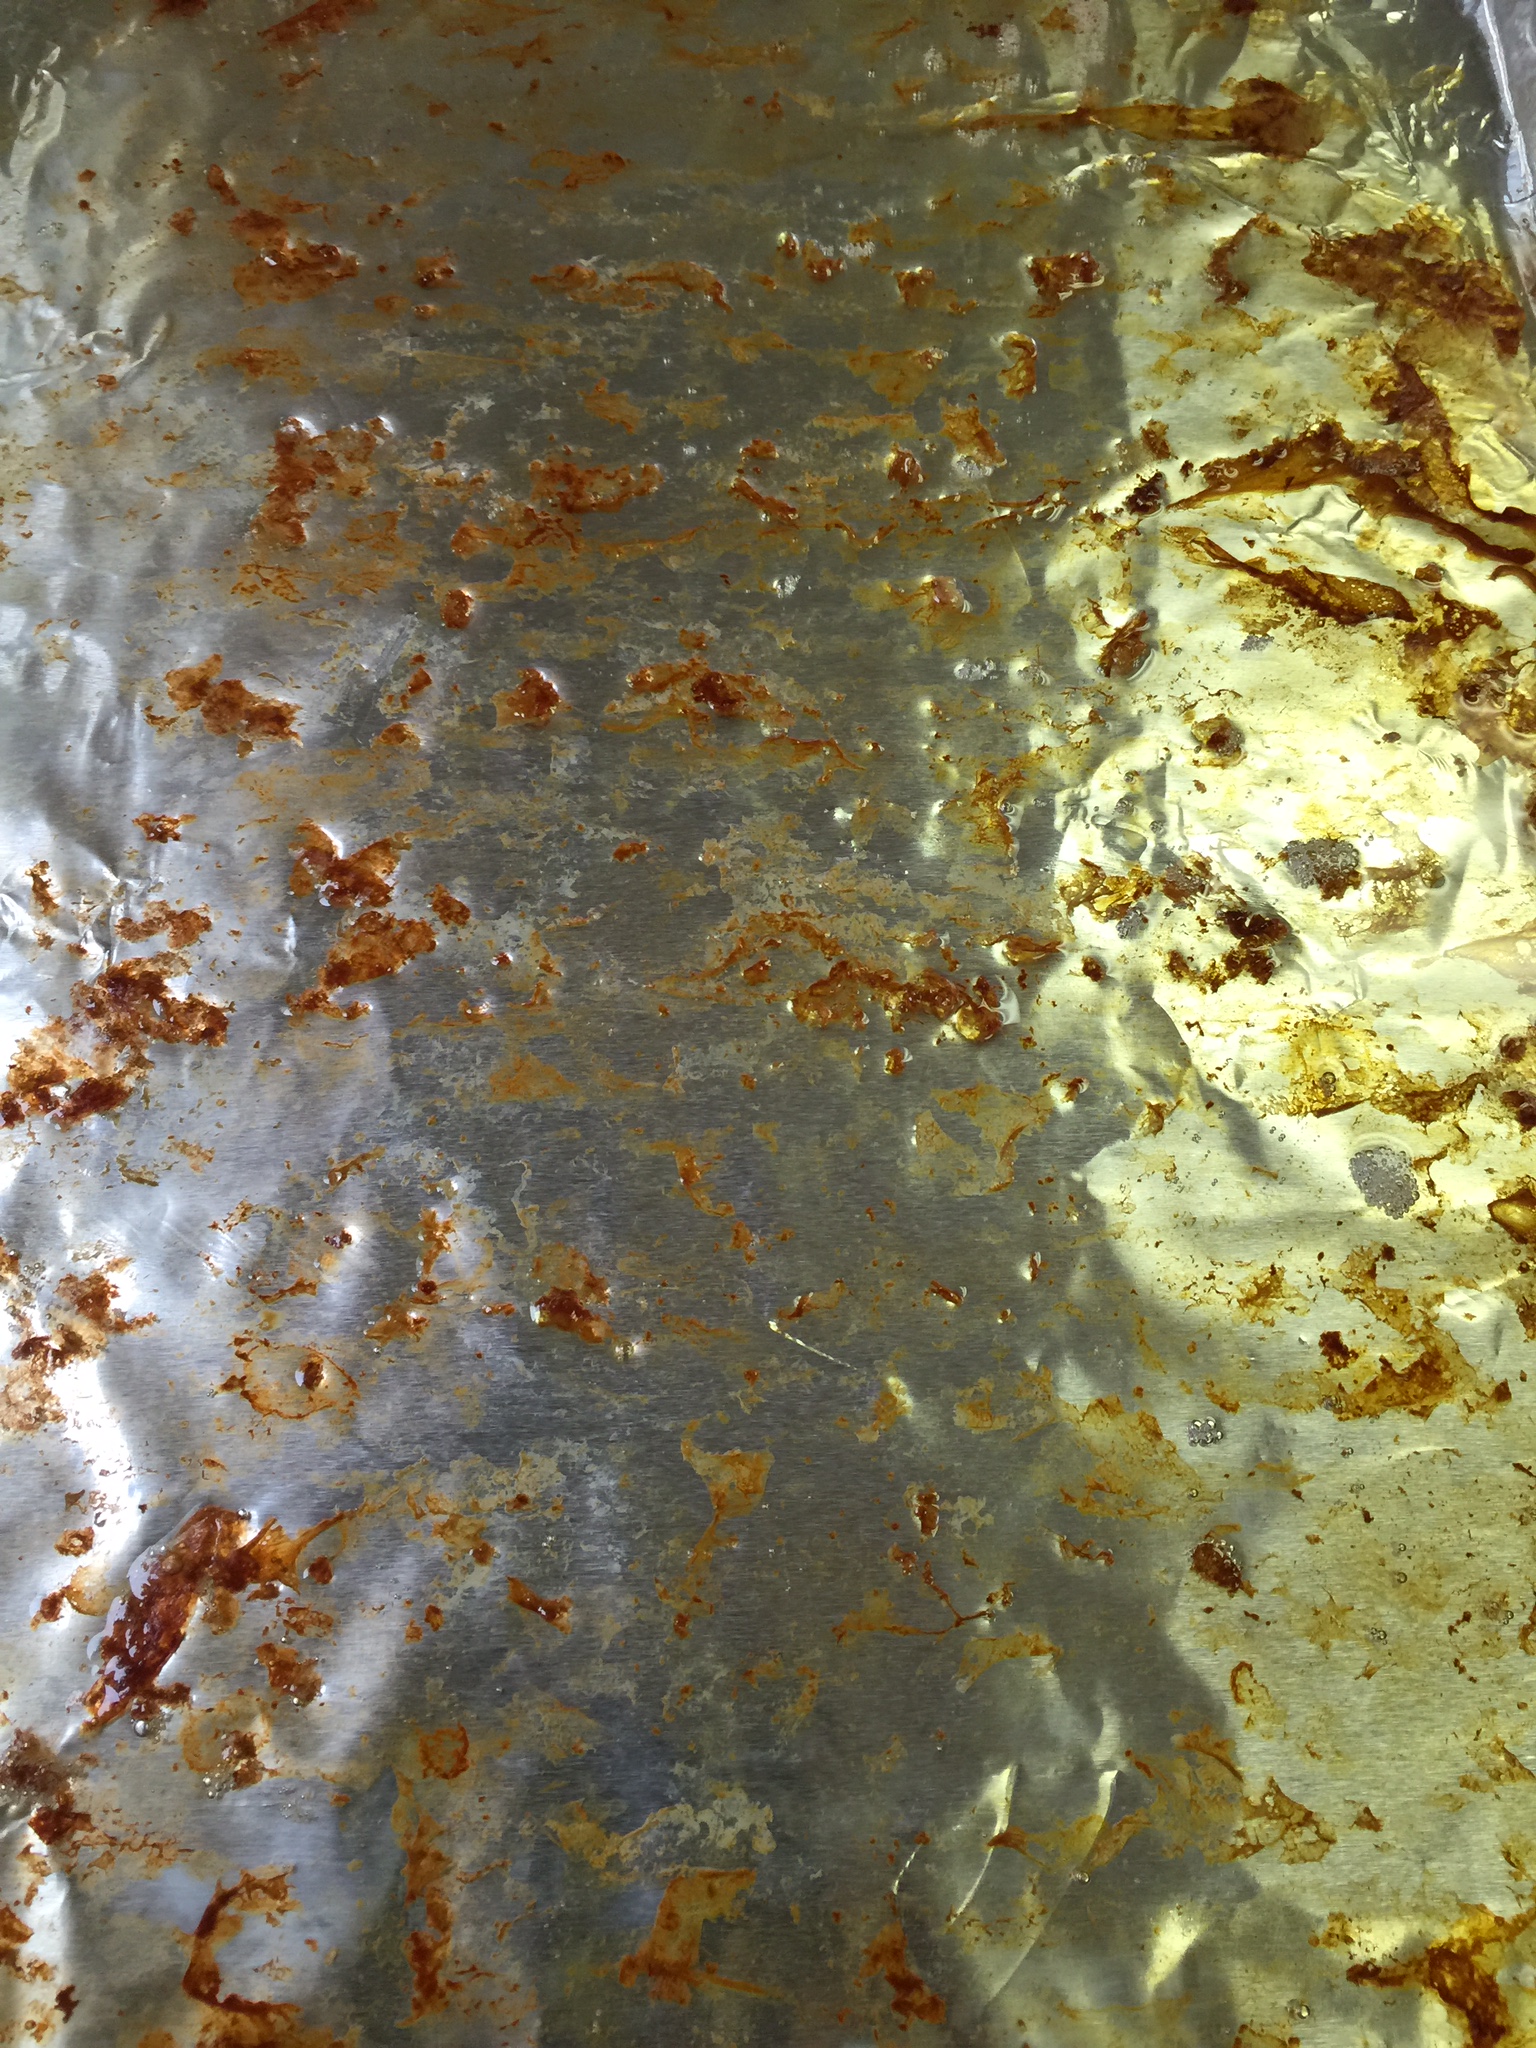
Remove your bacon to a paper towel lined plate to drain and crisp.
Do not discard your drippings. I almost always try to make a dish using the bacon drippings the day I make bacon such as the Bacon Brussels or Bacon Green Beans. If I am not cooking a dish, I save the drippings in a mason jar. (Yes, just like Grandma used to save hers!) Make sure you strain the bits out if you are using a jar – I use bits and all when preparing a dish the same night.
I reuse the tray over and over until I have enough bacon (and drippings) for my immediate and future bacon needs! Then, when you are finished, drain your drippings and toss the foil!
So many of us that follow the Ketogenic Lifestyle often eat eggs for breakfast. It is easy to quickly become tired of plain old scrambled eggs. We can mix them with chorizo, serve them with bacon or cheese, but underneath, they are still the same old scrambled eggs. Anytime you eat the same thing over and over again, it becomes tiresome. So what to do?
Mix it up with different cooking methods. This one is especially easy and fast with little mess, so it is a staple on busy weekday mornings. You can also gourmetify it with a little extra effort on the weekend.
Today, I am going to show a family favorite, and it only takes 7 minutes from start to finish with one dirty pan. By the way, the pan is extremely important unless you are only cooking for one, in which case, you can just use boiling water.
How to cook a poached egg:
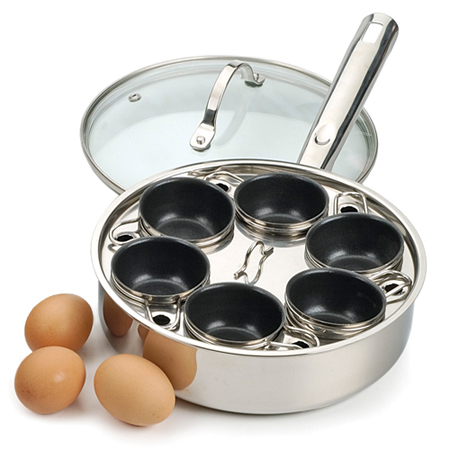
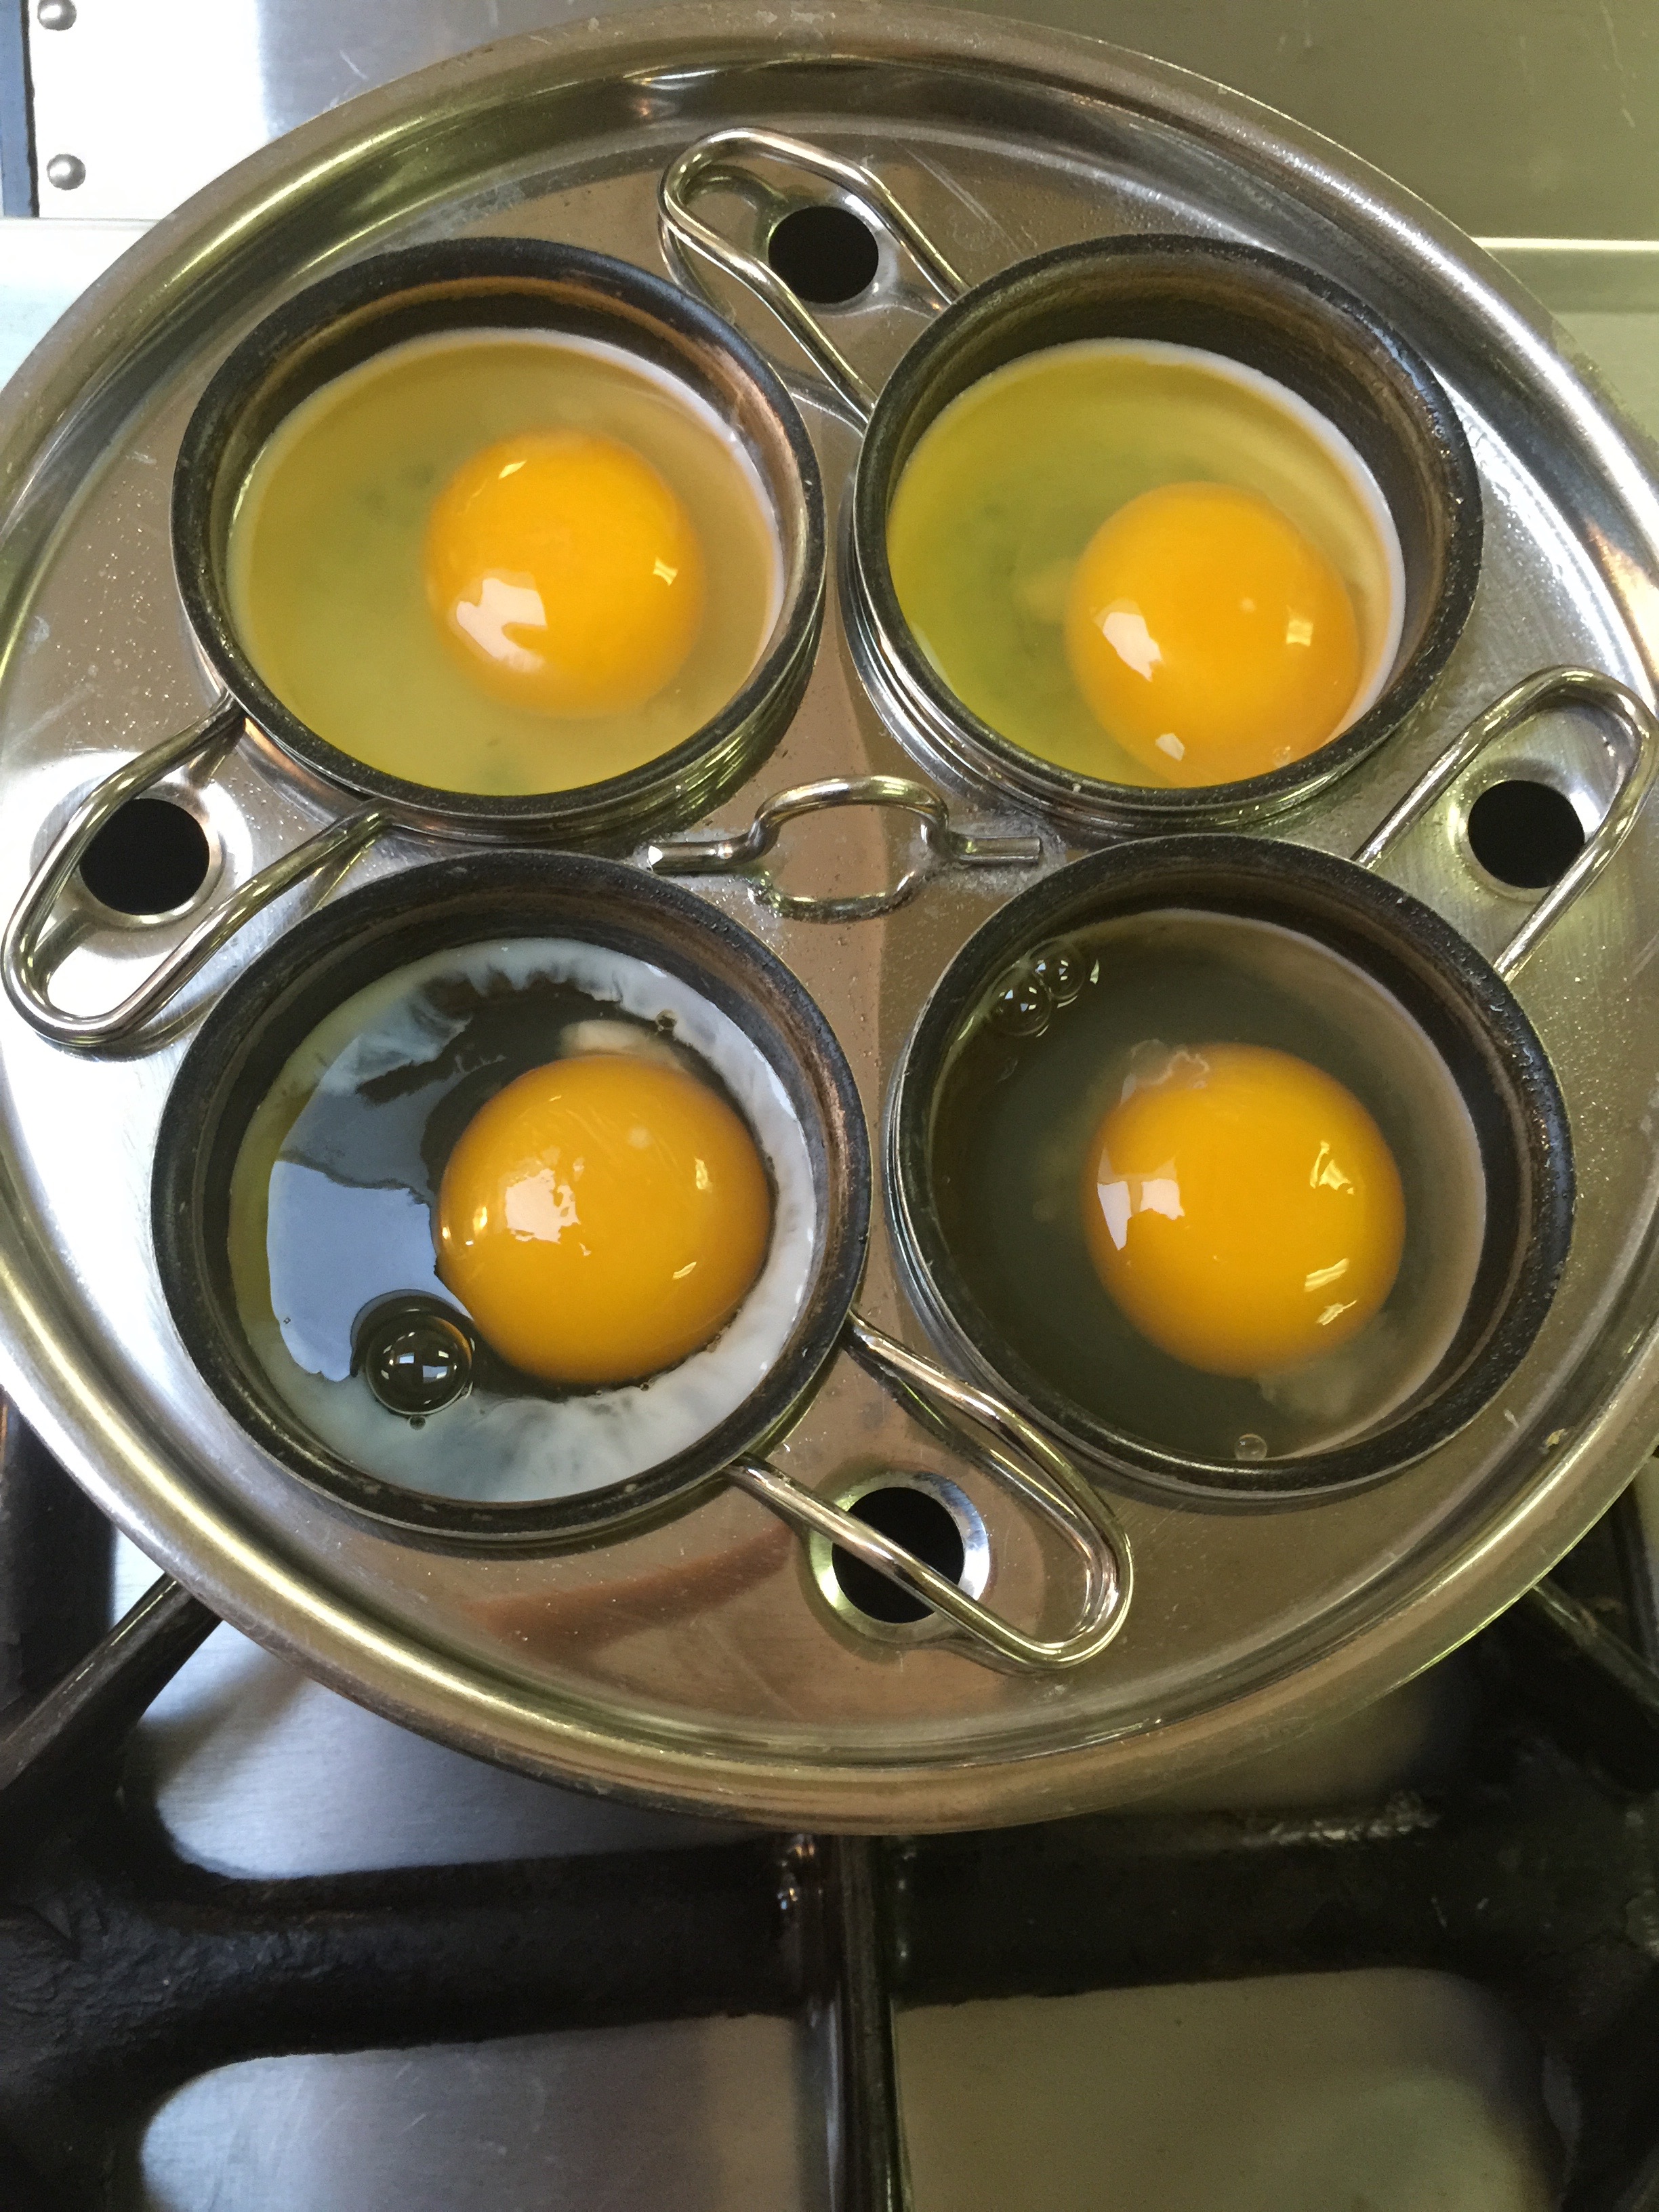
Start with an egg poaching pan and great eggs from pasture raised and fed hens. I have two pans, one with 4 inserts and another with 6, just depending on how many want one or two eggs. You can buy the larger 6 egg poacher here where I purchased mine.
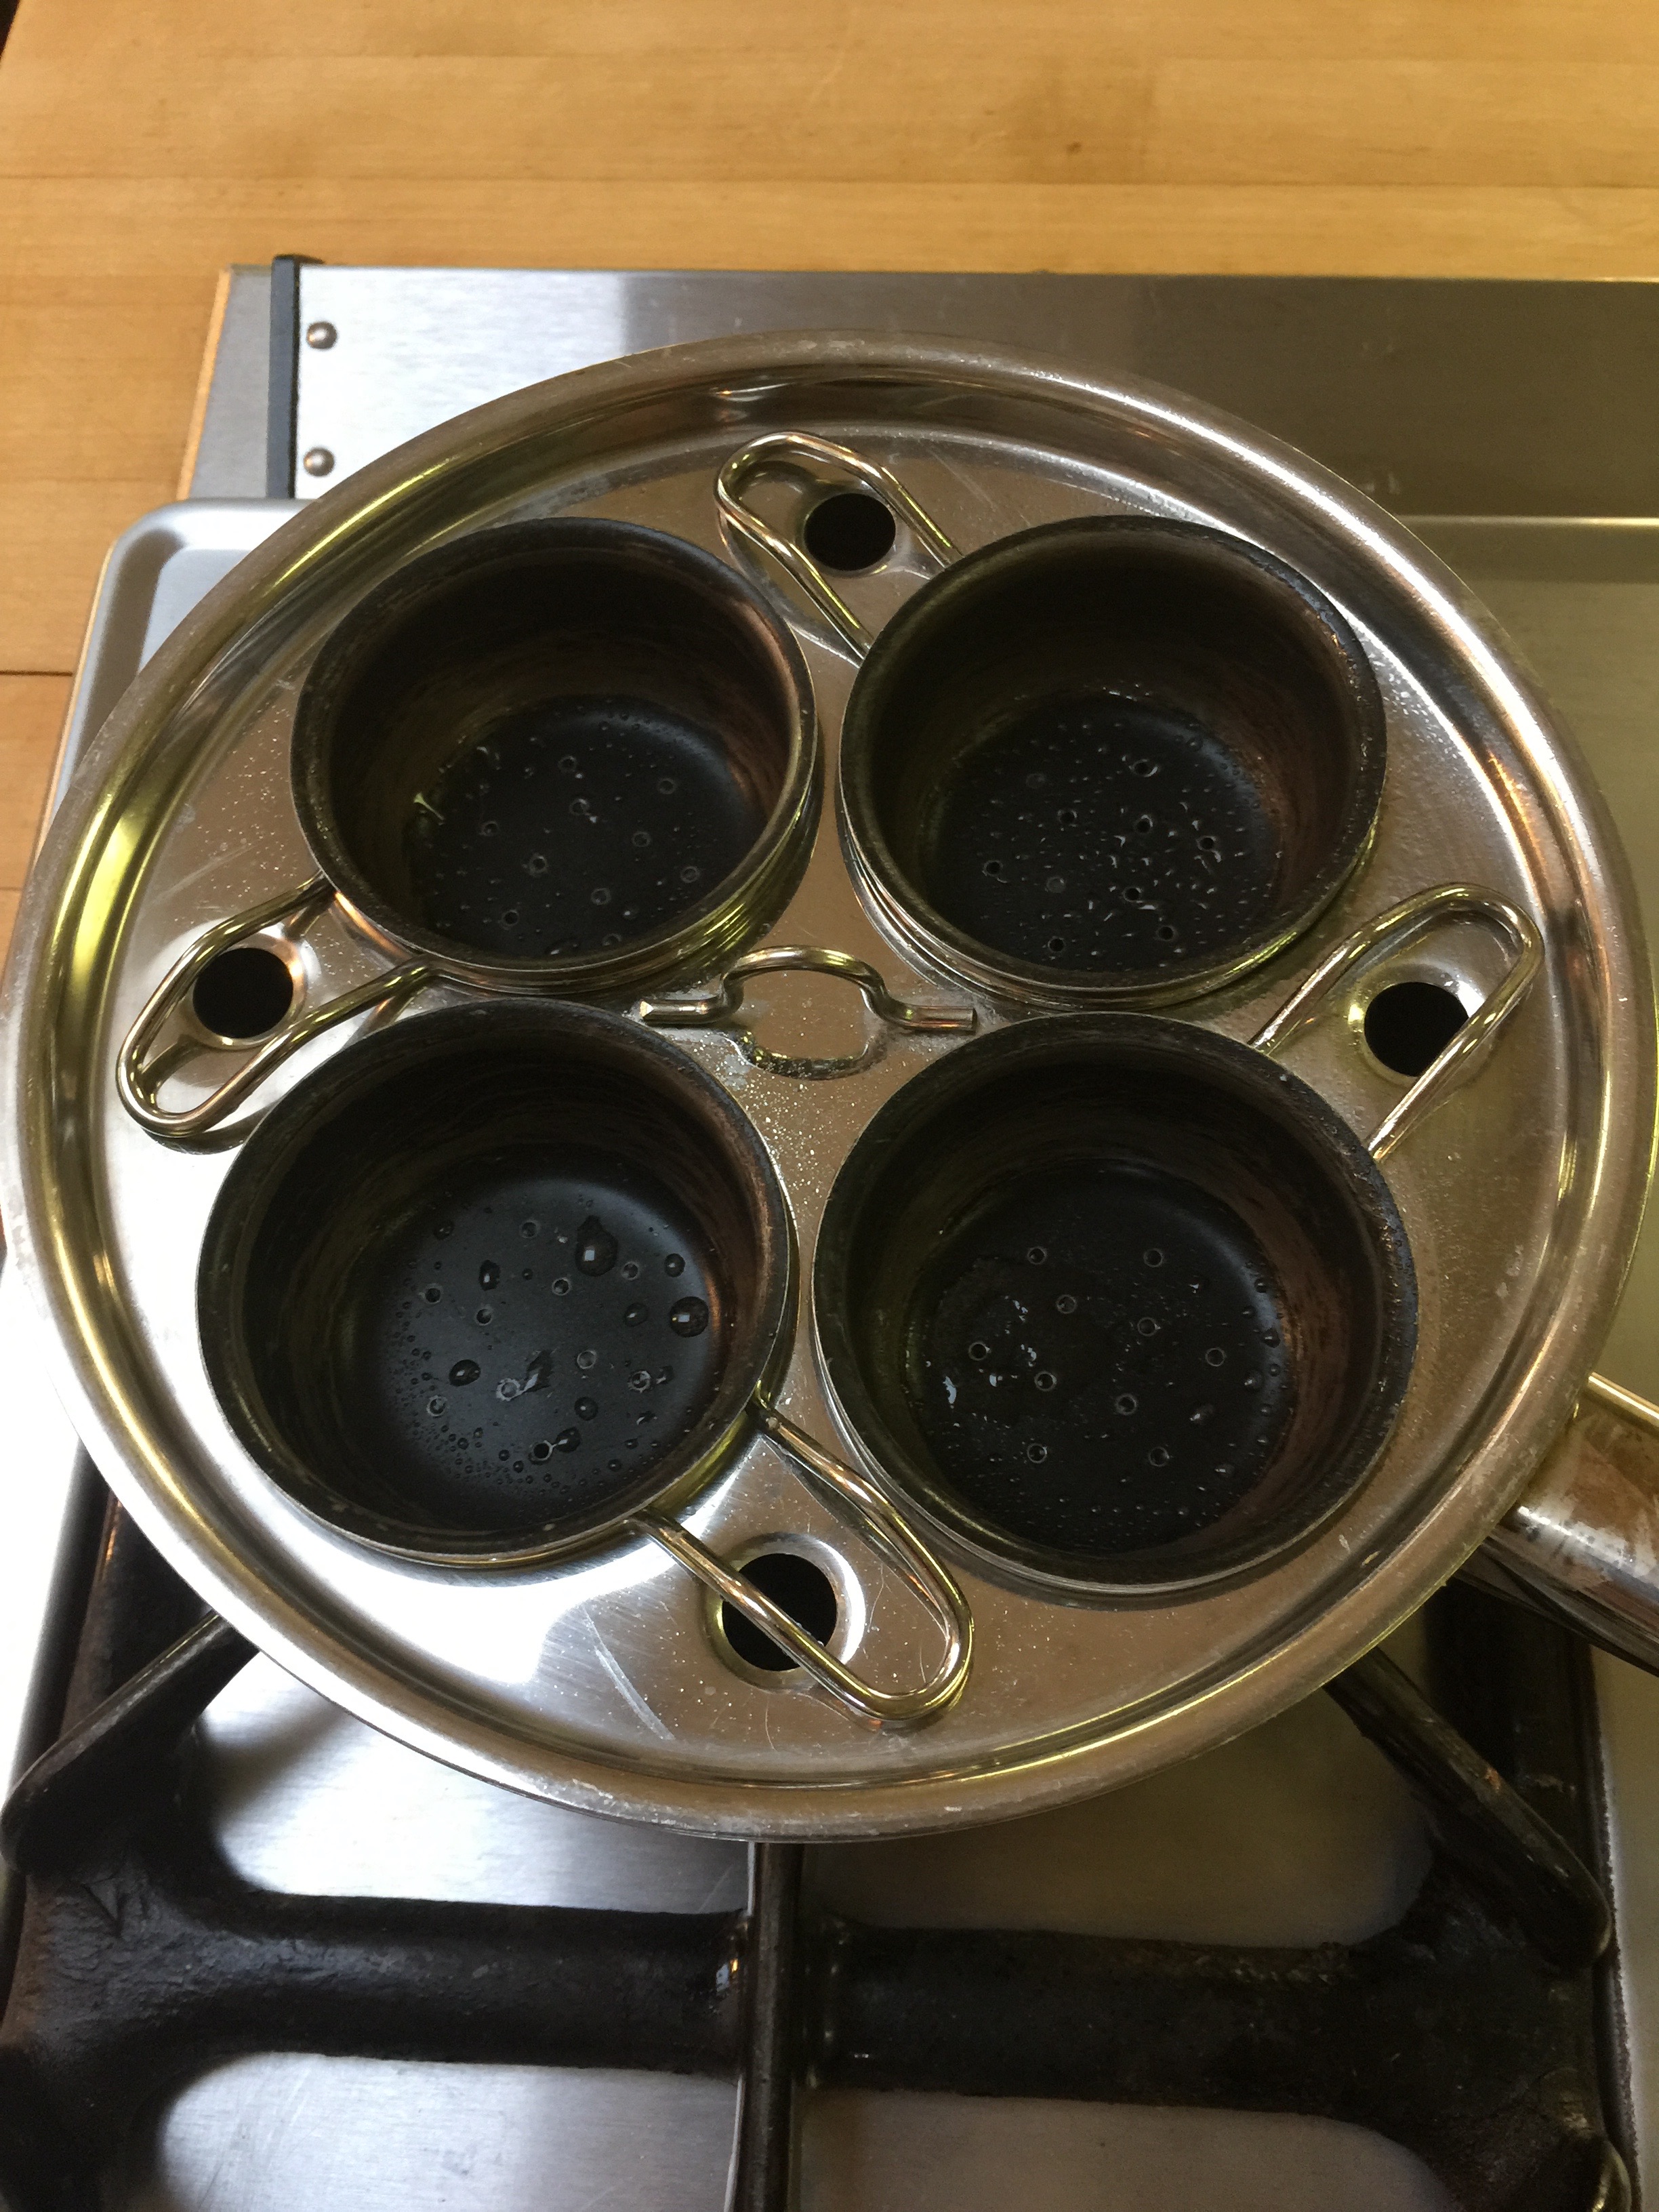
Today I used the four egg poacher. I purchased this one years ago from Williams Sonoma. Lift one cup out and pour about a 1/4 inch layer of water to cover the bottom of the pan to create the steam.
Spray each cup with coconut oil spray.
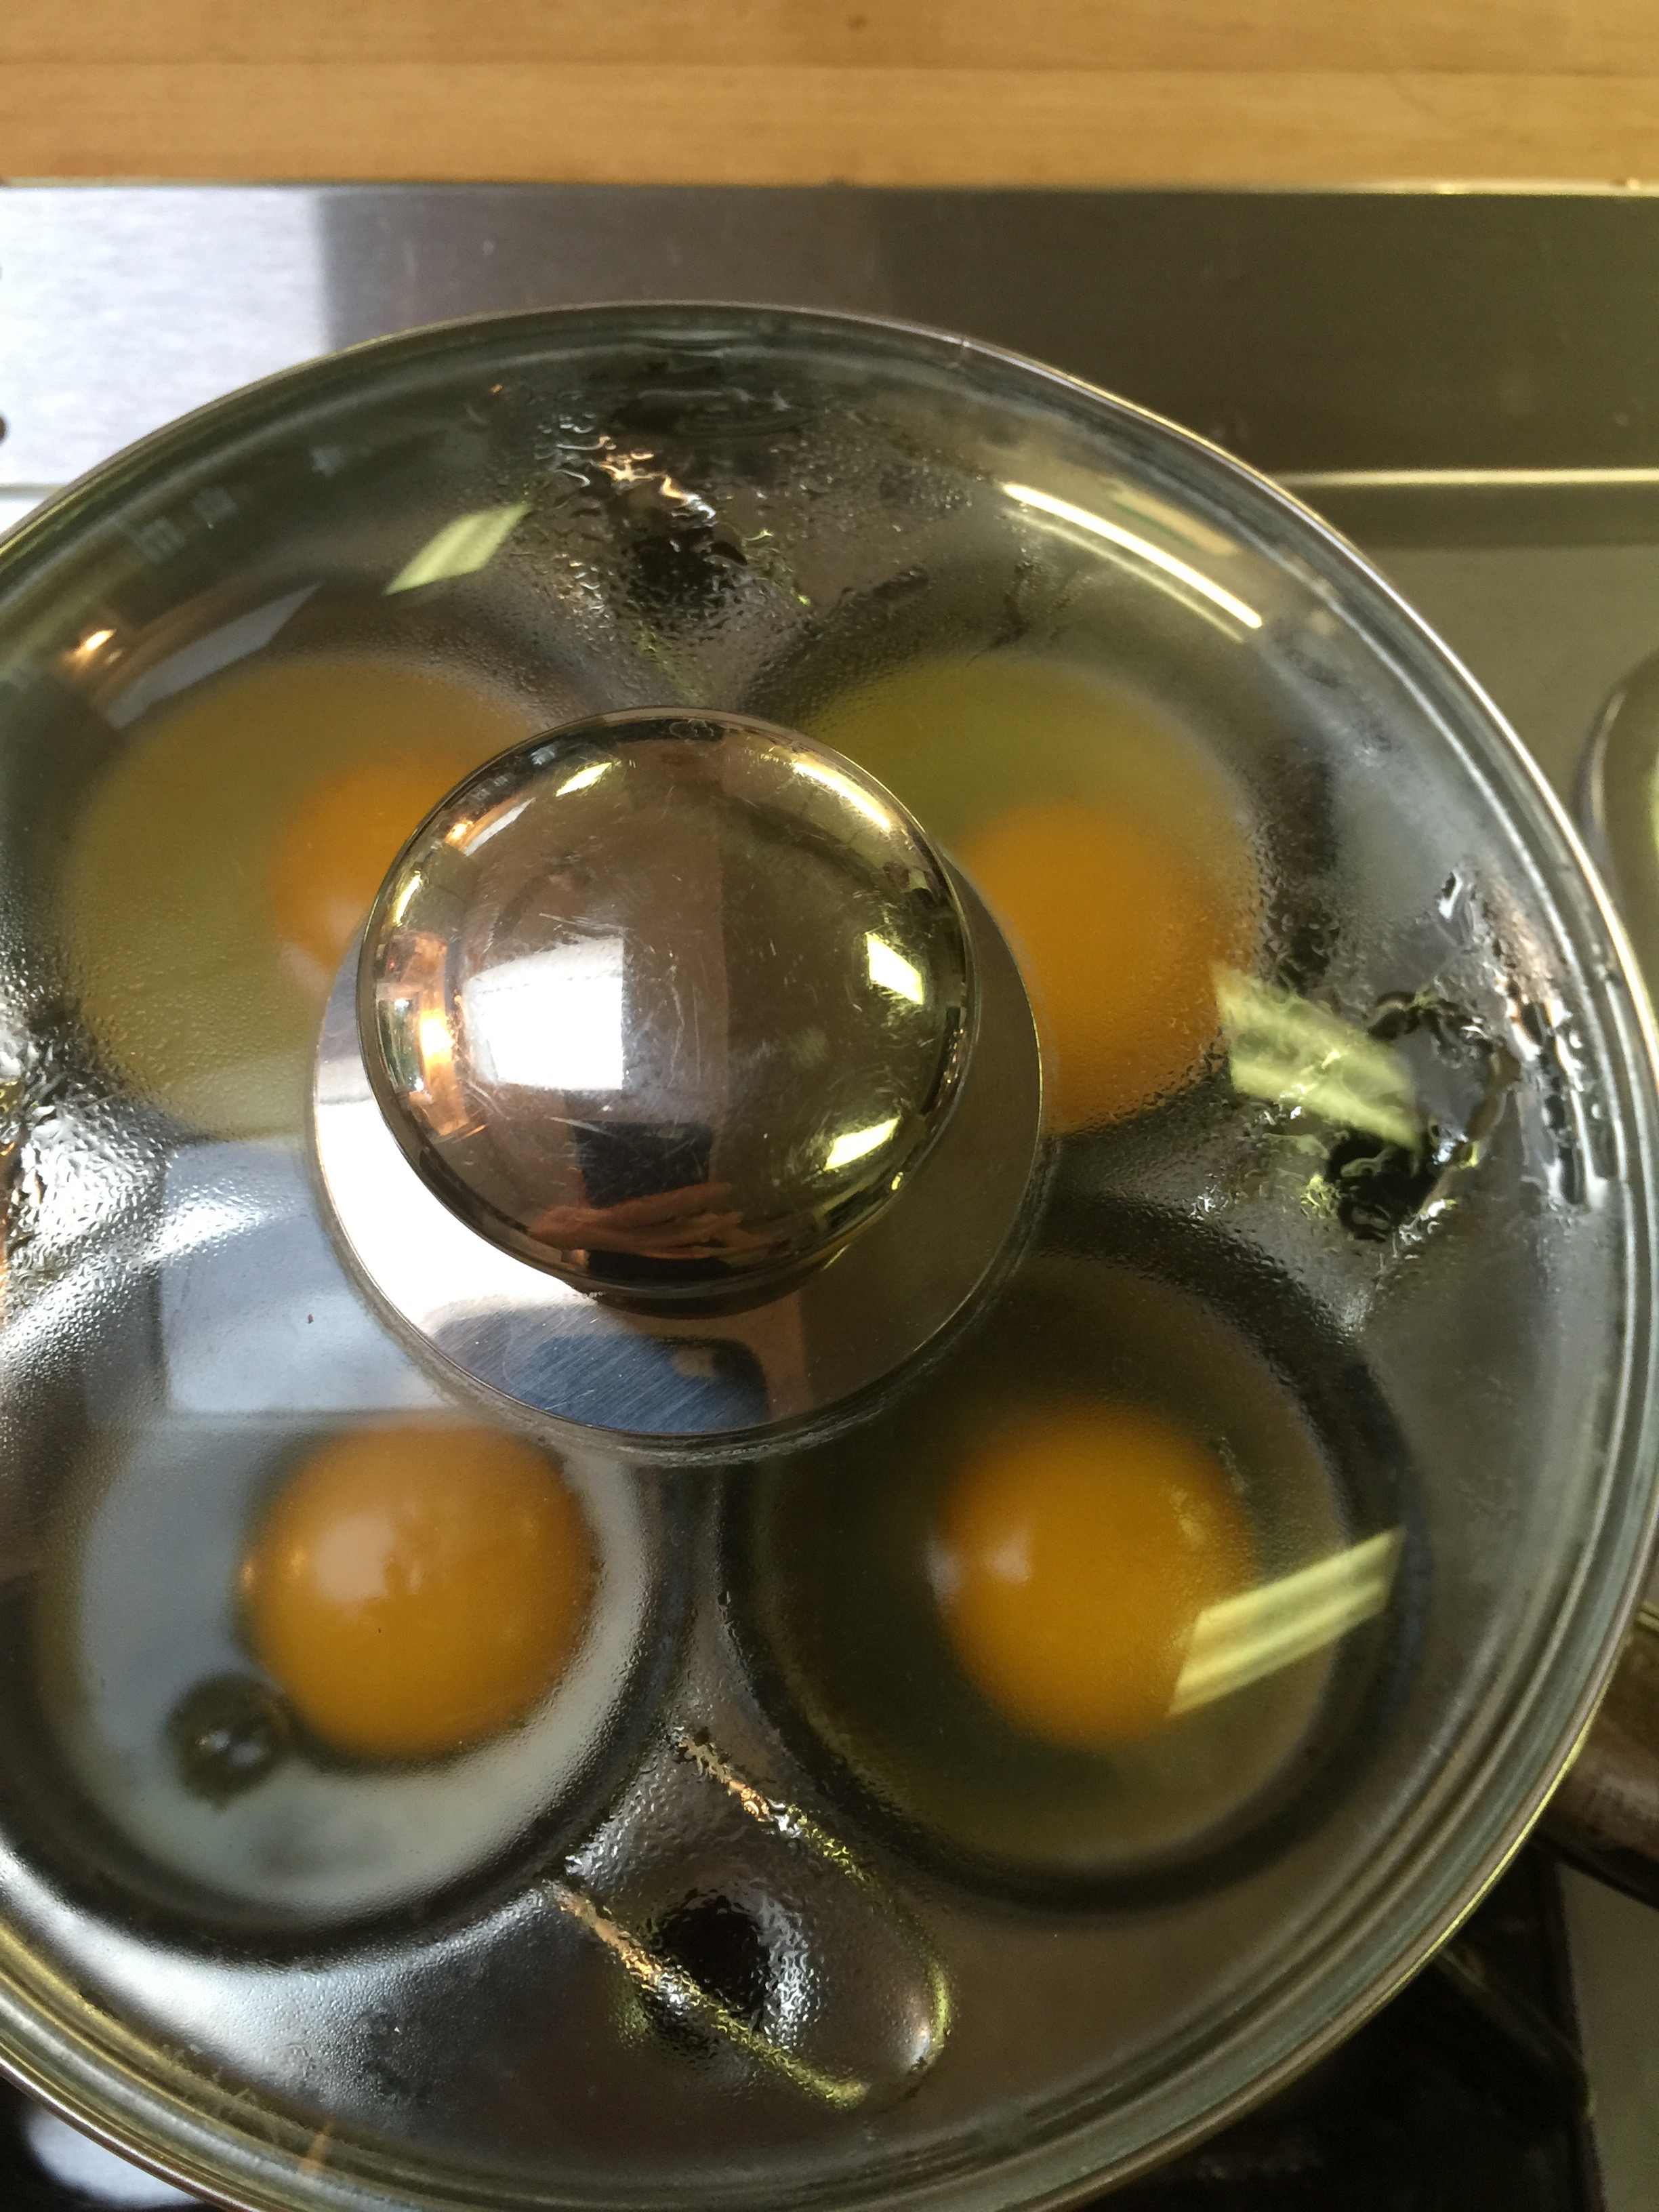
Place the lid on the pan, and turn your heat to high. It should start steaming with boiling water in no more than two minutes.
Once it is boiling, turn your heat down to Medium, and crack eggs one at a time, placing them in a cup insert.
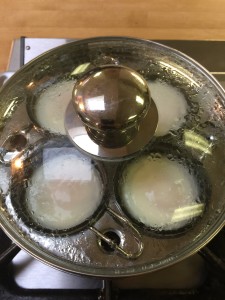
Place your lid on, and set your timer for 4 1/2 to 5 minutes. Depending on how you like your yolk, you may need to adjust your time. This time gives us a nice somewhat runny center but firm white.
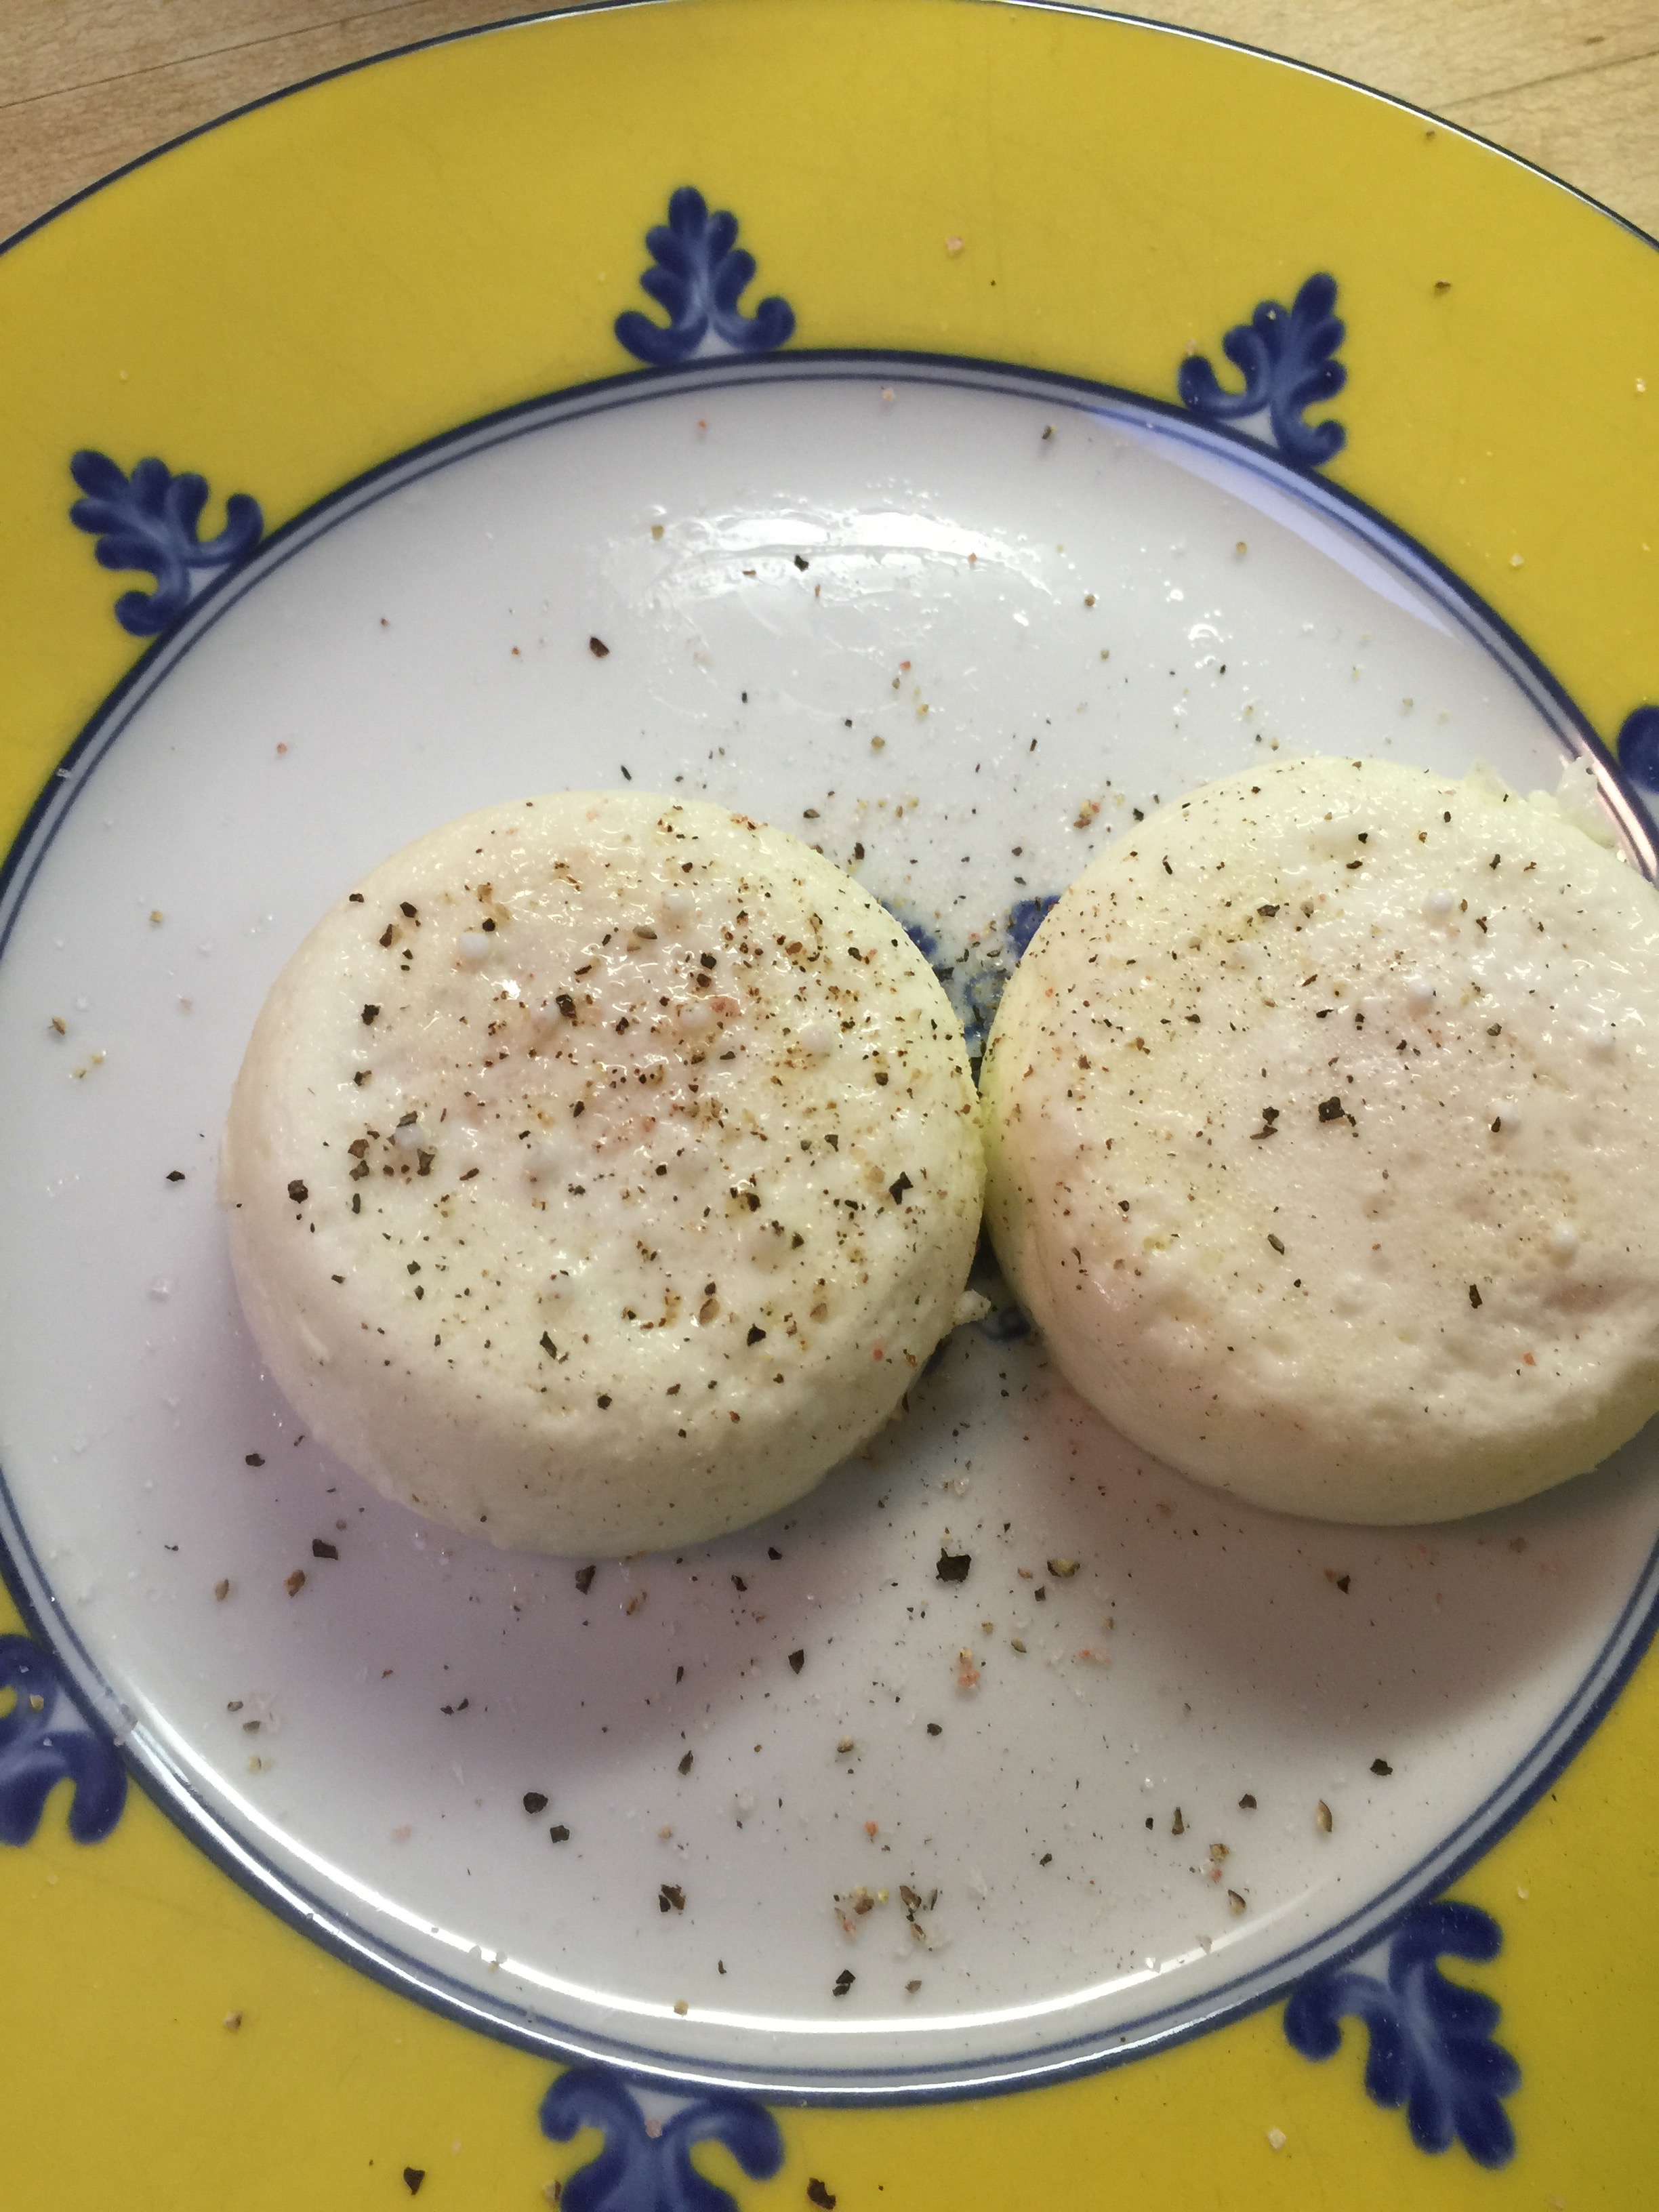
Once the eggs are set, and don’t jiggle if you nudge the pan a little from side to side, remove from heat and empty each egg onto your plates. Be sure to use a hot pad to protect your finger tips. I usually run a knife along the outside edge of the insert, but it is not always needed.
My husband likes his plain with salt, pepper and sometimes a little homemade salsa.
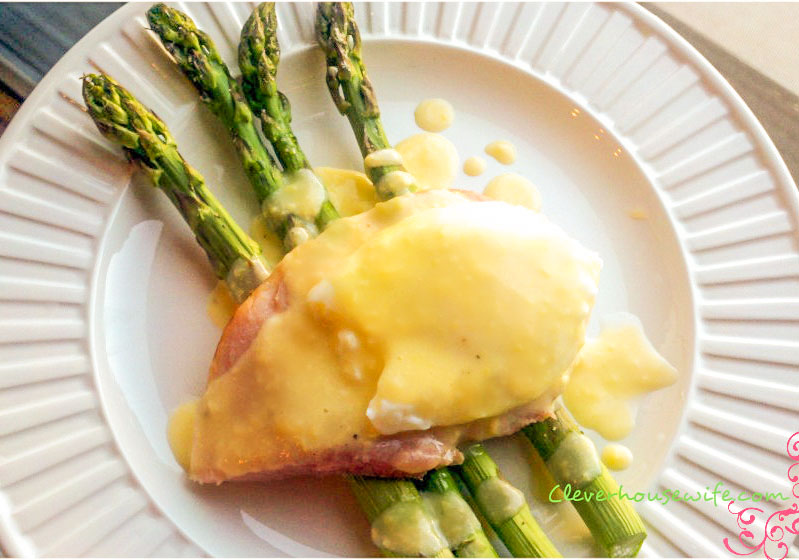
I love mine with a little hollandaise. Stay tuned this week for this awesome recipe!
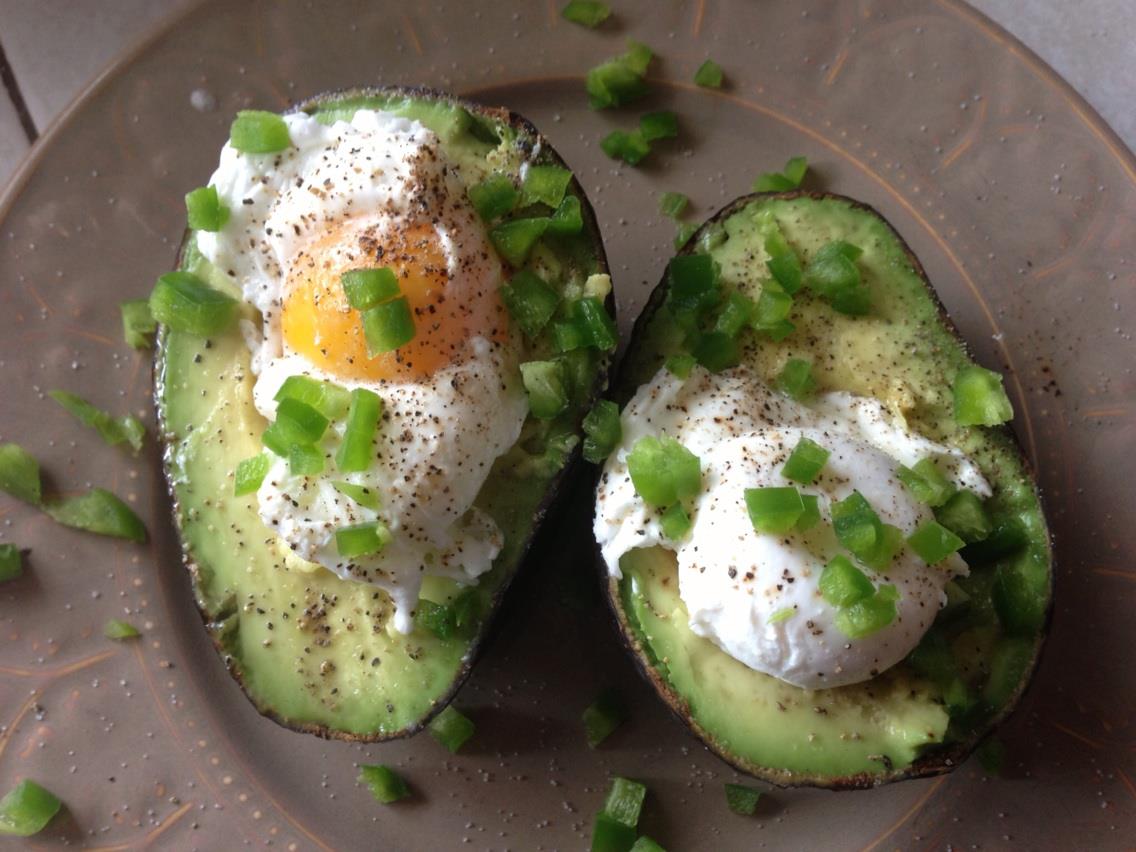
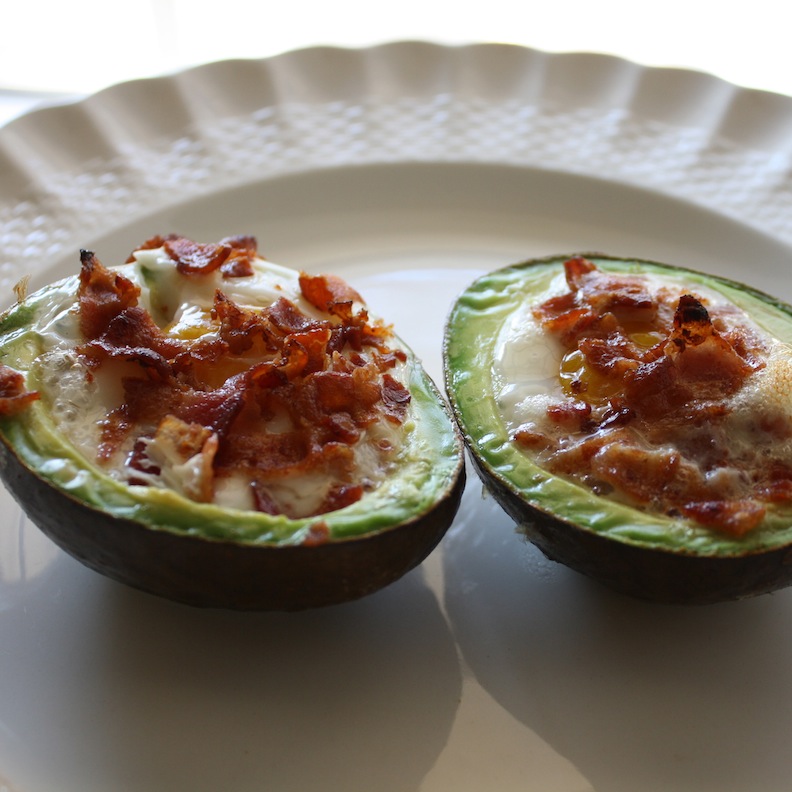
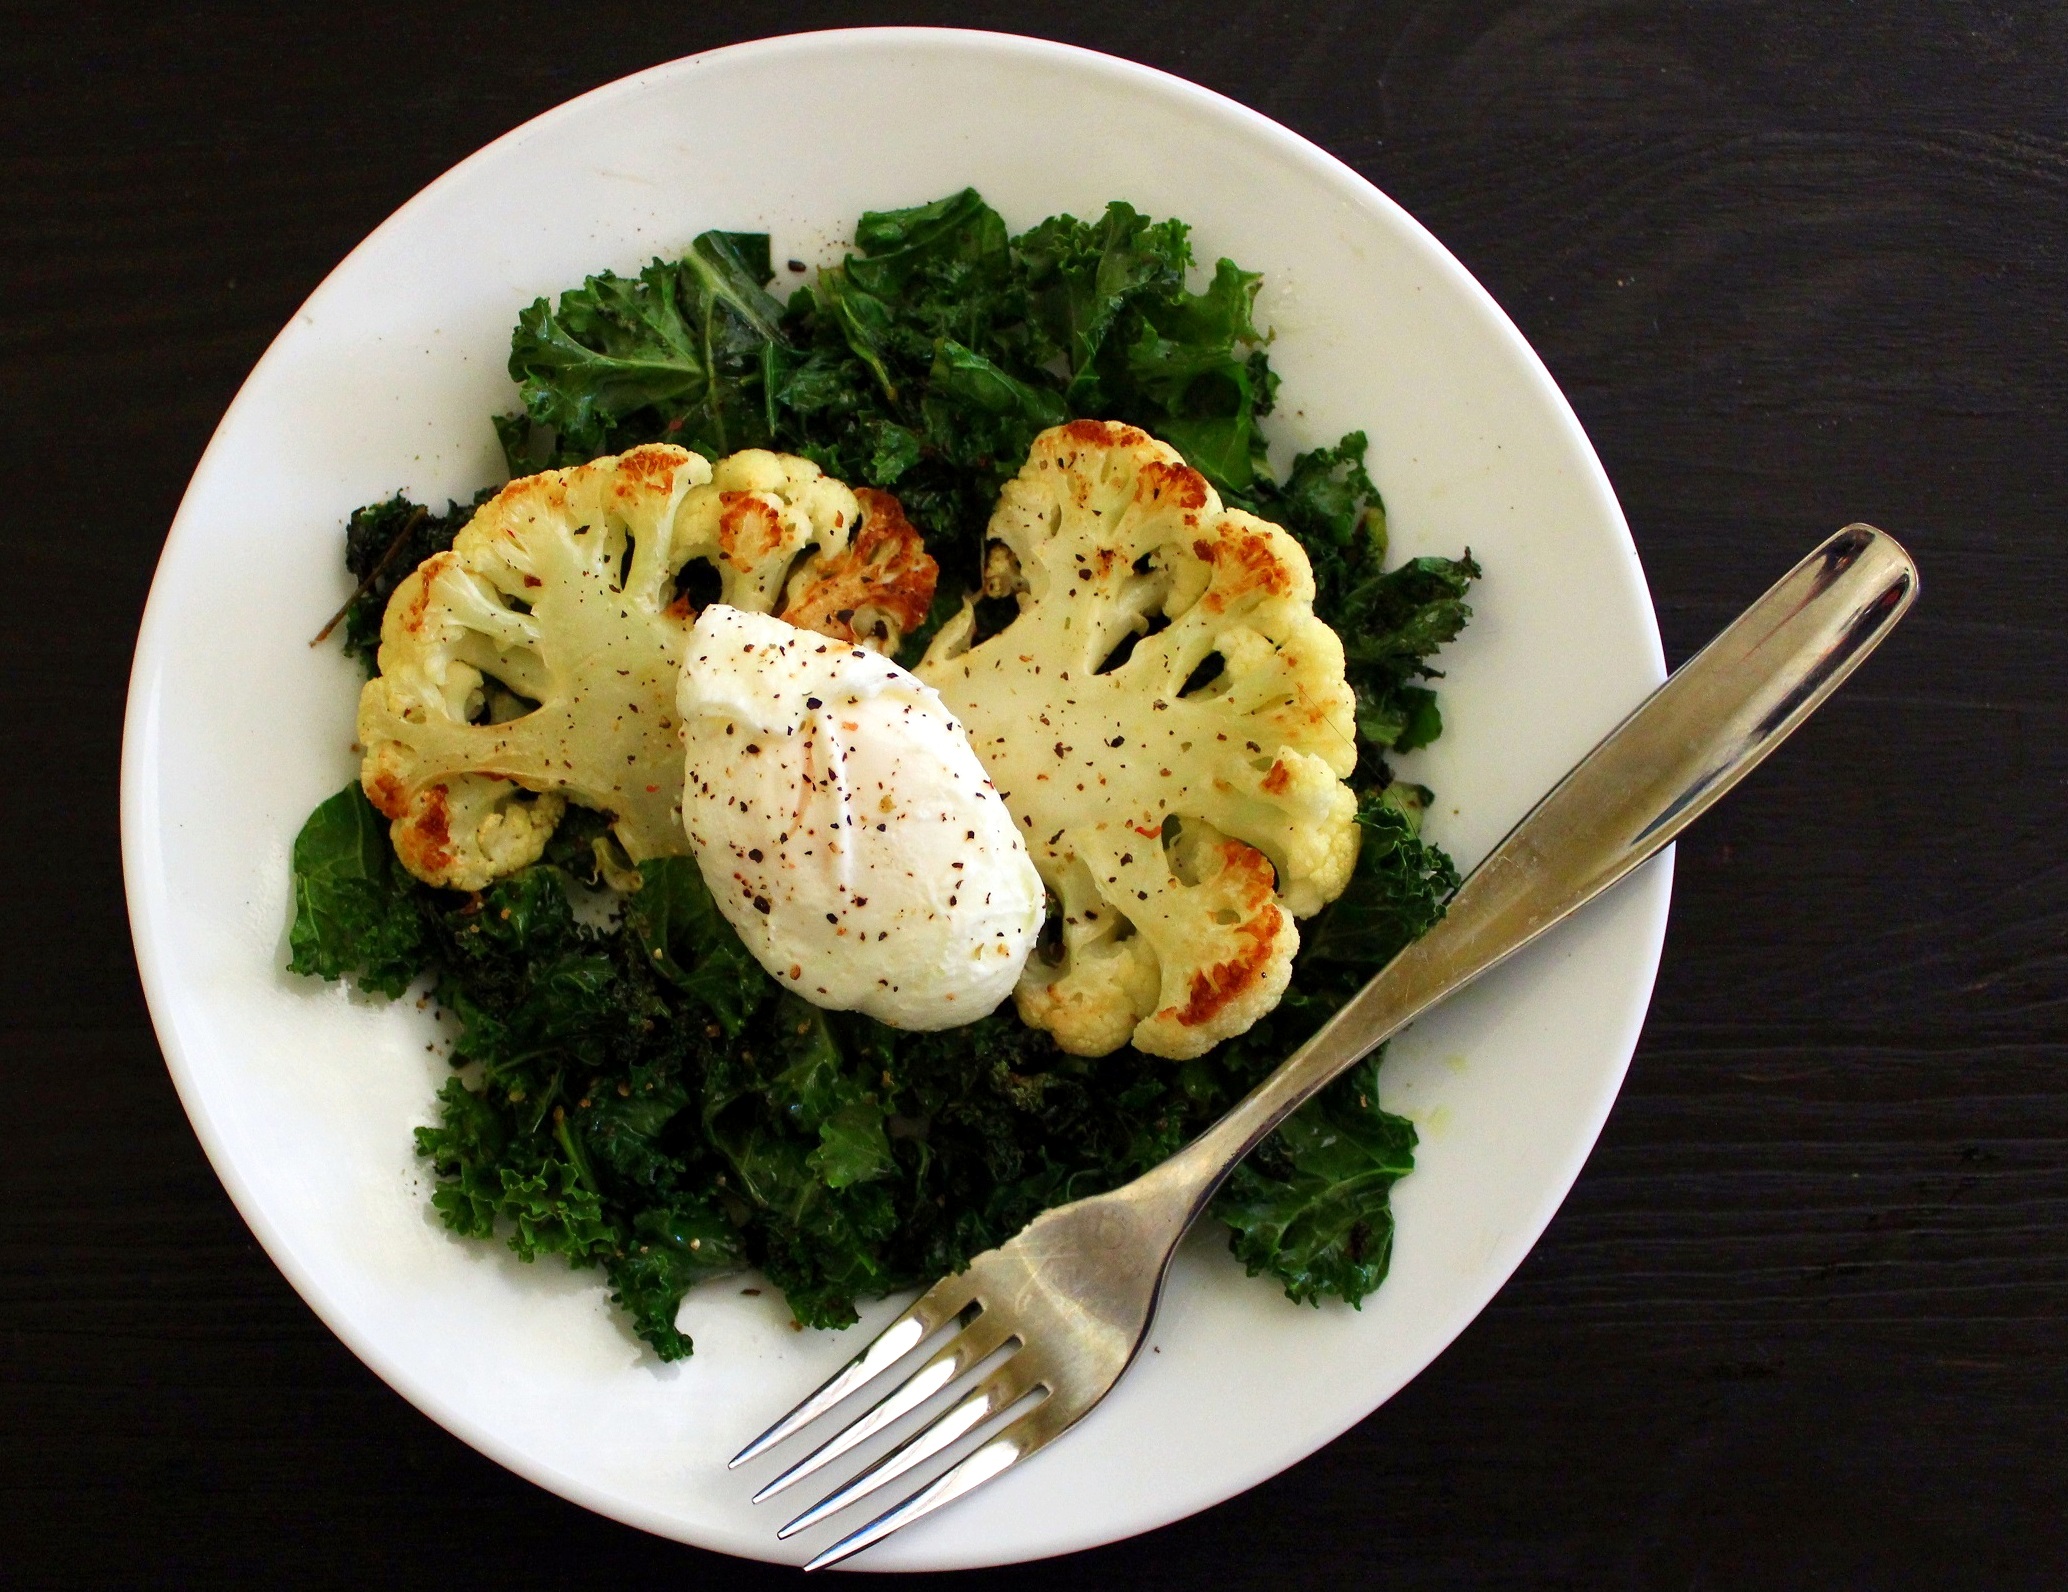
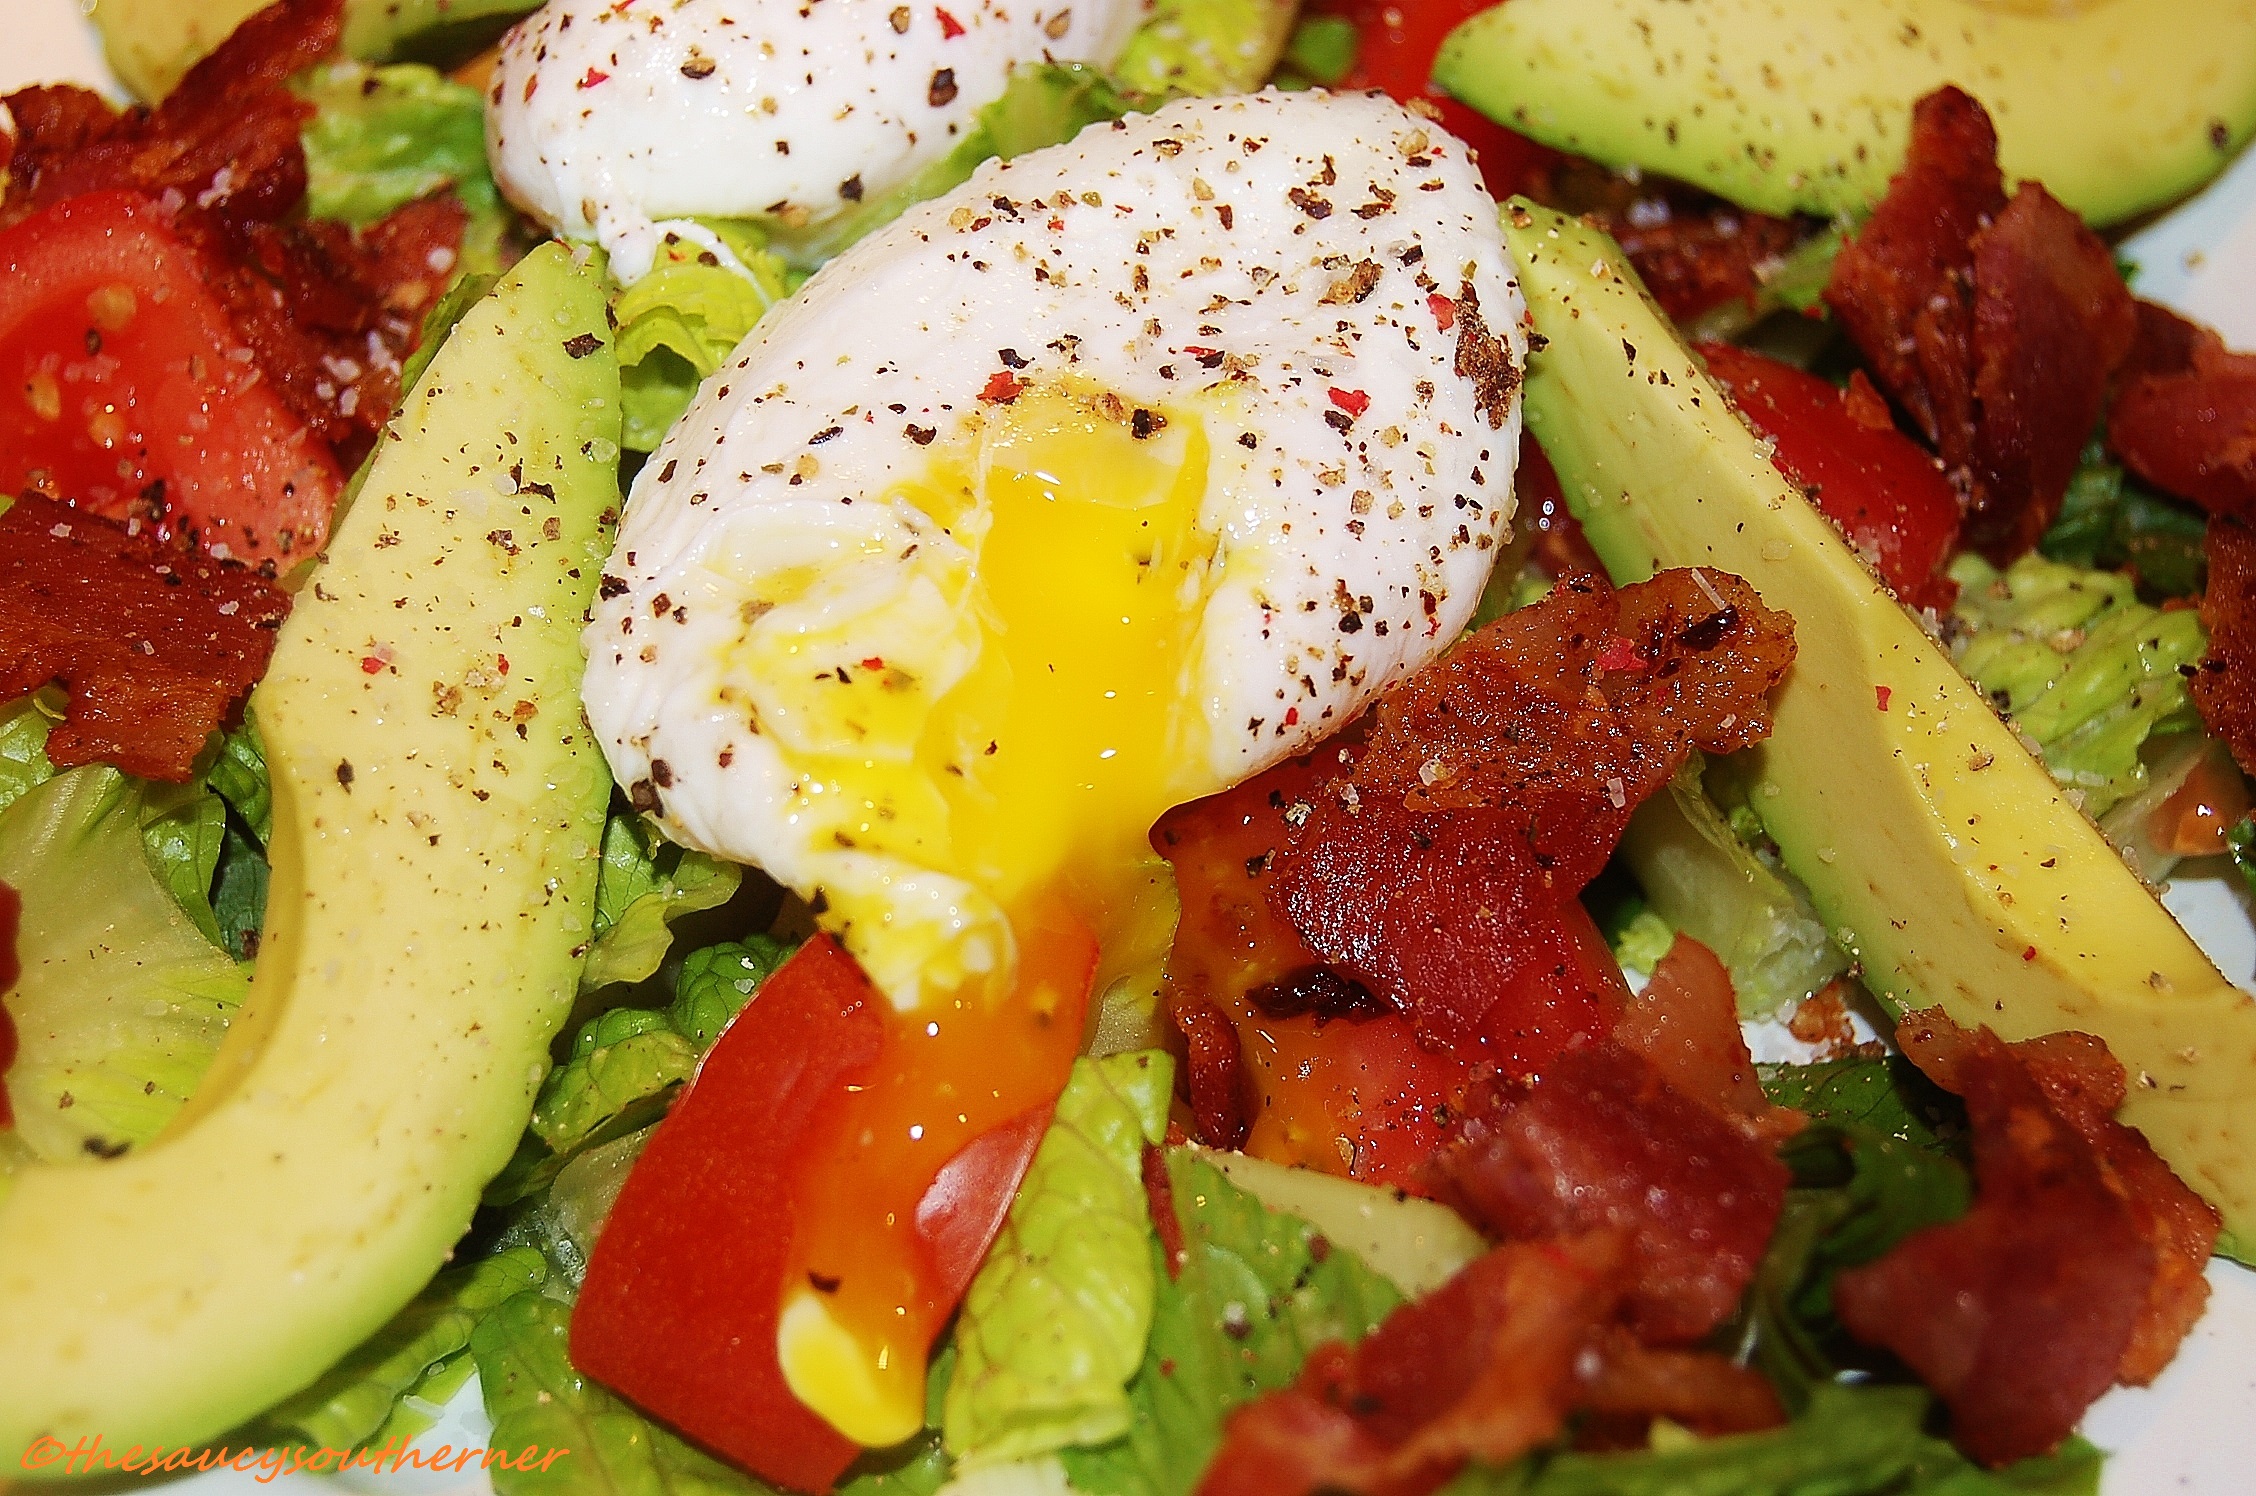
Poached eggs are so versatile. Here are a few other ideas that I love to try when we have a bit more time:
Place in an avocado with or without bacon:
Get your greens too by serving over spinach or asparagus:
What else can I make besides scrambled eggs and bacon? This is in the Top 10 list of questions we receive.
Eggs are great! We know that, but we also get tired of the same old thing every day!
A Quiche is a great way to dress up your eggs in a beautiful way that the whole family can enjoy for any meal of the day. It is filled with all the great nutrients that eggs provide, and anything else you wish to add to give it that special touch. It is also a method to hide vegetables if you have picky eaters! And…best of all, it cooks great without a crust. No need to add carbs to something so savory and wonderful already!
These are great with the end of school approaching because you can prepare it a day ahead, and it reheats quickly and perfectly. It is also delicious as a weekend dish straight out of the oven! Fresh quiche just melts in your mouth. Prepare to be creative and enjoy!
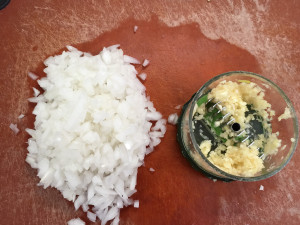
Gather your ingredients, and chop your onion, garlic, and broccoli. This is my favorite garlic chopper!
Sauté your onion and garlic in the butter. Then add your broccoli to soften slightly.
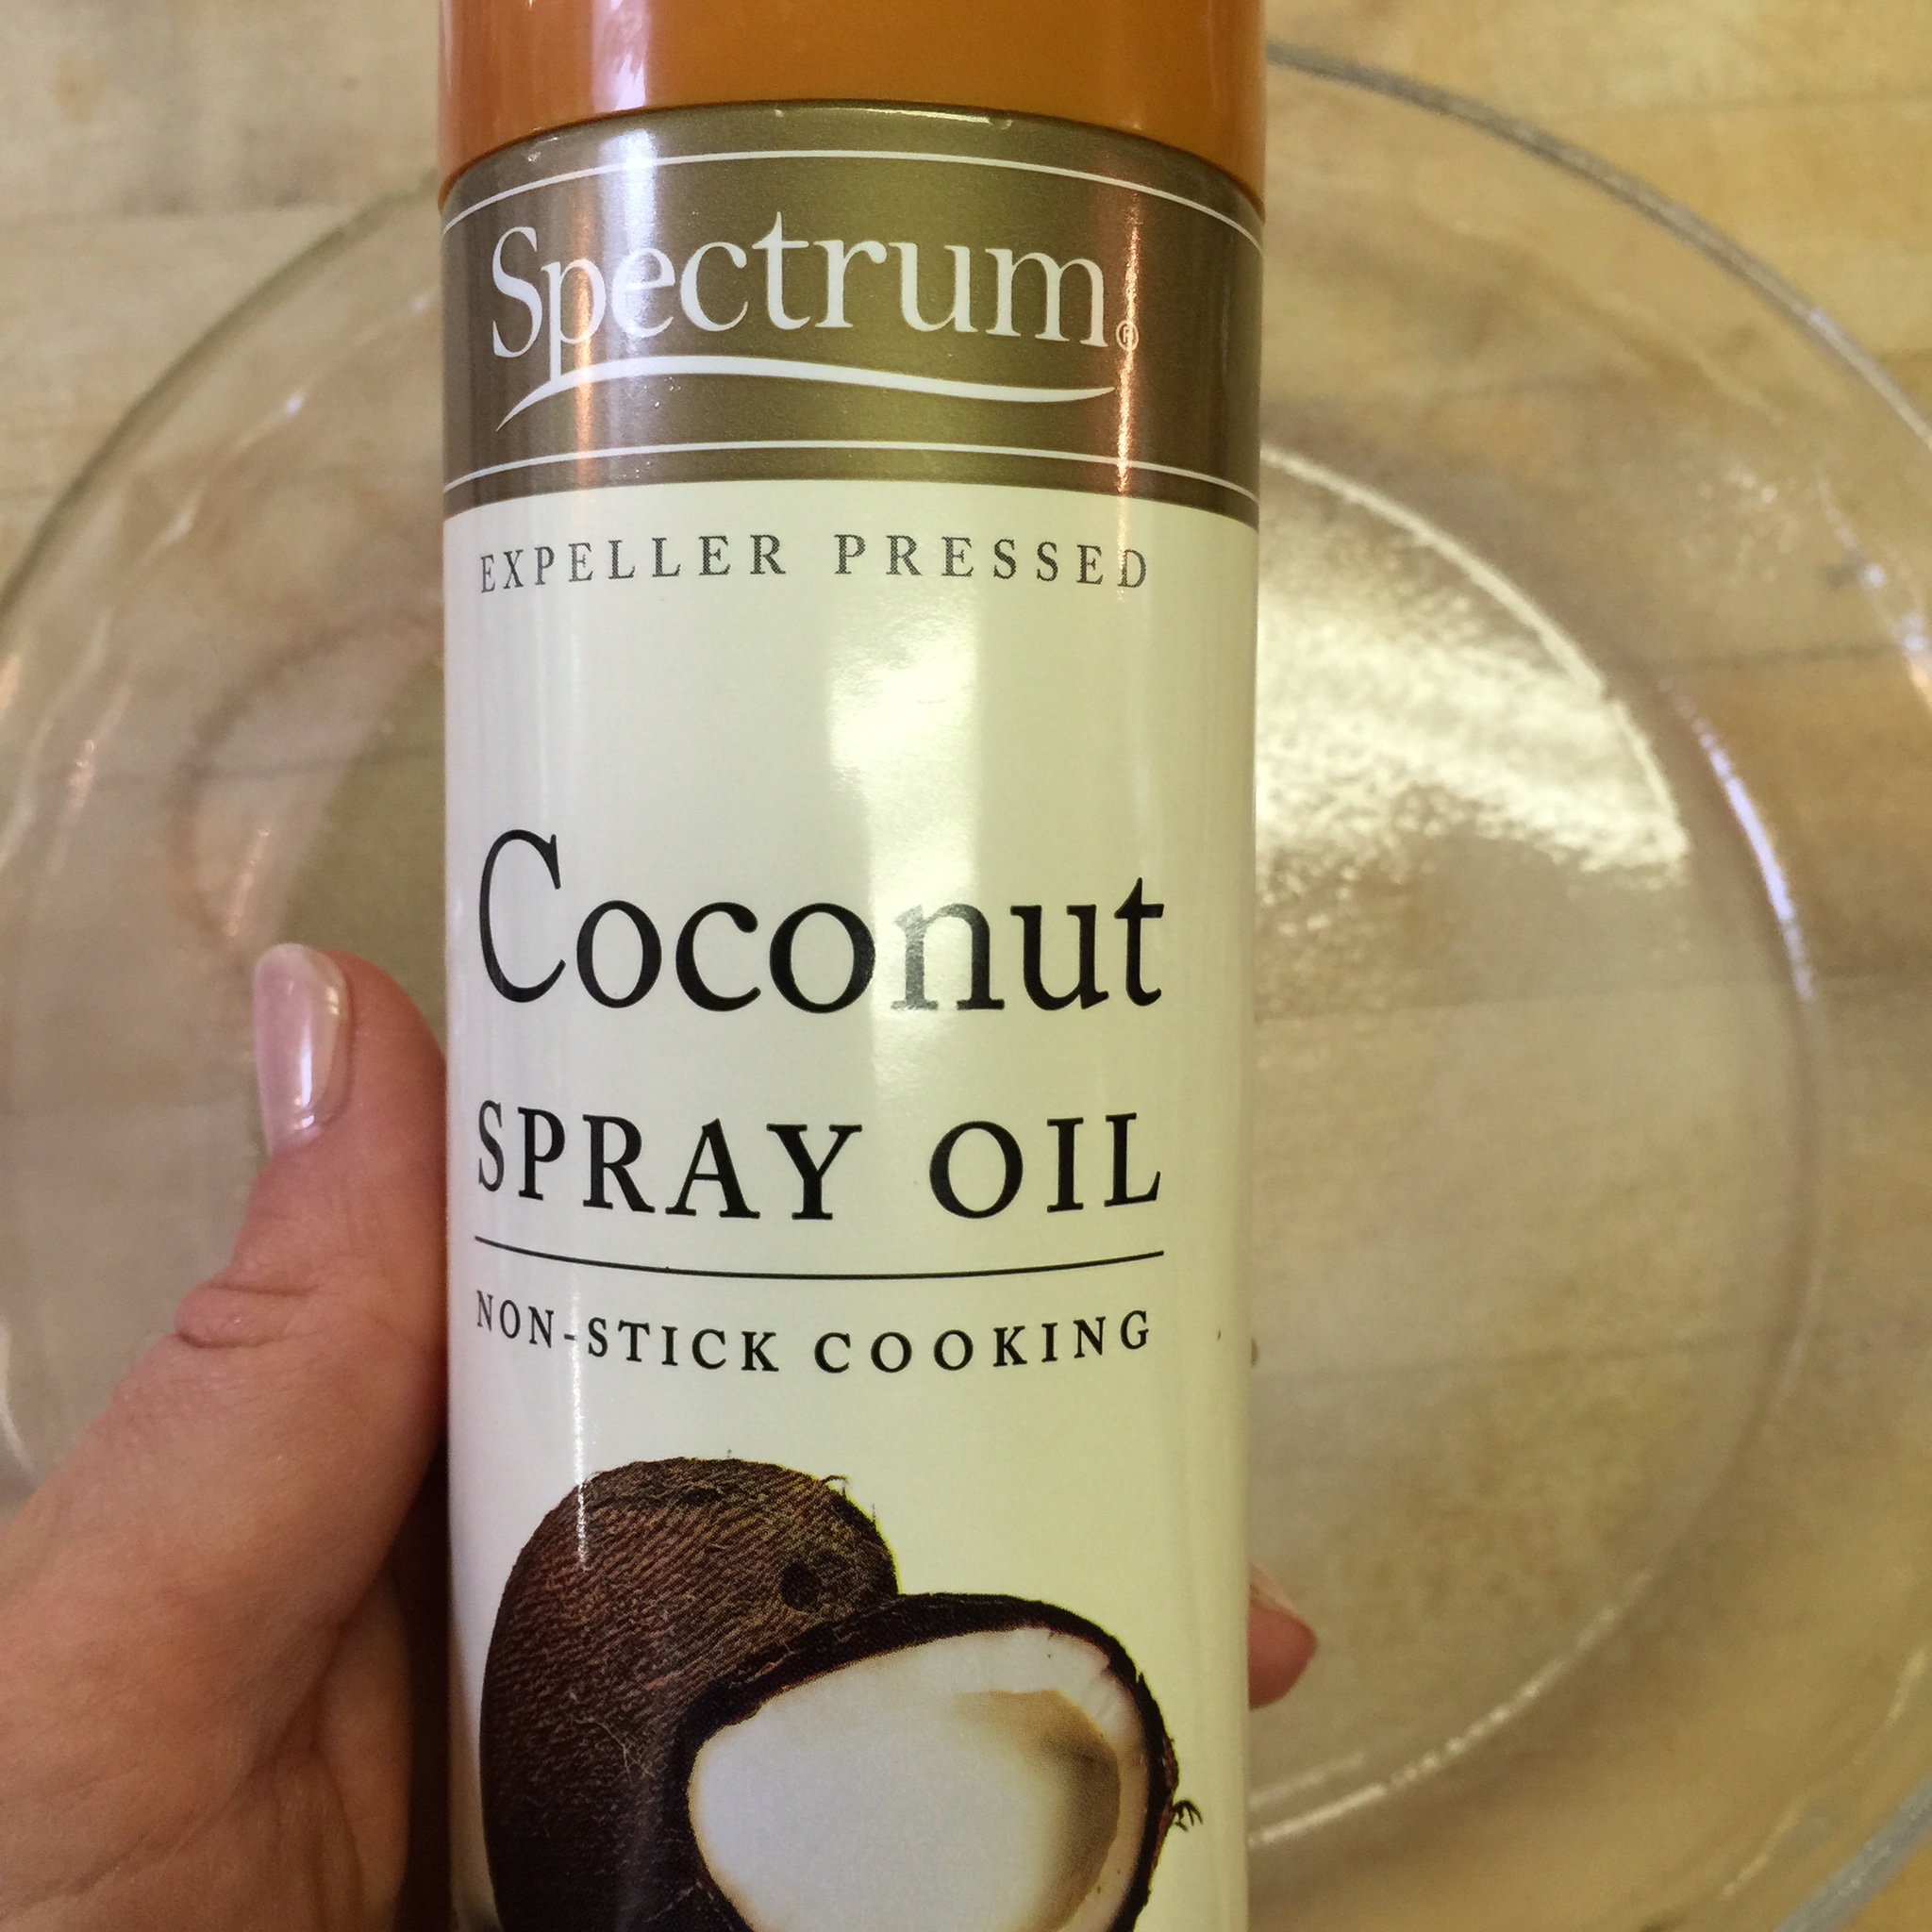
Spray your pie dish with coconut oil spray (you can find it here).
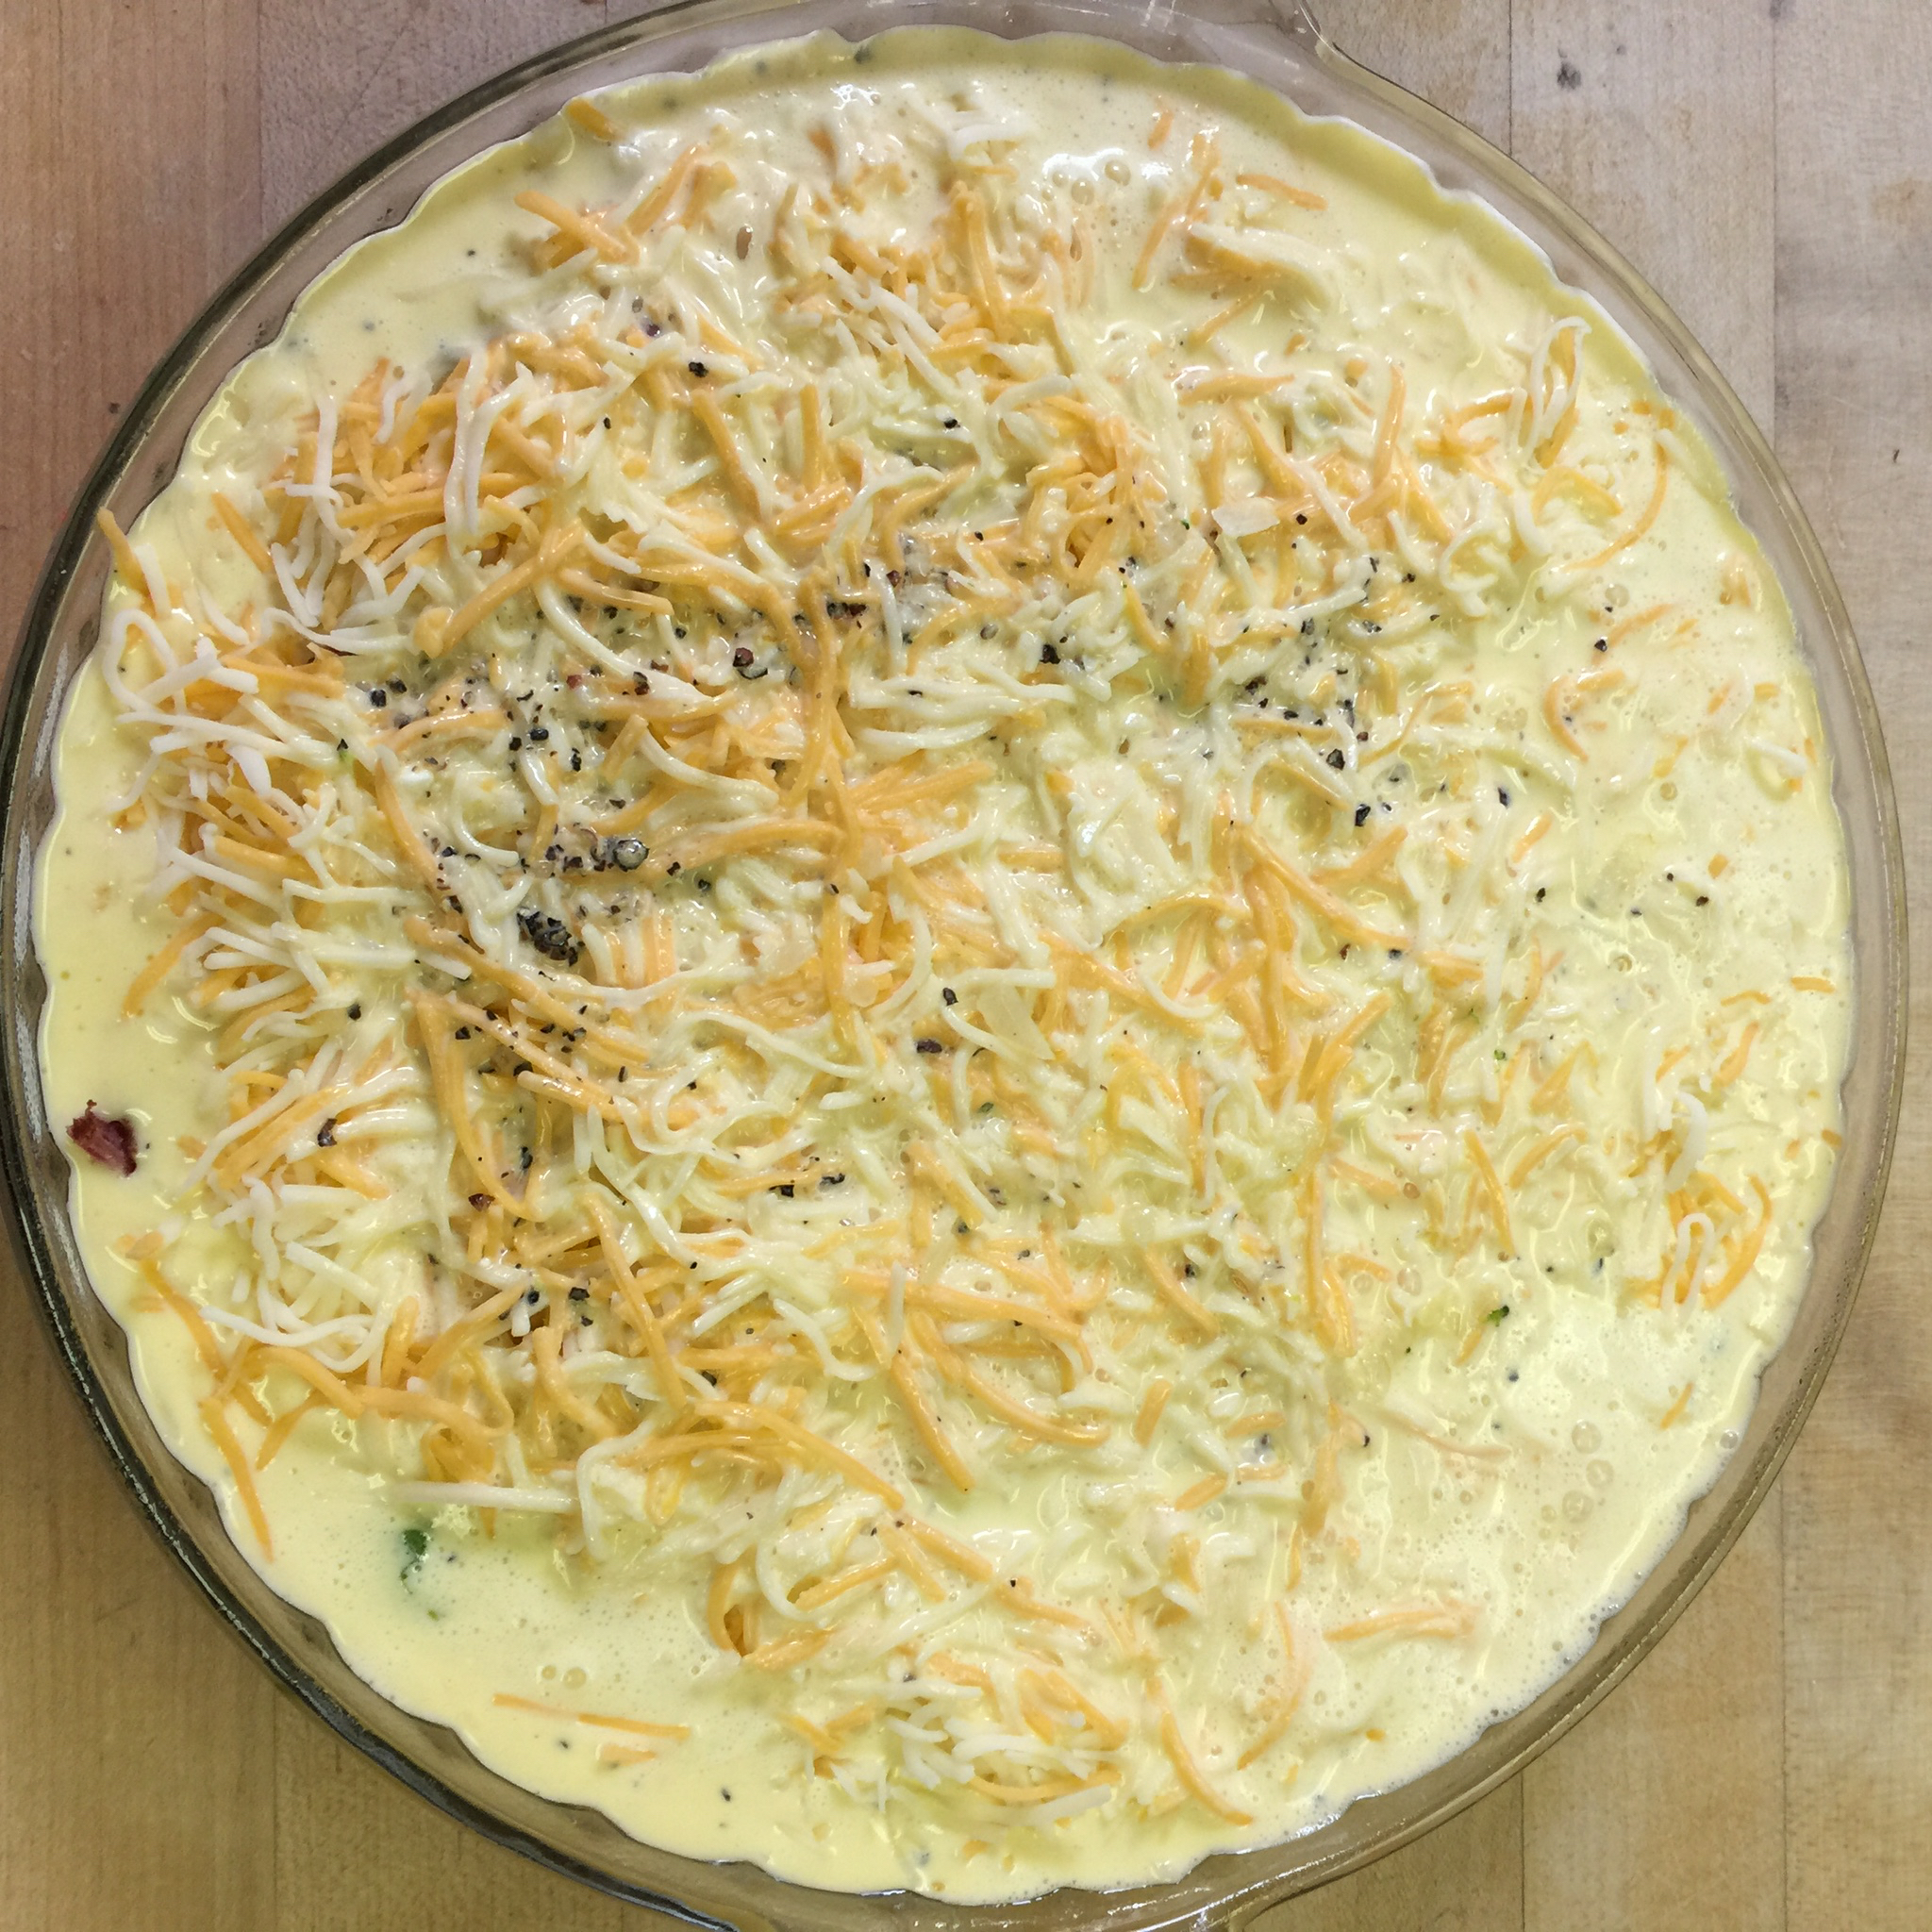
For a Quiche, you want to layer your ingredients. Start with your sautéed vegetables, and then top with bacon. This goes for any type of quiche – veggies on the bottom, then your meat, then cheese, then top with your egg mixture.
Sprinkle the cheese on top of the bacon.
Mix your eggs, cream, nutmeg, ground mustard, cayenne, salt and pepper.
Pour over the cheese.
Place your quiche in your preheated 400 degree oven for 15 minutes. Reduce heat after 15 minutes to 325 degrees and bake for an additional 30 minutes.
It should look puffy and delicious when you remove from the oven:
As it cools, it will sink slightly. Allow to cool for 20 minutes or so if you want to enjoy it right away. If you are preparing ahead, allow to cool completely, cover with saran, and store in the refrigerator until ready to use. This will keep for up to 5 days in the refrigerator. Reheat in the oven or in the microwave for about 30 seconds a slice.
Be creative with your ingredients. My children have requested ham and cheese for the next one. You can do spinach and parmesan, vegetable, bacon and cheese, or any other combination you can imagine. Just remember to layer in the order above and cook accordingly! Enjoy!
Just about everything is better with BACON! It is definitely a staple in our house. We can eat it for breakfast, lunch, and dinner!
Here is an example of eating bacon for dinner; one of many ways! On days when I make my sheets of bacon, I try to make use of my bacon drippings by doing a dish that requires bacon AND oil.
I mean, really, what isn’t satisfyingly delicious when you cook it in bacon grease?
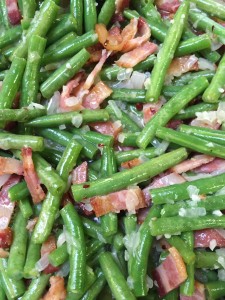
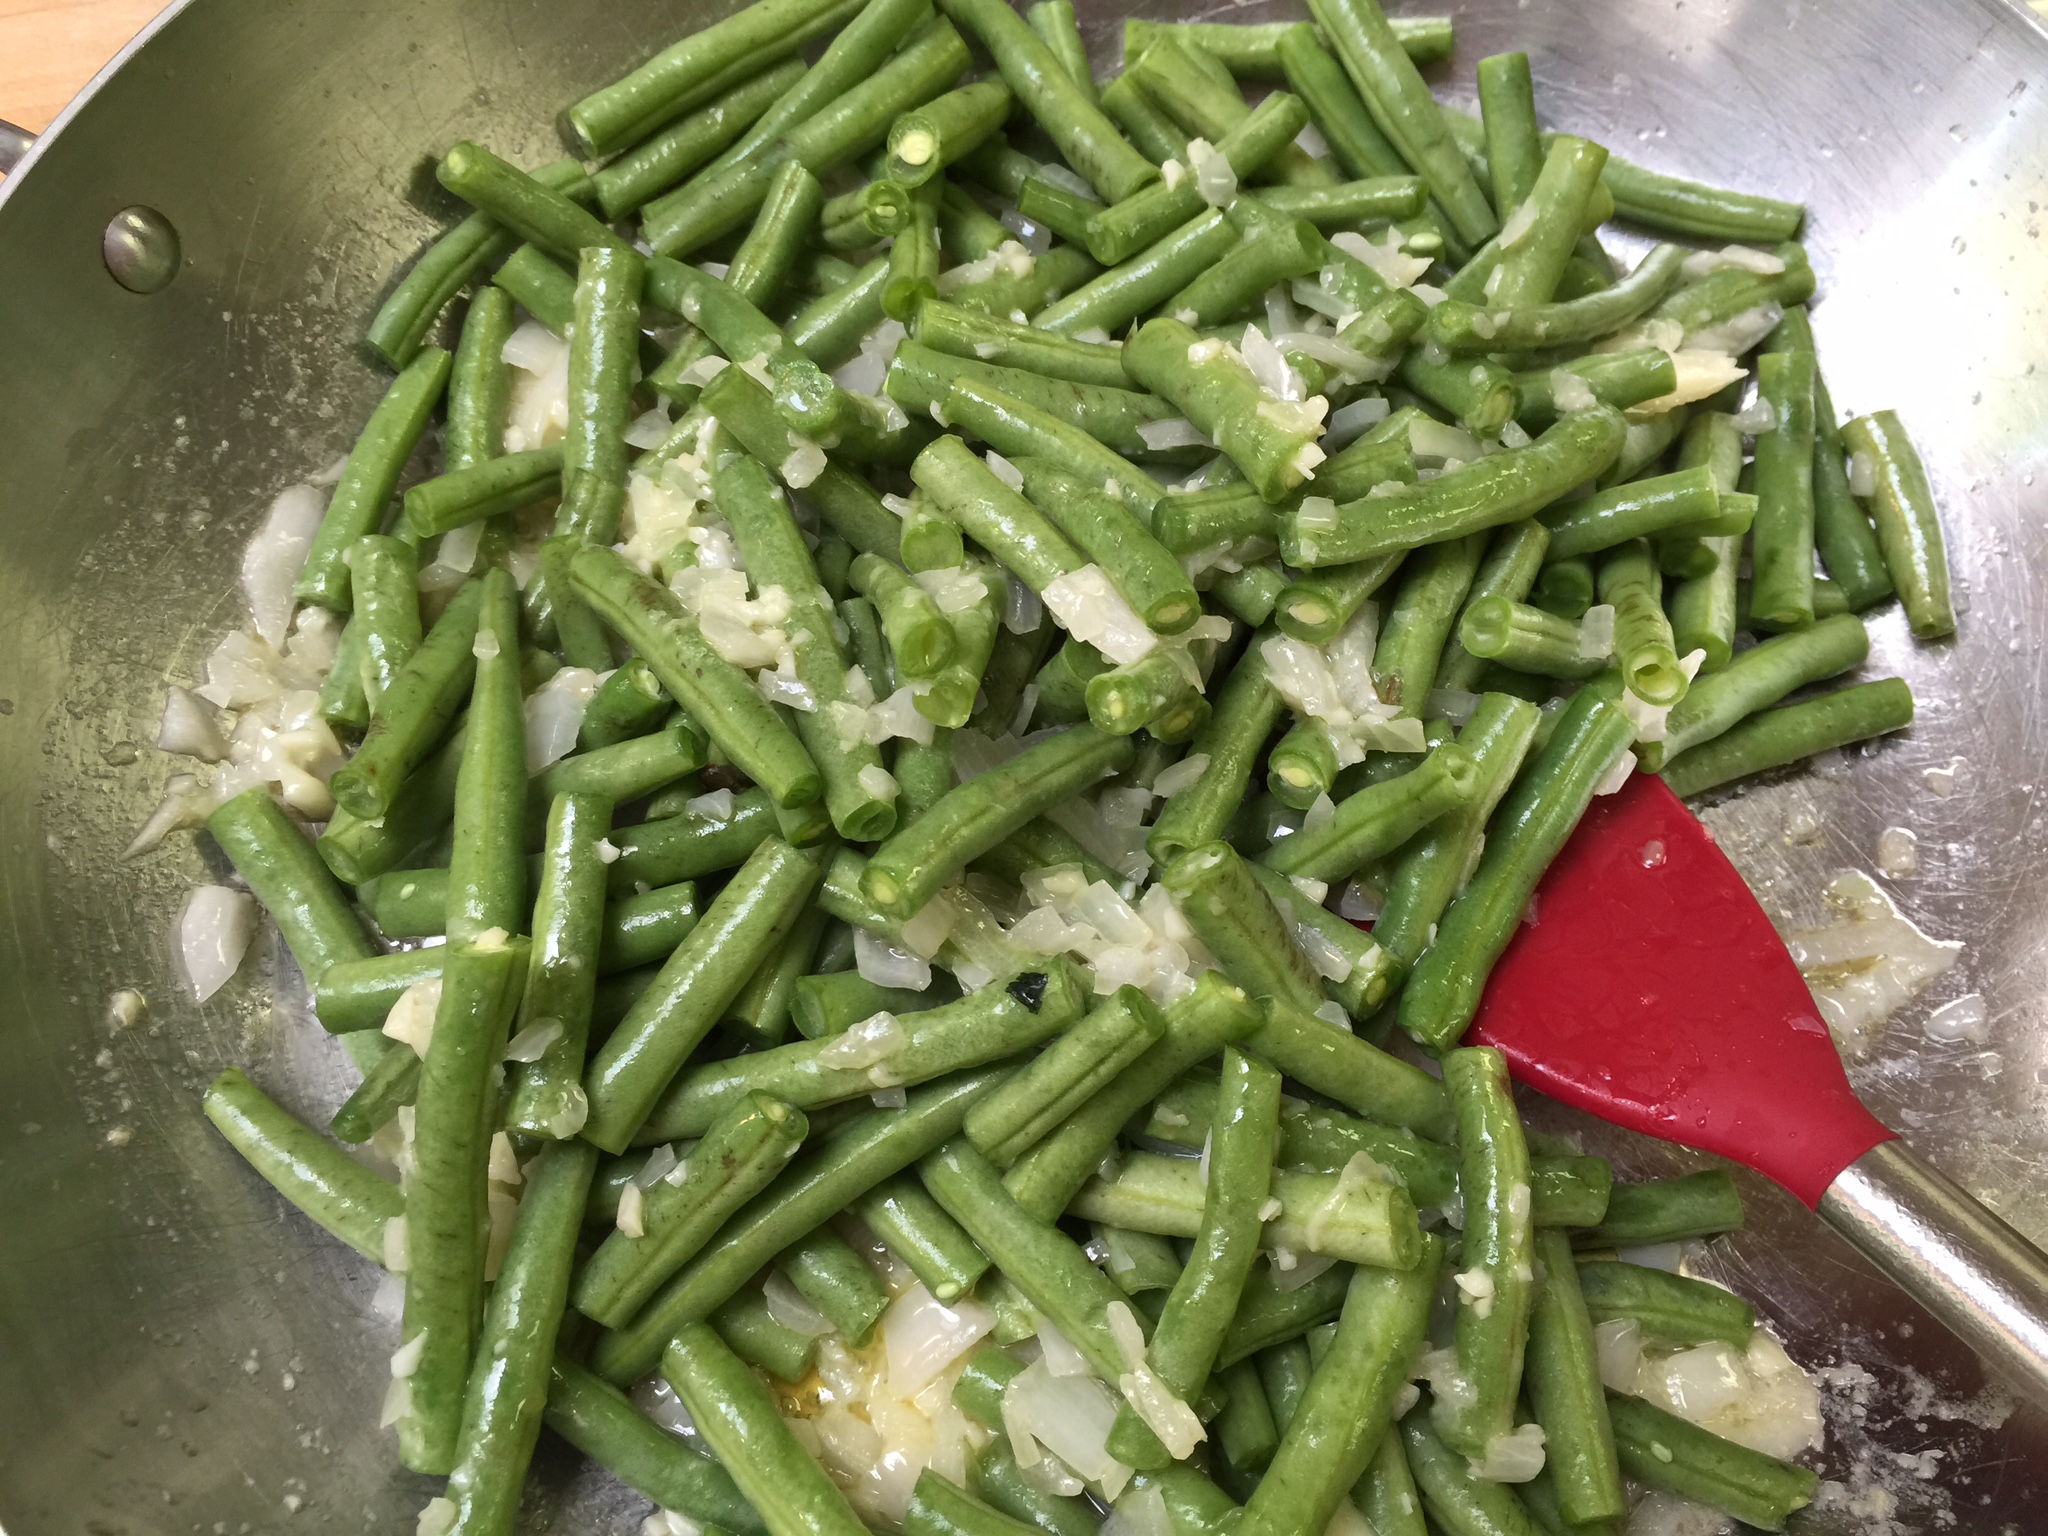
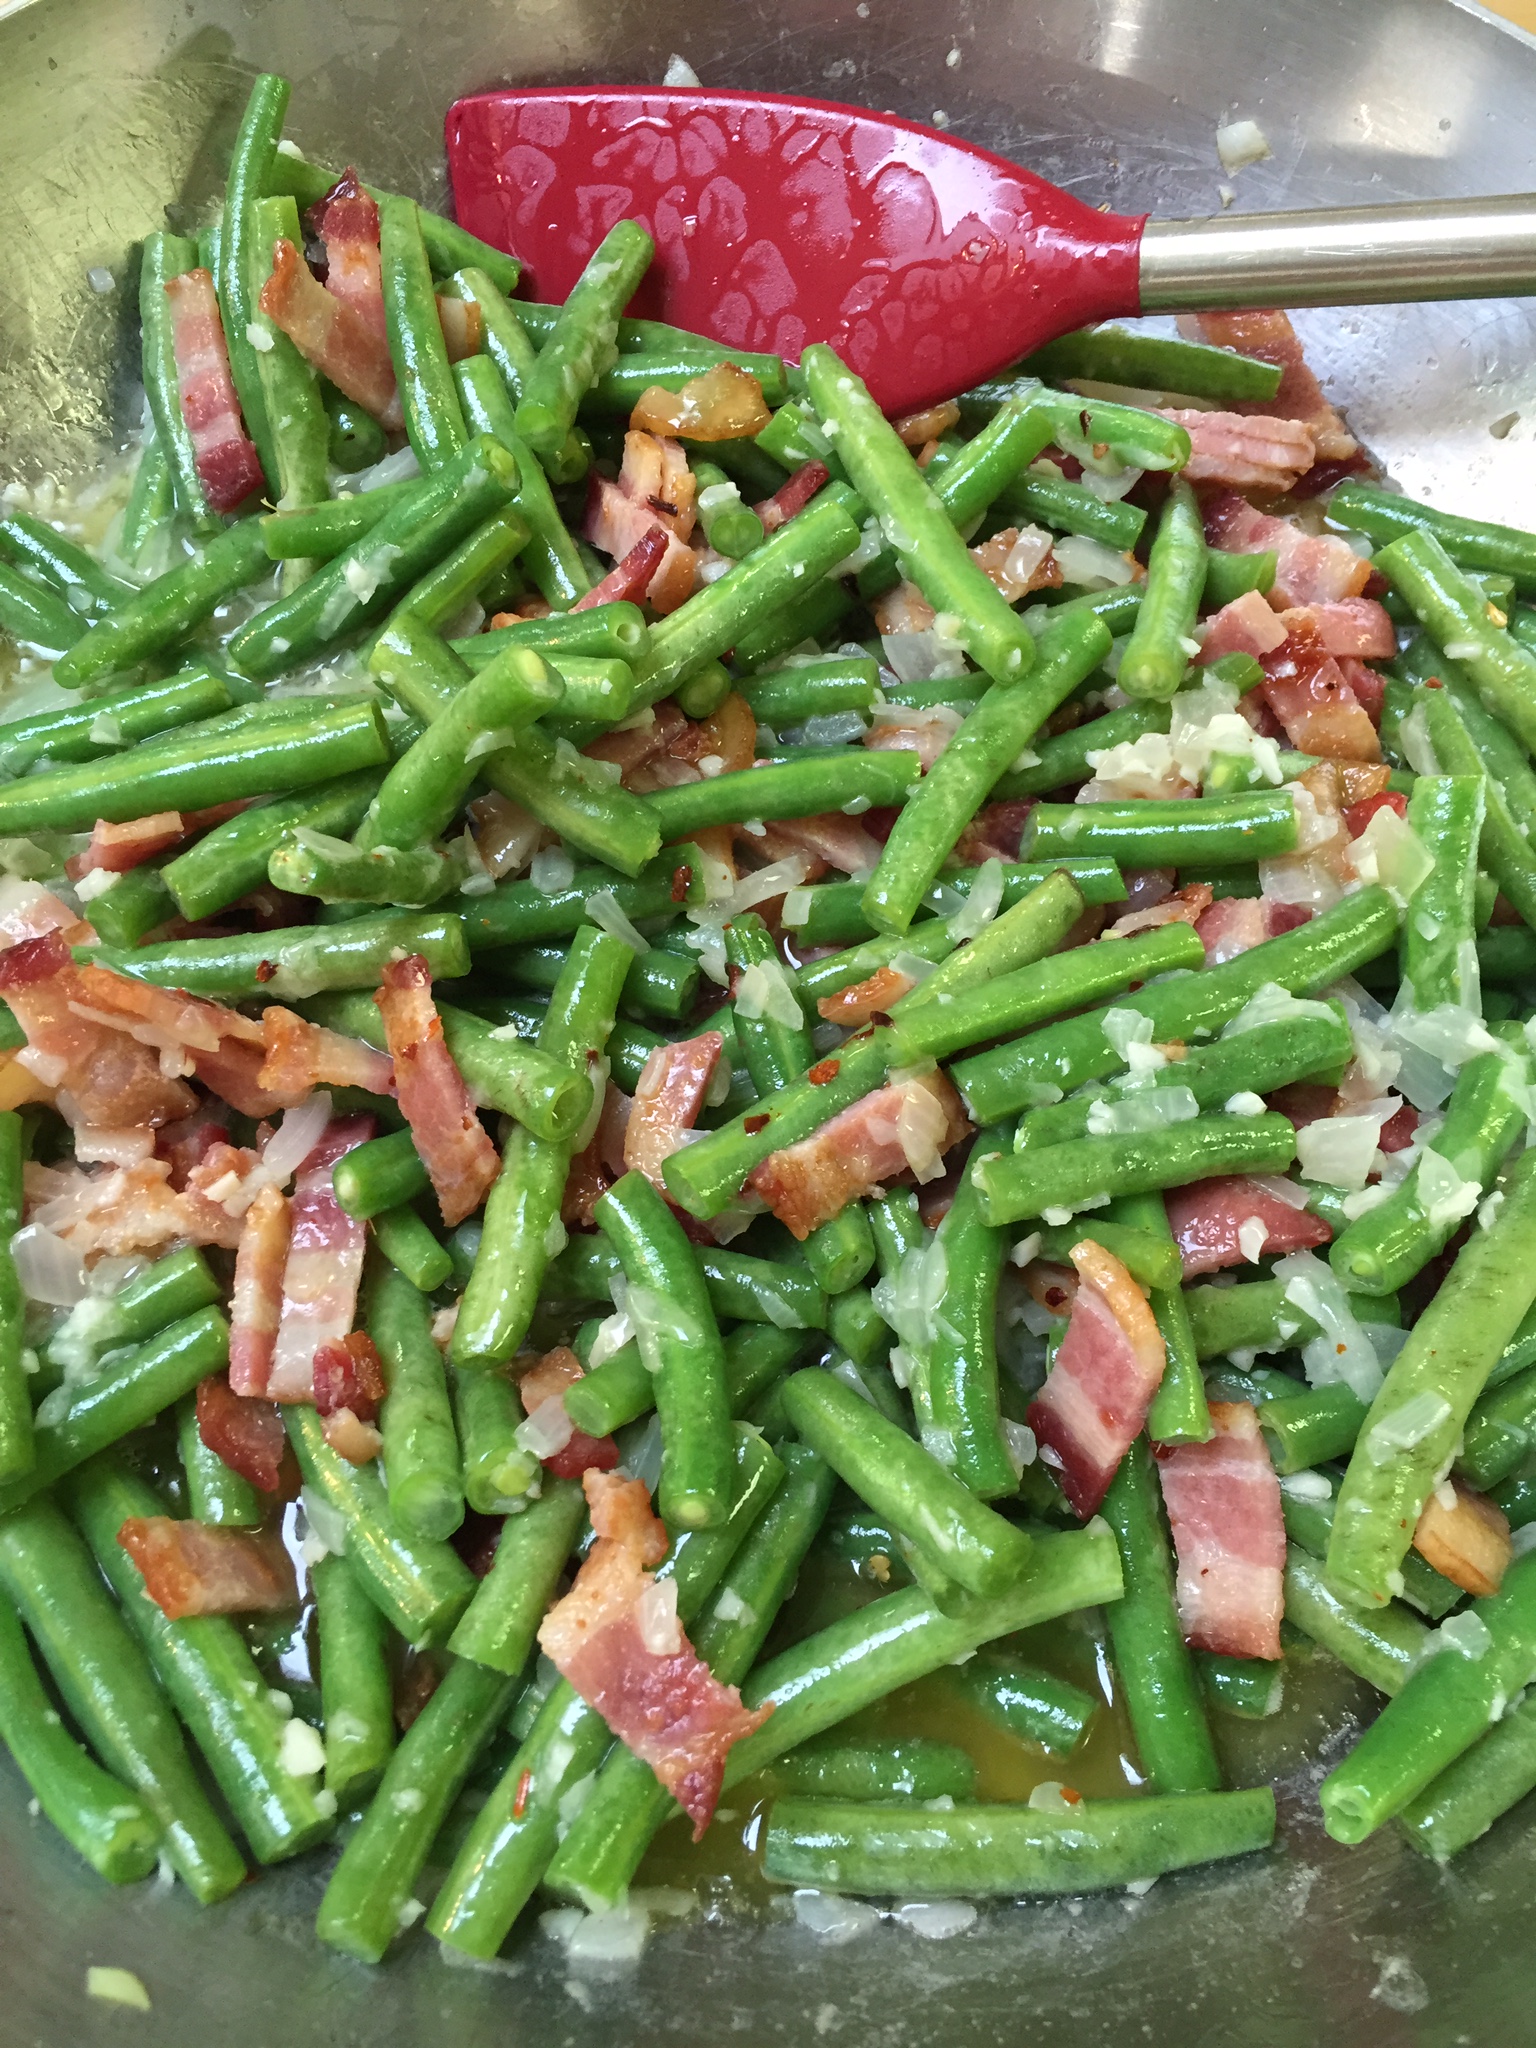
My Bacon Green Beans are a hit with the whole family!
Start with your sheets of bacon. I usually try to do two to three cookie sheets of bacon at the beginning of the week. Search for my bacon blog if you missed it!
Bake a foil lined cookie sheet of bacon on 350 to 375 for 15 minutes. DO NOT discard your bacon drippings! Please!
You can keep going with your bacon on the same sheet to get more drippings (and more bacon).
Meanwhile, prepare your ingredients:
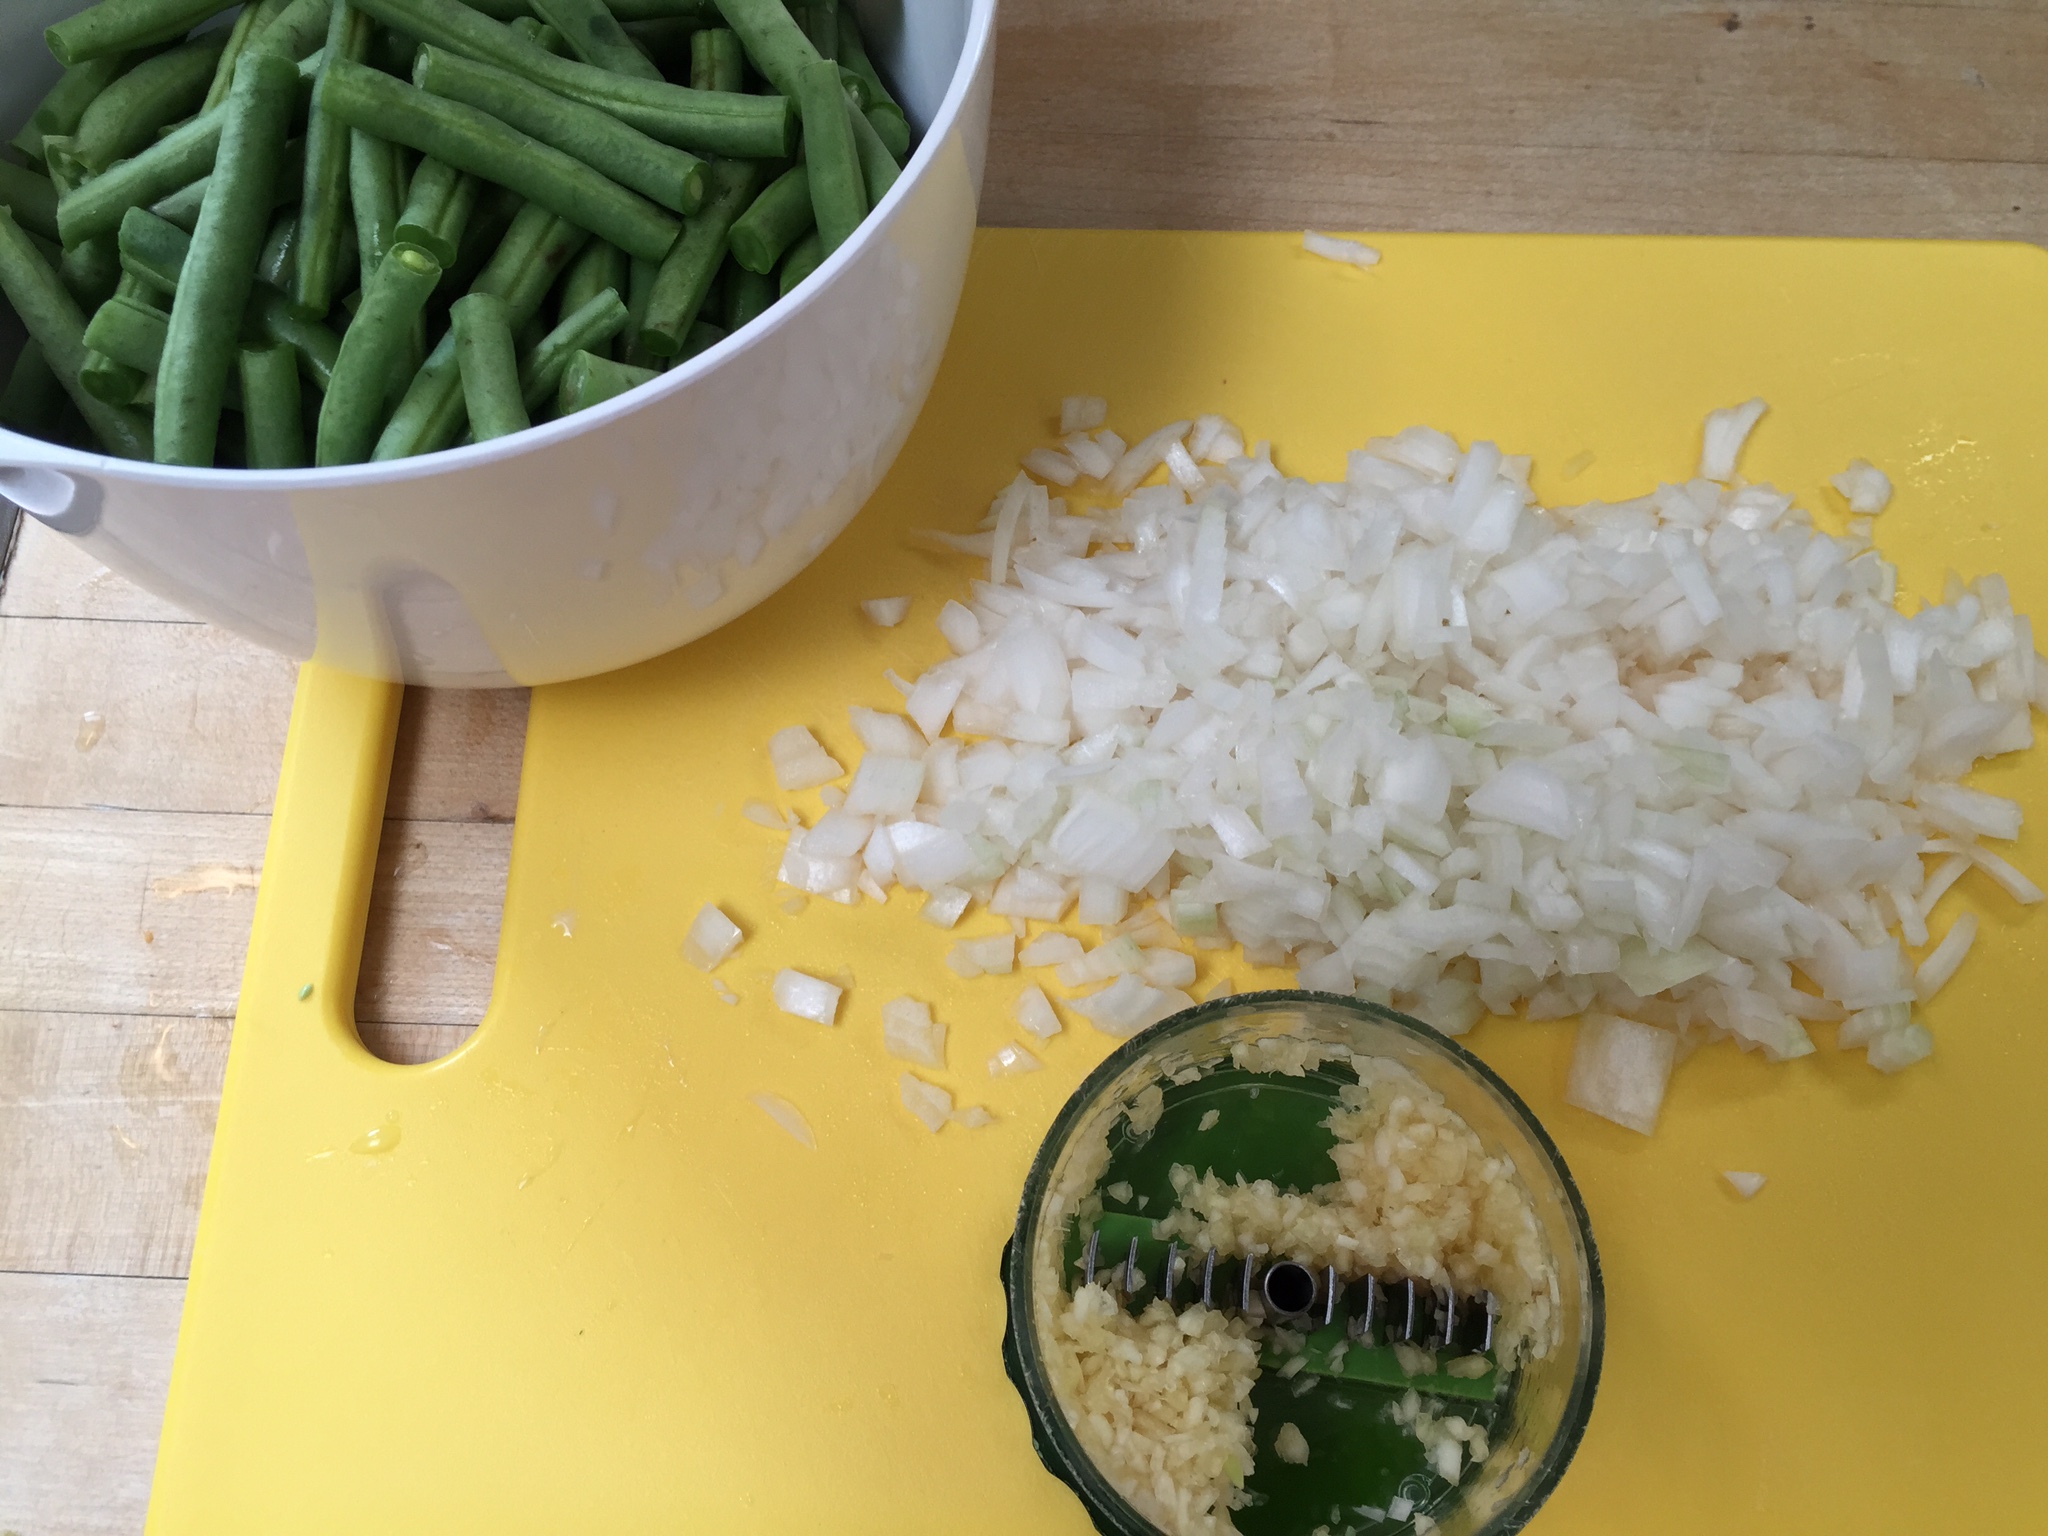
Wash and trim about 2 pounds of green beans. Set aside.
Chop finely, 1 cup of white onion.
Using a garlic press, mince 5-6 cloves of garlic. I love, love, love my garlic chopper! You can find one here, and chop all of your cloves at one time! My favorite kitchen tool!
Squeeze the juice of 1 lemon into a small bowl, discarding seeds.
Chop your bacon, and get your seasonings: crushed red pepper, black pepper, and Celtic or Himalayan salt. Parmesan cheese if desired.
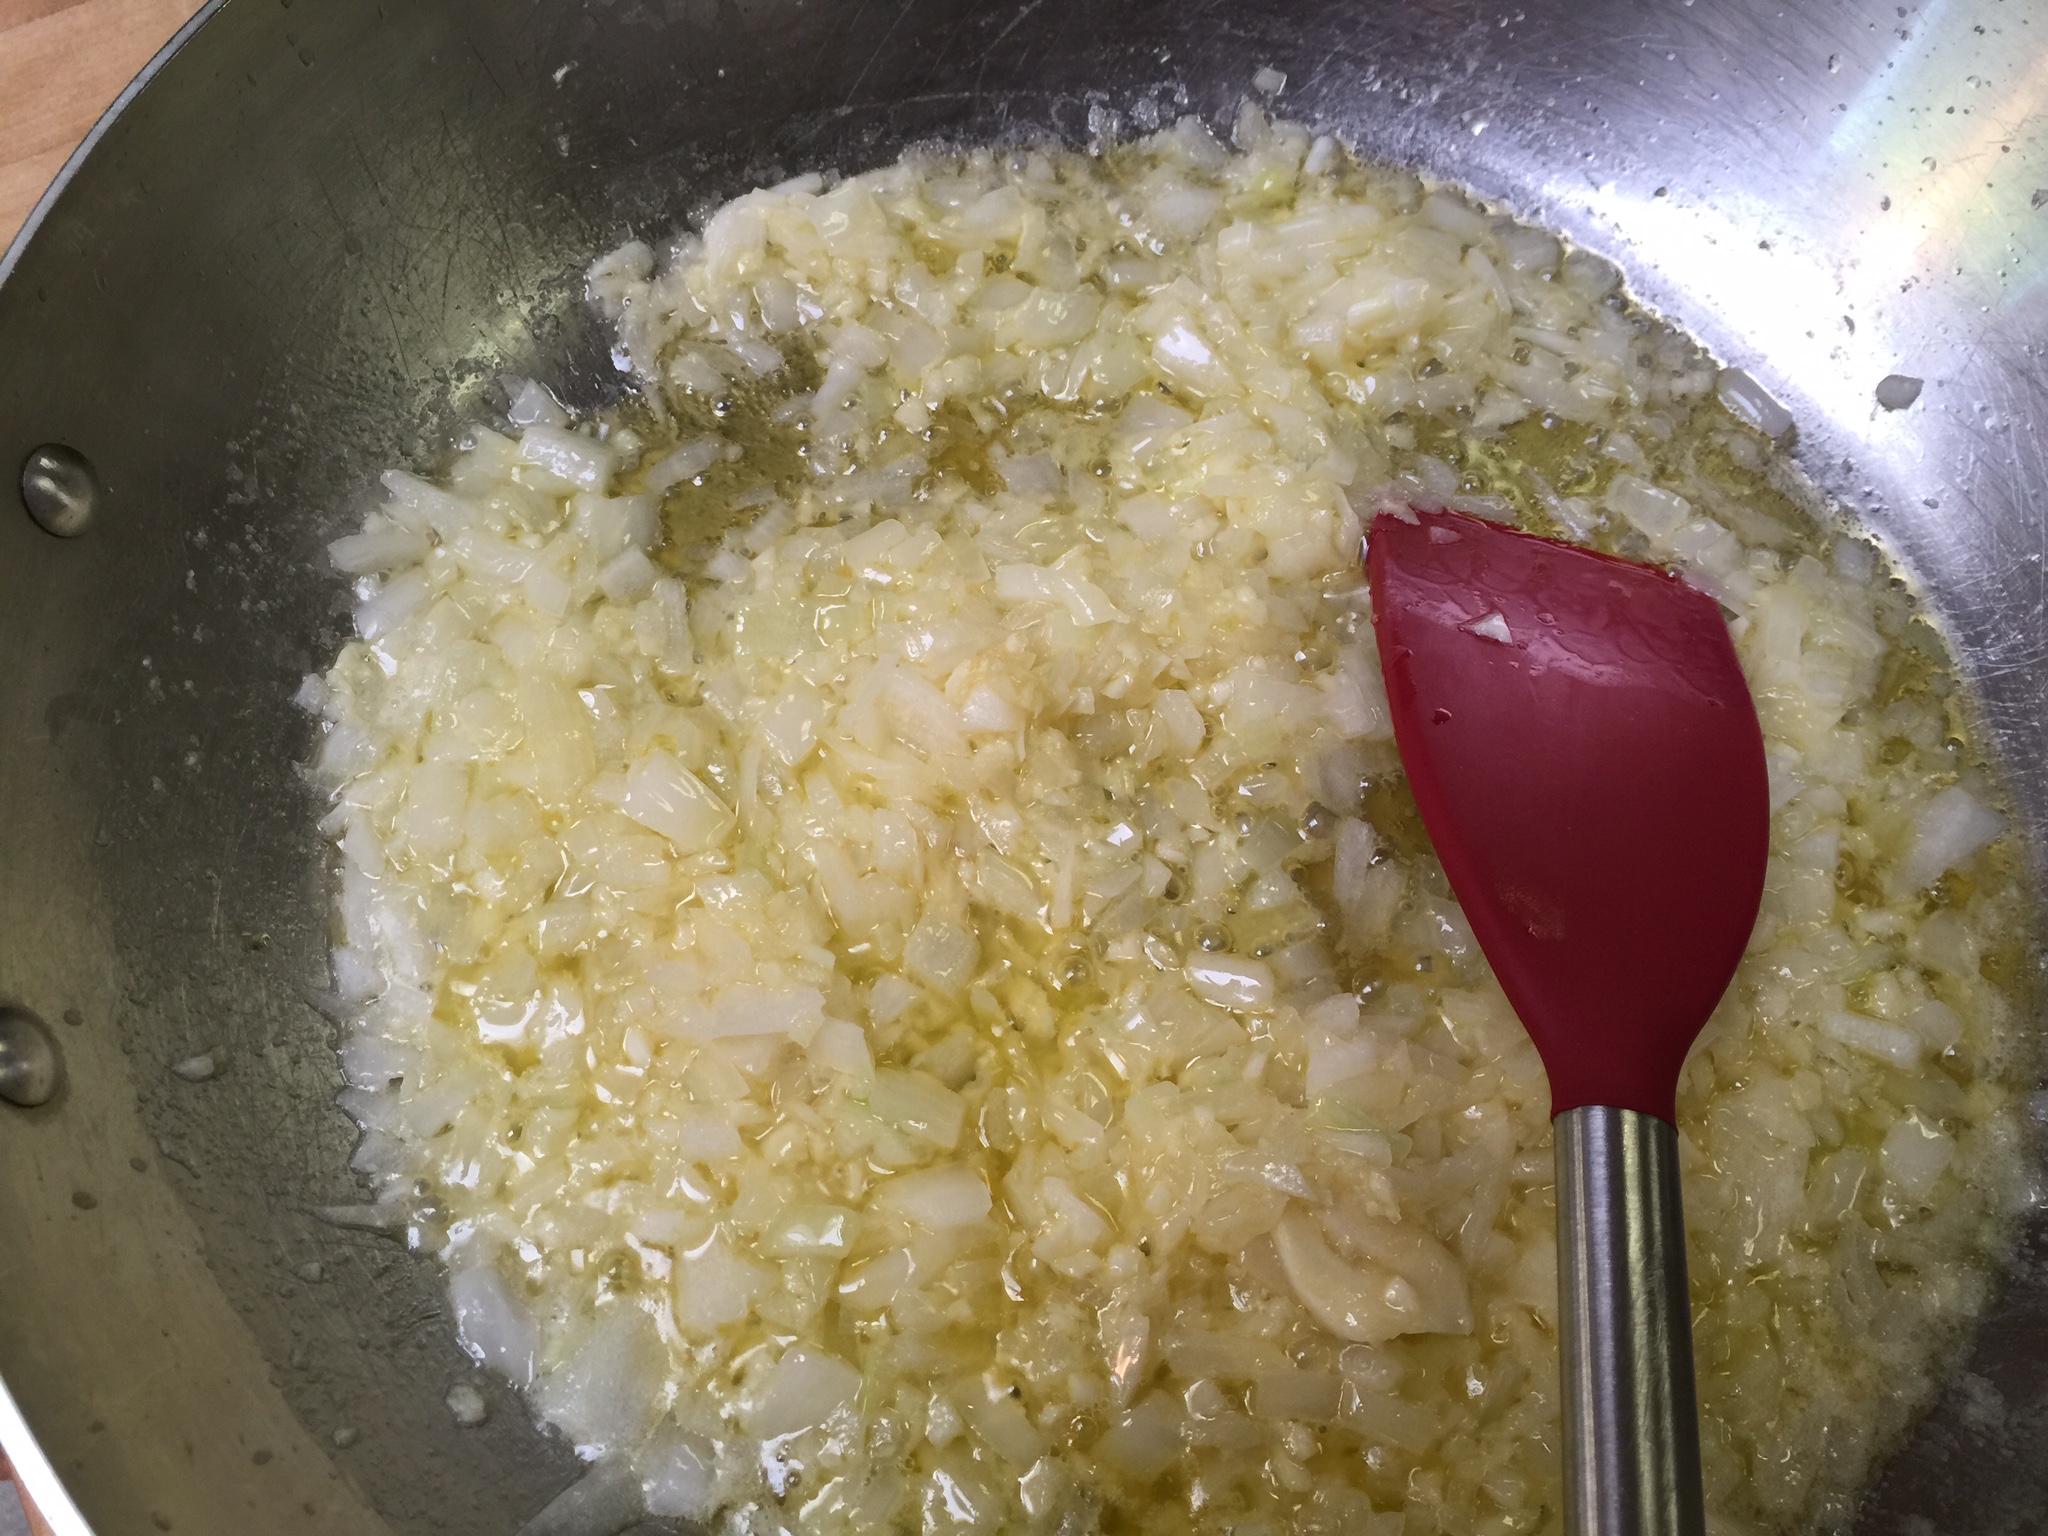
Saute your onion and garlic in your bacon drippings until translucent.
Add your green beans:
Once your green beans are slightly tender, but still crisp, add your bacon, lemon and seasonings.
End with a sprinkle of parmesan cheese across the top! I usually do this step on individual plates.
It’s that easy for a gorgeous, colorful, and delicious side that the whole family will enjoy.
To find items that we use in our posts, such as the All Clad sauté pan, the silicone spatulas and spoons, and cookie sheets, check out our new Amazon store here.
This is one of my favorite side dishes for a Bar-B-Que when you have gone Low-Carb! Perfect for the Memorial Day holiday and filled with many of our favorite ingredients!
We hope that everyone has a safe, fun weekend filled with laughter, and time spent with loved ones and friends! Special thanks to all who have served to protect our freedom this Memorial Day!
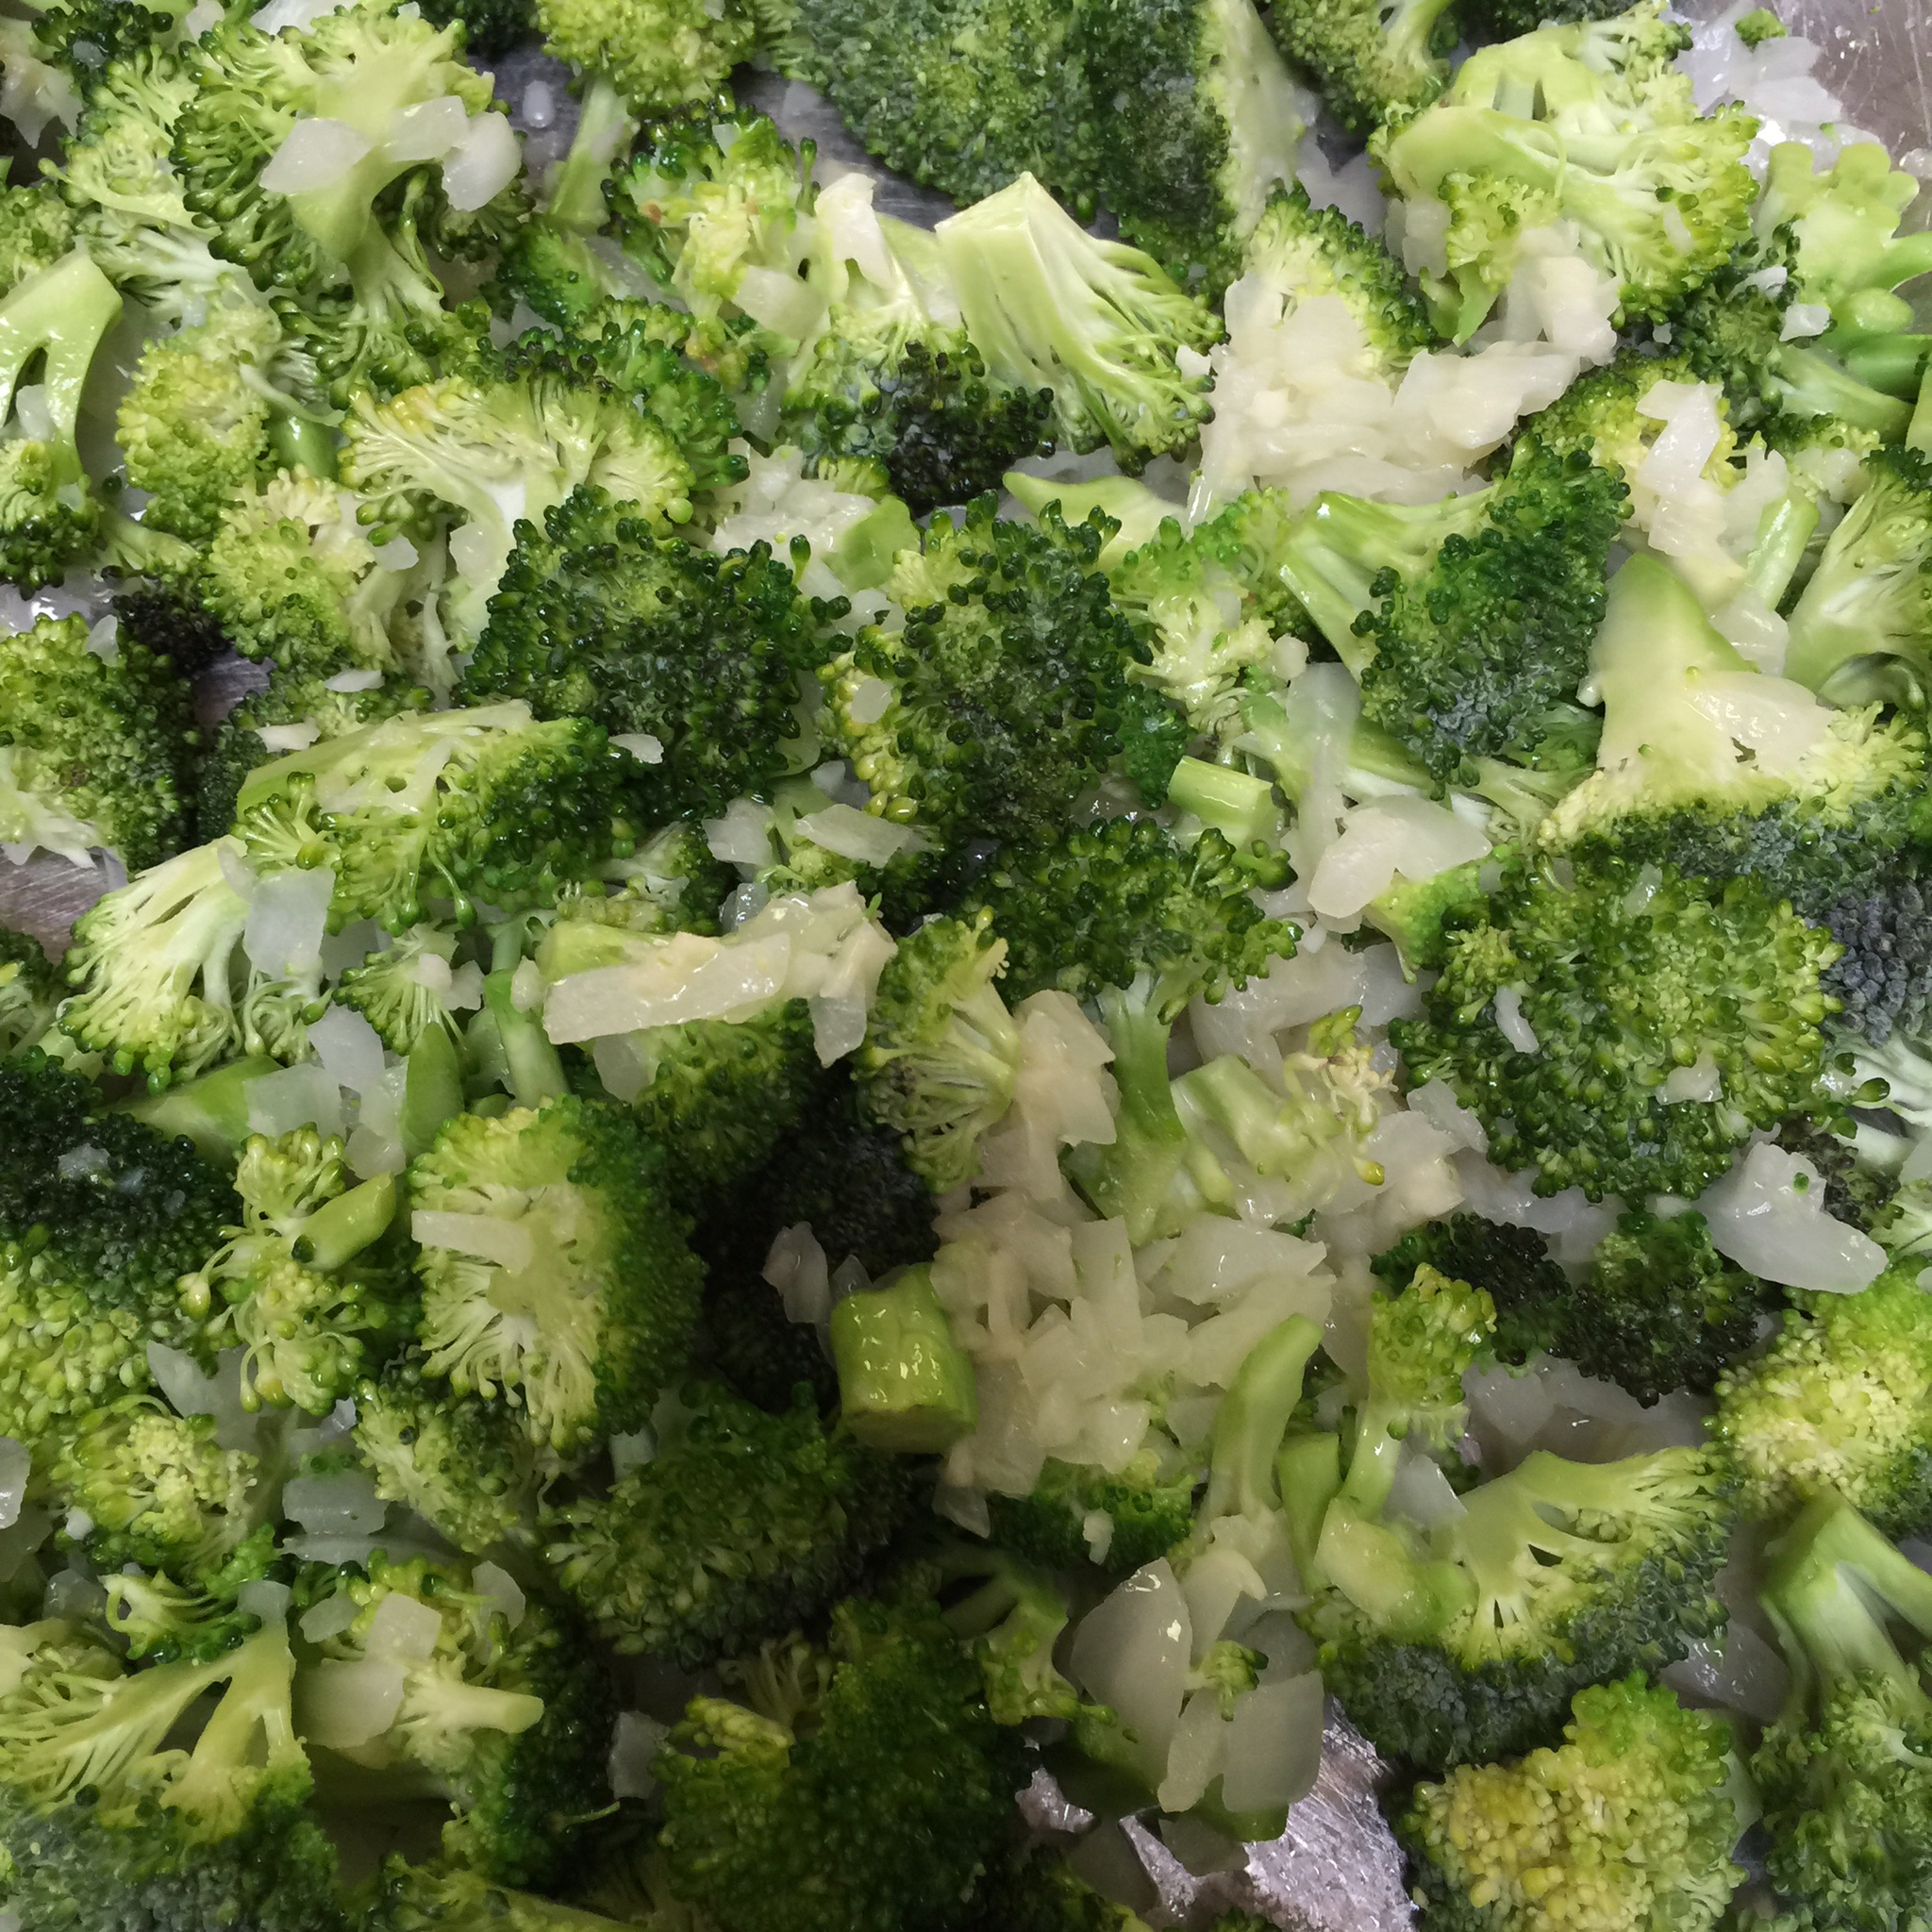
Bar-B-Que Broccoli Salad
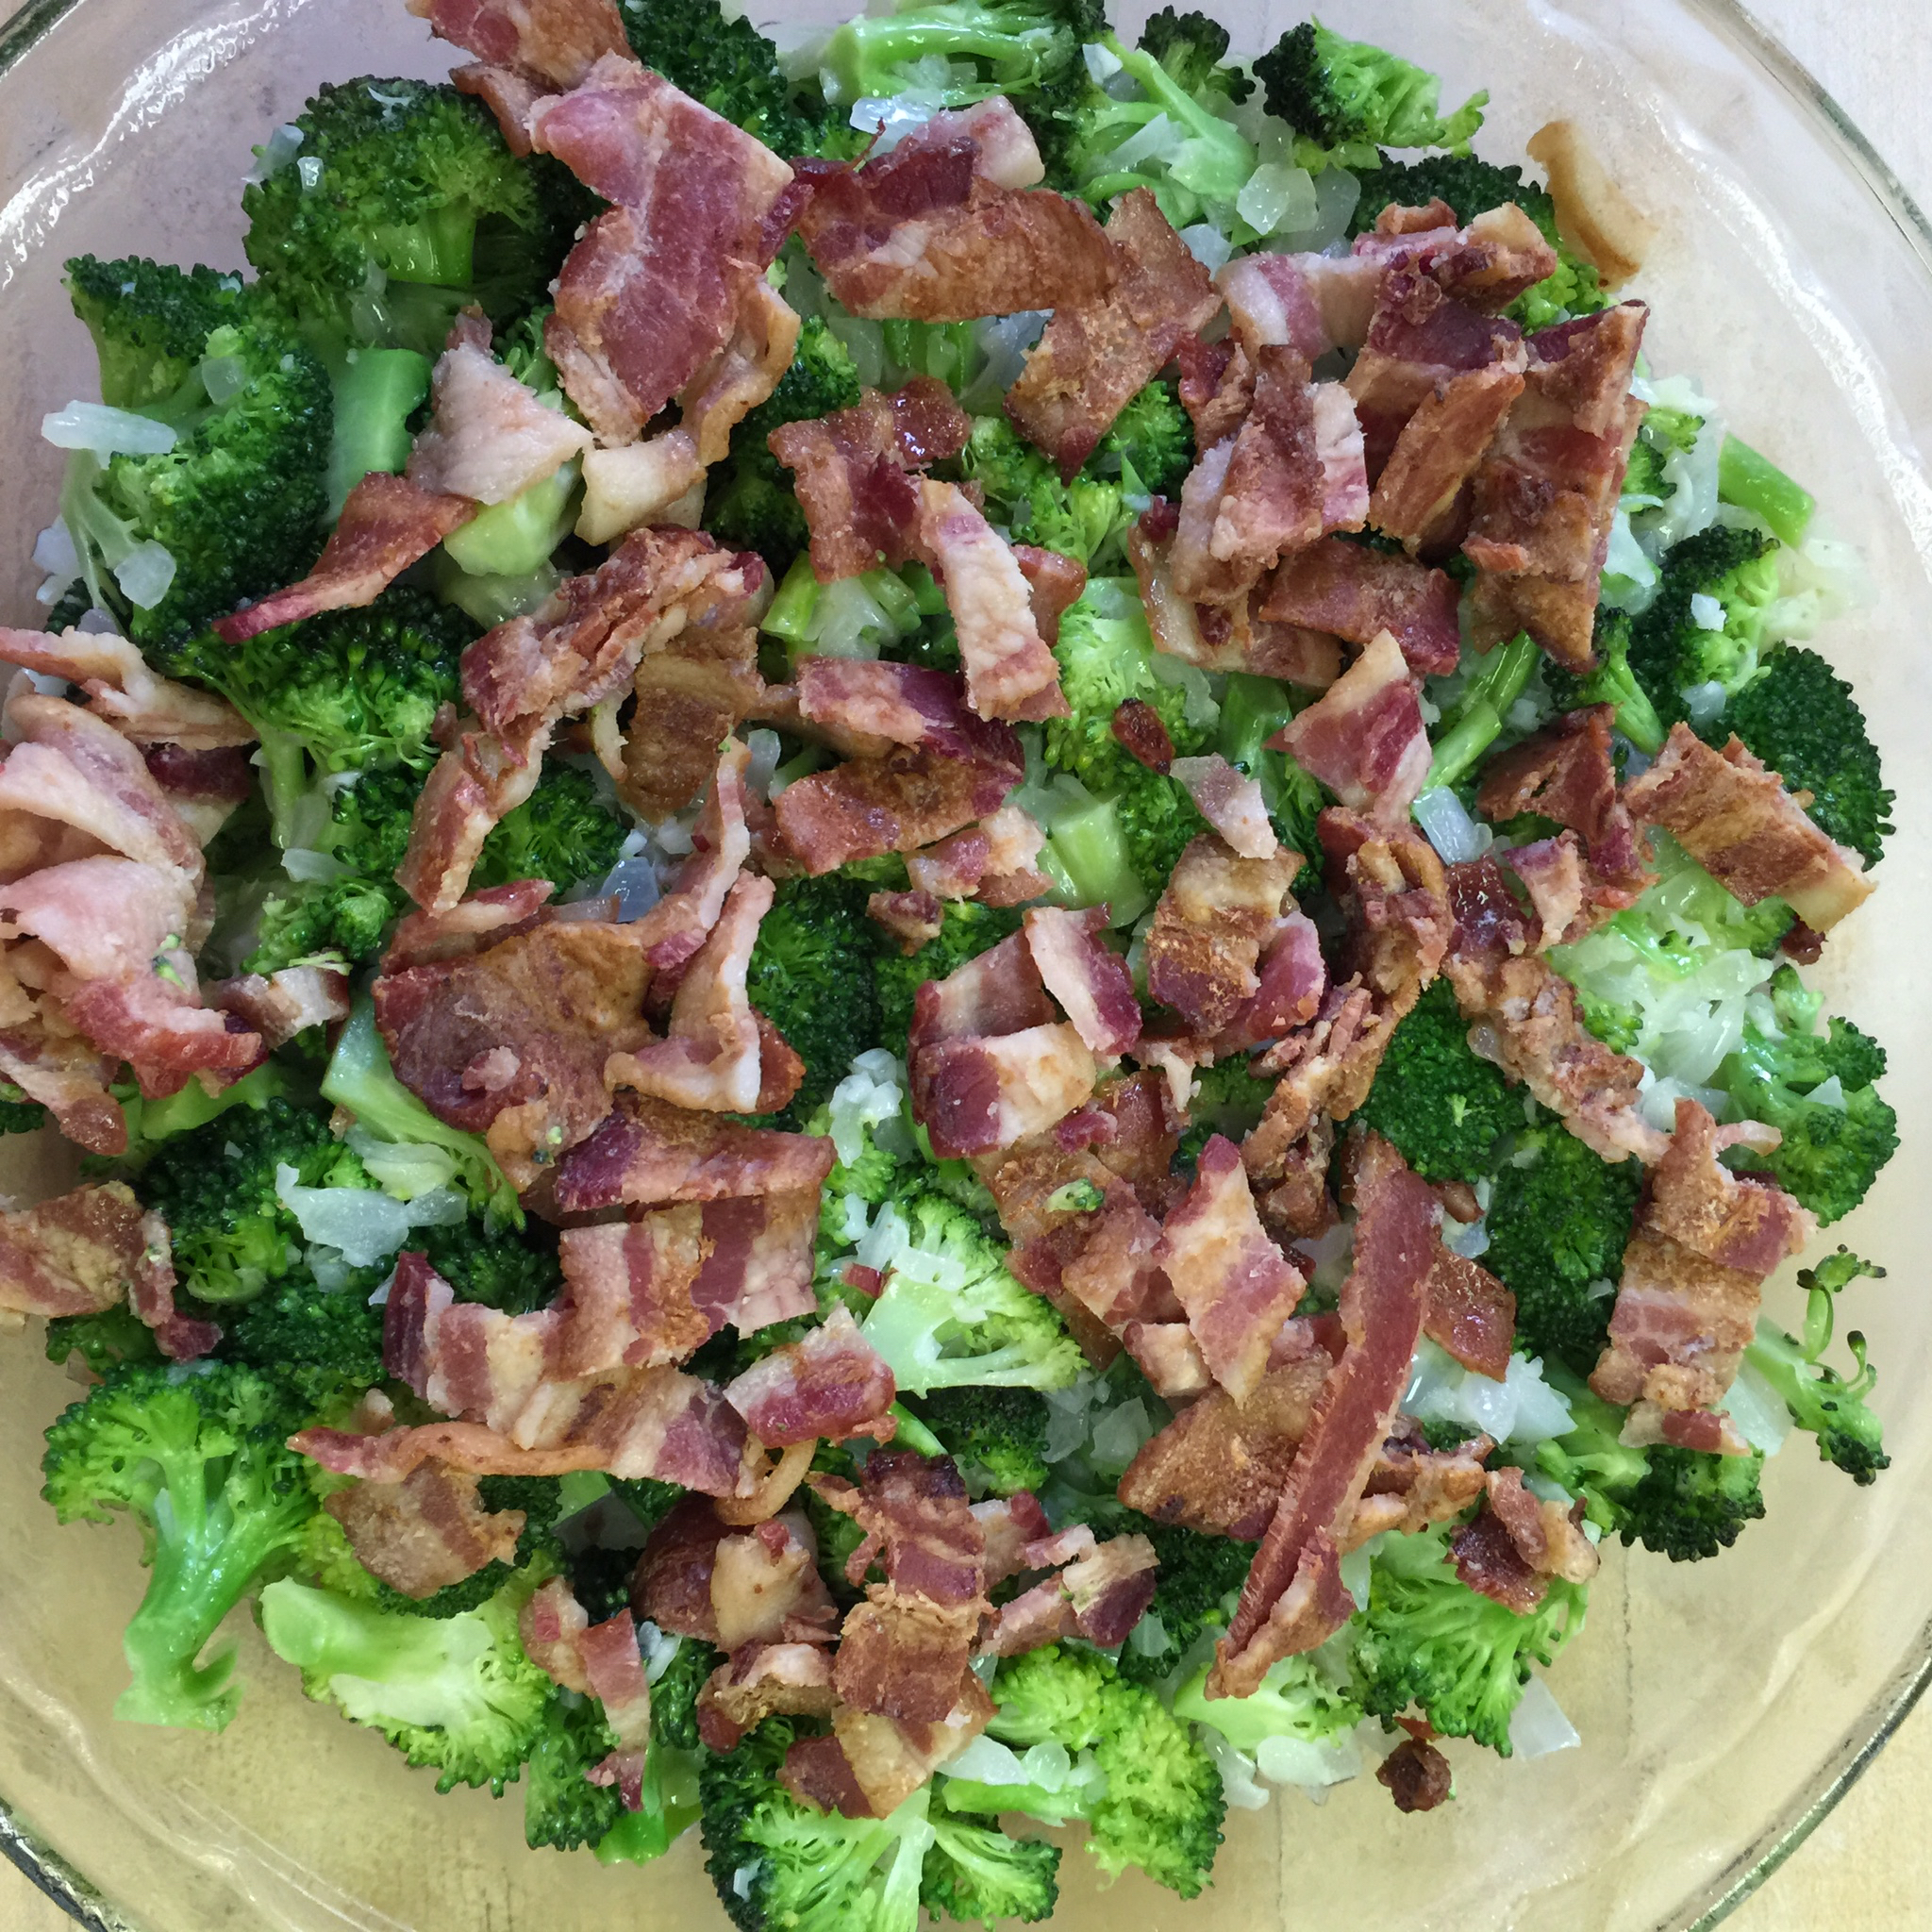
8 Slices of Bacon Cooked and chopped
2 heads of Broccoli (chopped and lightly steamed-emphasis on lightly)
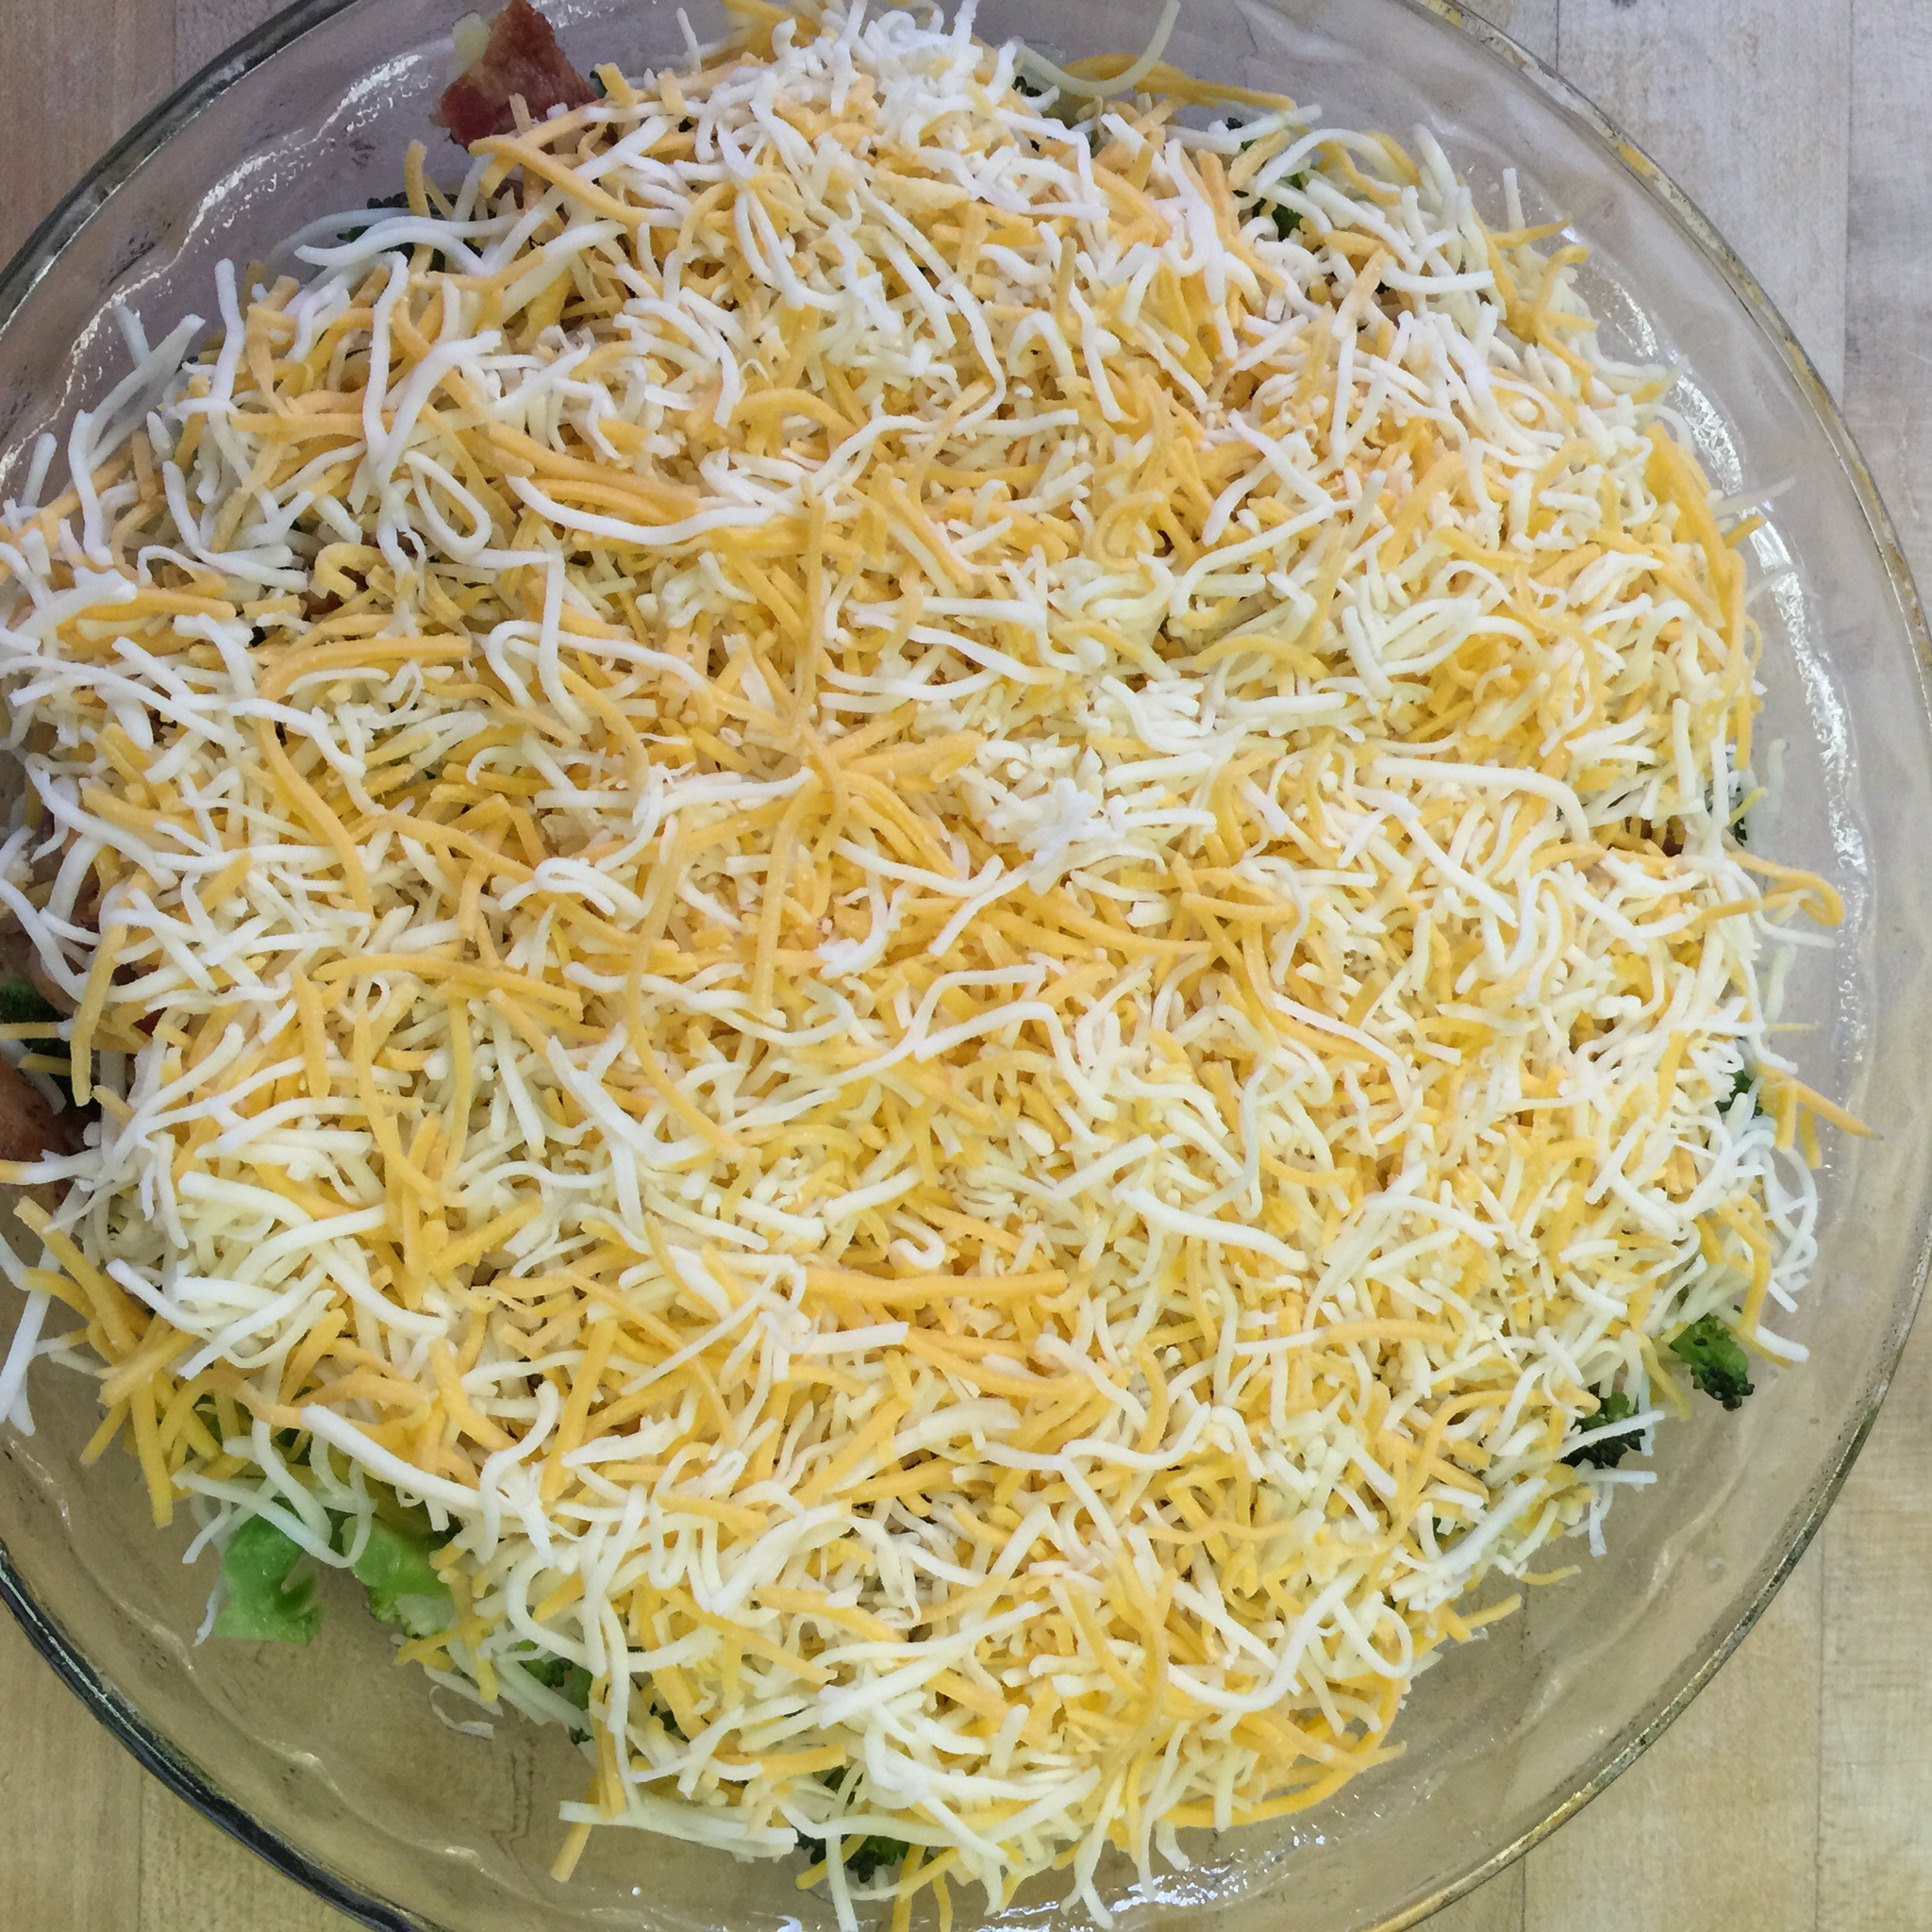
2 cups of Sharp Cheddar Cheese, shredded
1/2 red onion finely chopped
1/2 cup red wine vinegar
1/4 cup xylitol
3 tsp black pepper
1 1/2 tsp salt
1 1/2 cup mayonnaise
2 tsp fresh lemon juice
1. Cook your bacon and lightly steam your broccoli. Cool.
2. Mix together your red wine vinegar, xylitol, black pepper, salt, lemon juice, and mayonnaise. This is your dressing!
3. Combine your broccoli, cheese, bacon, and onion, and combine together for your salad.
4. Slowly pour and mix your dressing with your salad, tossing to combine well. Start with half of your dressing, and add more to your desired taste. Let it sit in the refrigerator for 2 hours before serving.
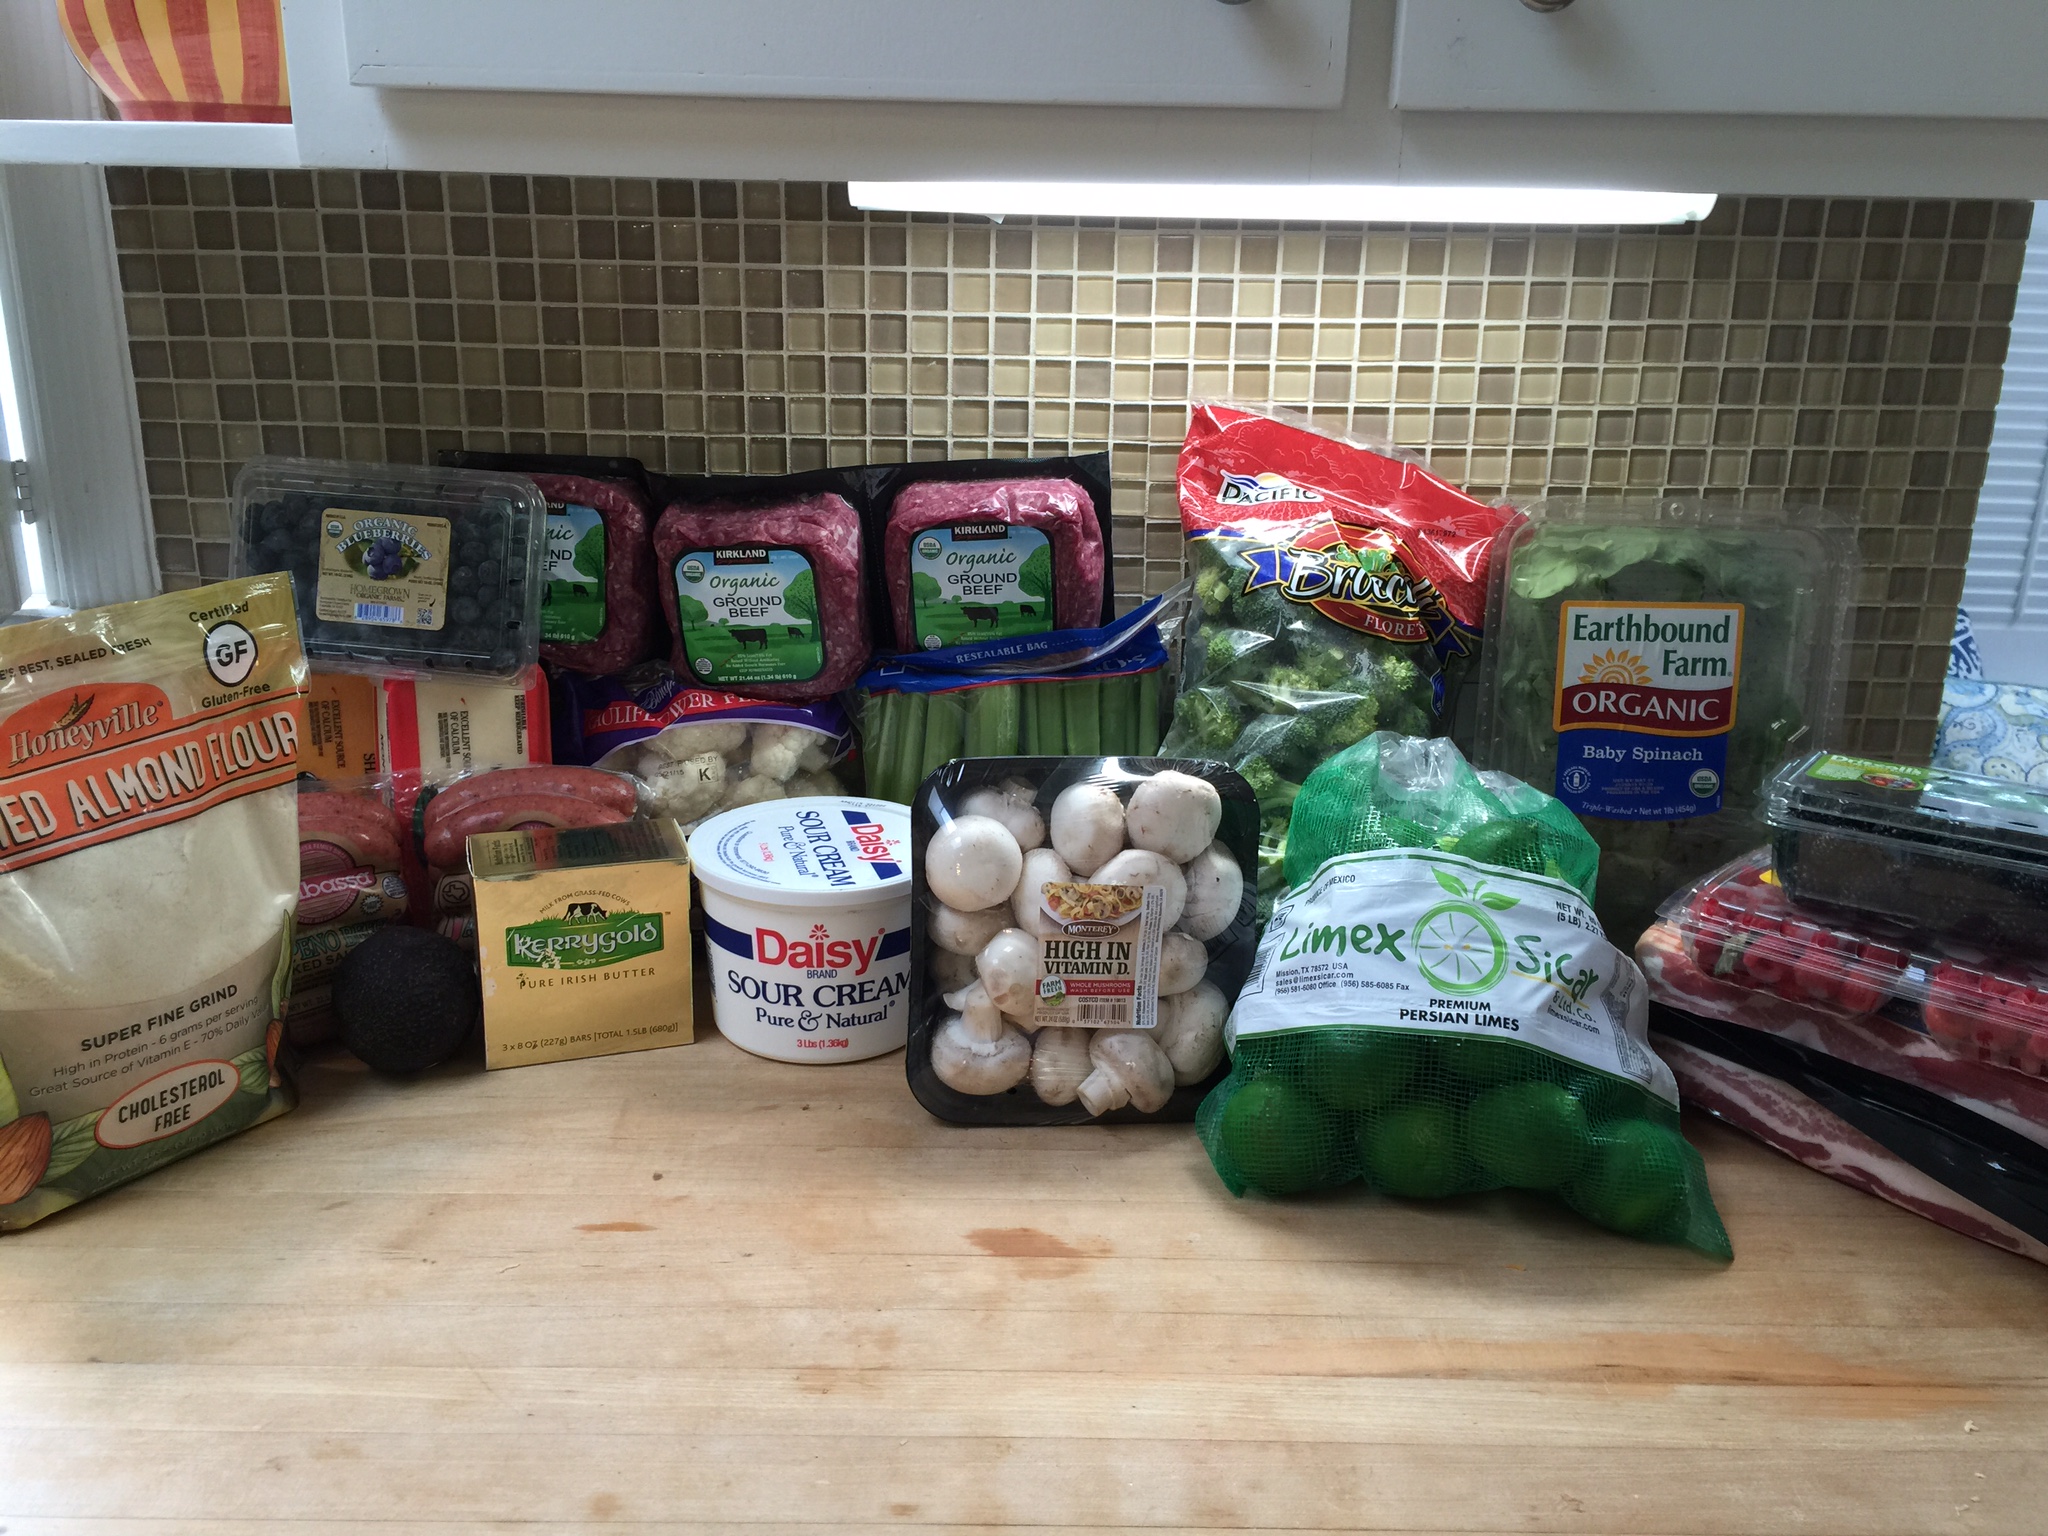
Let’s face it…being on a Ketogenic diet with REAL food is not inexpensive! We are trying to be as healthy as possible, which comes at an expense to our wallets. In fact, today, while listening to a Livin’ La Vida podcast, a nutrition expert and author was discussing the fact that higher income countries are actually consuming less grains now than low net income countries because those packaged foods and grains cost pennies compared to “real food” which is actually nourishing. Very sad! I totally believe it is worth every penny to feed my family well, but at the same time, I try to save where I can! This is where buying in bulk can help, especially when feeding a hungry family of five. I have two growing boys that eat constantly.
Now, I do have to say, a high fat, real food diet, keeps you full much longer that the recommended, low fat Standard American Diet (SAD), so in terms of food, you are not eating the same quantity. There are certain foods that we consume more often than others, so using a store like Costco or Sam’s can help you. One of the more frequent questions we receive is where we buy our groceries. The answer is…everywhere, but I don’t shop at every store every week. I probably make a Costco run every two weeks, so I thought I would share the basics I keep on hand in bulk.
From left to right:
1. Almond Flour: I have said this before, but do not even try the other brands…Honeyville is far superior to any of the others. I have tried all of them, and hands down, Honeyville bakes the best with the least amount of heavy texture. Costco saves you a ton…you can’t find a lower price even on Honeyville’s own website!
2. Berries: (On both sides – All organic!) While we do not recommend a large amount of fruit on a Keto diet, berries are by far the best choice. They are the lowest in fructose and have a high amount of anti-oxidants. These are primarily for the children, but every once in a while, I will have a small handful in a bowl of sugar-free whipped cream (homemade) with Swerve and vanilla for a sweet treat. Remember to always eat protein and carbs with lots of fat so you stay a fat burner!
3. Avocados: Costco usually has bags of five or six avocados. I use these for lunch filled with shrimp salad or plain with salt and lime or on salads. We ALWAYS have guacamole in the house. We use it on eggs in the morning and meat in the evenings. You can never have too many avocados.
4. Cheese: One of the biggest differences between the Ketogenic diet and the Paleo diet is the allowance of dairy. We love cheese! I bought the blocks of cheese because many of the shredded cheeses use potato starch to keep the cheese from clumping. I use my food processor attachment to shred the cheese for large quantities. I DO cheat, and buy shredded cheese on occasion to keep in the fridge for morning eggs and a quick grab, but the blocks are better as well as cheese sticks. All are a great buy at Costco or Sam’s.
5. Organic Ground Meat: I keep these in the freezer for an easy throw together dinner. You know we prefer the Grass-fed beef, but in a pinch these are great to have stored. While not as great as Grass-fed, it is a better alternative than your antibiotic and hormone ridden meats.
6. Kerrygold Butter: Need I say more? I think you all know how we feel about Kerrygold. It is delicious Grass-fed butter from Irish cows! It comes in packs of 3 at Costco, so I always pick up a couple when I am there!
7. Sausage: My kiddos love sausage. My husband grills it, and we serve it over zucchini noodles or eat it plain. Kiolbassa is also made in San Antonio so you are supporting a local business if you live here!
8. Daisy Sour Cream: I always have sour cream and cream cheese (I buy cream cheese at Sam’s) on hand for sides to add more fat. Remember, you want full fat. The low fat and fat free versions are NOT REAL FOOD! They are filled with chemicals and additives. Stick with the good ingredients our great-grandparents used, and their ancestors before them!
9. Veggies: We LOVE veggies…We are fortunate that Costco has many organic vegetable options. Not all of them are organic, however, so please wash well! A friend was over recently, and I was washing fruit with soap and water when she questioned me about it. Water alone will not wash off the chemicals. You really need to wash in a fruit and veggie wash or use a soap. I make a bath of soapy water and soak them in the wash and then rinse in a colander with cold water. This still does not guarantee the removal of all chemicals, but it is a better bet. I love the cauliflower, spinach, and mushrooms at Costco. These are always on my list. I also stock up on limes in the summer to make infused water and iced tea. I must admit, that I also like a cocktail on the weekends made with a lot of fresh lime juice mixed with vodka and soda, or dare I say, tequila, for a homemade sugar-free margarita! One drink usually takes 4 to 5 limes (or more) so that explains the bulk on these. Broccoli and celery were also on the list this week. Please make sure you wash your celery VERY well. It can be a really dirty one!
10. BACON: Who can have too much bacon? Always on the list. Try to buy bacon as naturally as possible without a lot of curing ingredients. Each Costco carries different bacon I’ve noticed, so look at your labels.
11. Coconut Oil: It is not in the picture, but another staple that we all buy at Costco is Coconut Oil. This makes great Bulletproof Coffee for all of us each morning! A definite staple, and a much better buy at Costco or Sam’s.
Any questions or comments? Leave us feedback. We would love to hear what Low-Carb High-Fat foods you like to buy at Costco or Sam’s!
The reality is, no one wants to admit it when they are wrong. But, when it comes to something that is impacting every single one us, either directly or through our neighbors’ healthcare costs, the updated information should be shouted from the rooftops. While that is not going to happen, thankfully, the studies are being analyzed and people are getting wiser.
So many people have cut delicious foods from their diets in the name of being healthy, (eggs, bacon, full fat dairy, butter, etc.) but science is now learning that these things are actually GREAT for you!
We are so excited that these foods’ bad names are starting to be cleared! We can finally go back to eating the way we were designed to eat, and have eaten for thousands and thousands of years. It’s call REAL food folks, so cook it up and enjoy!
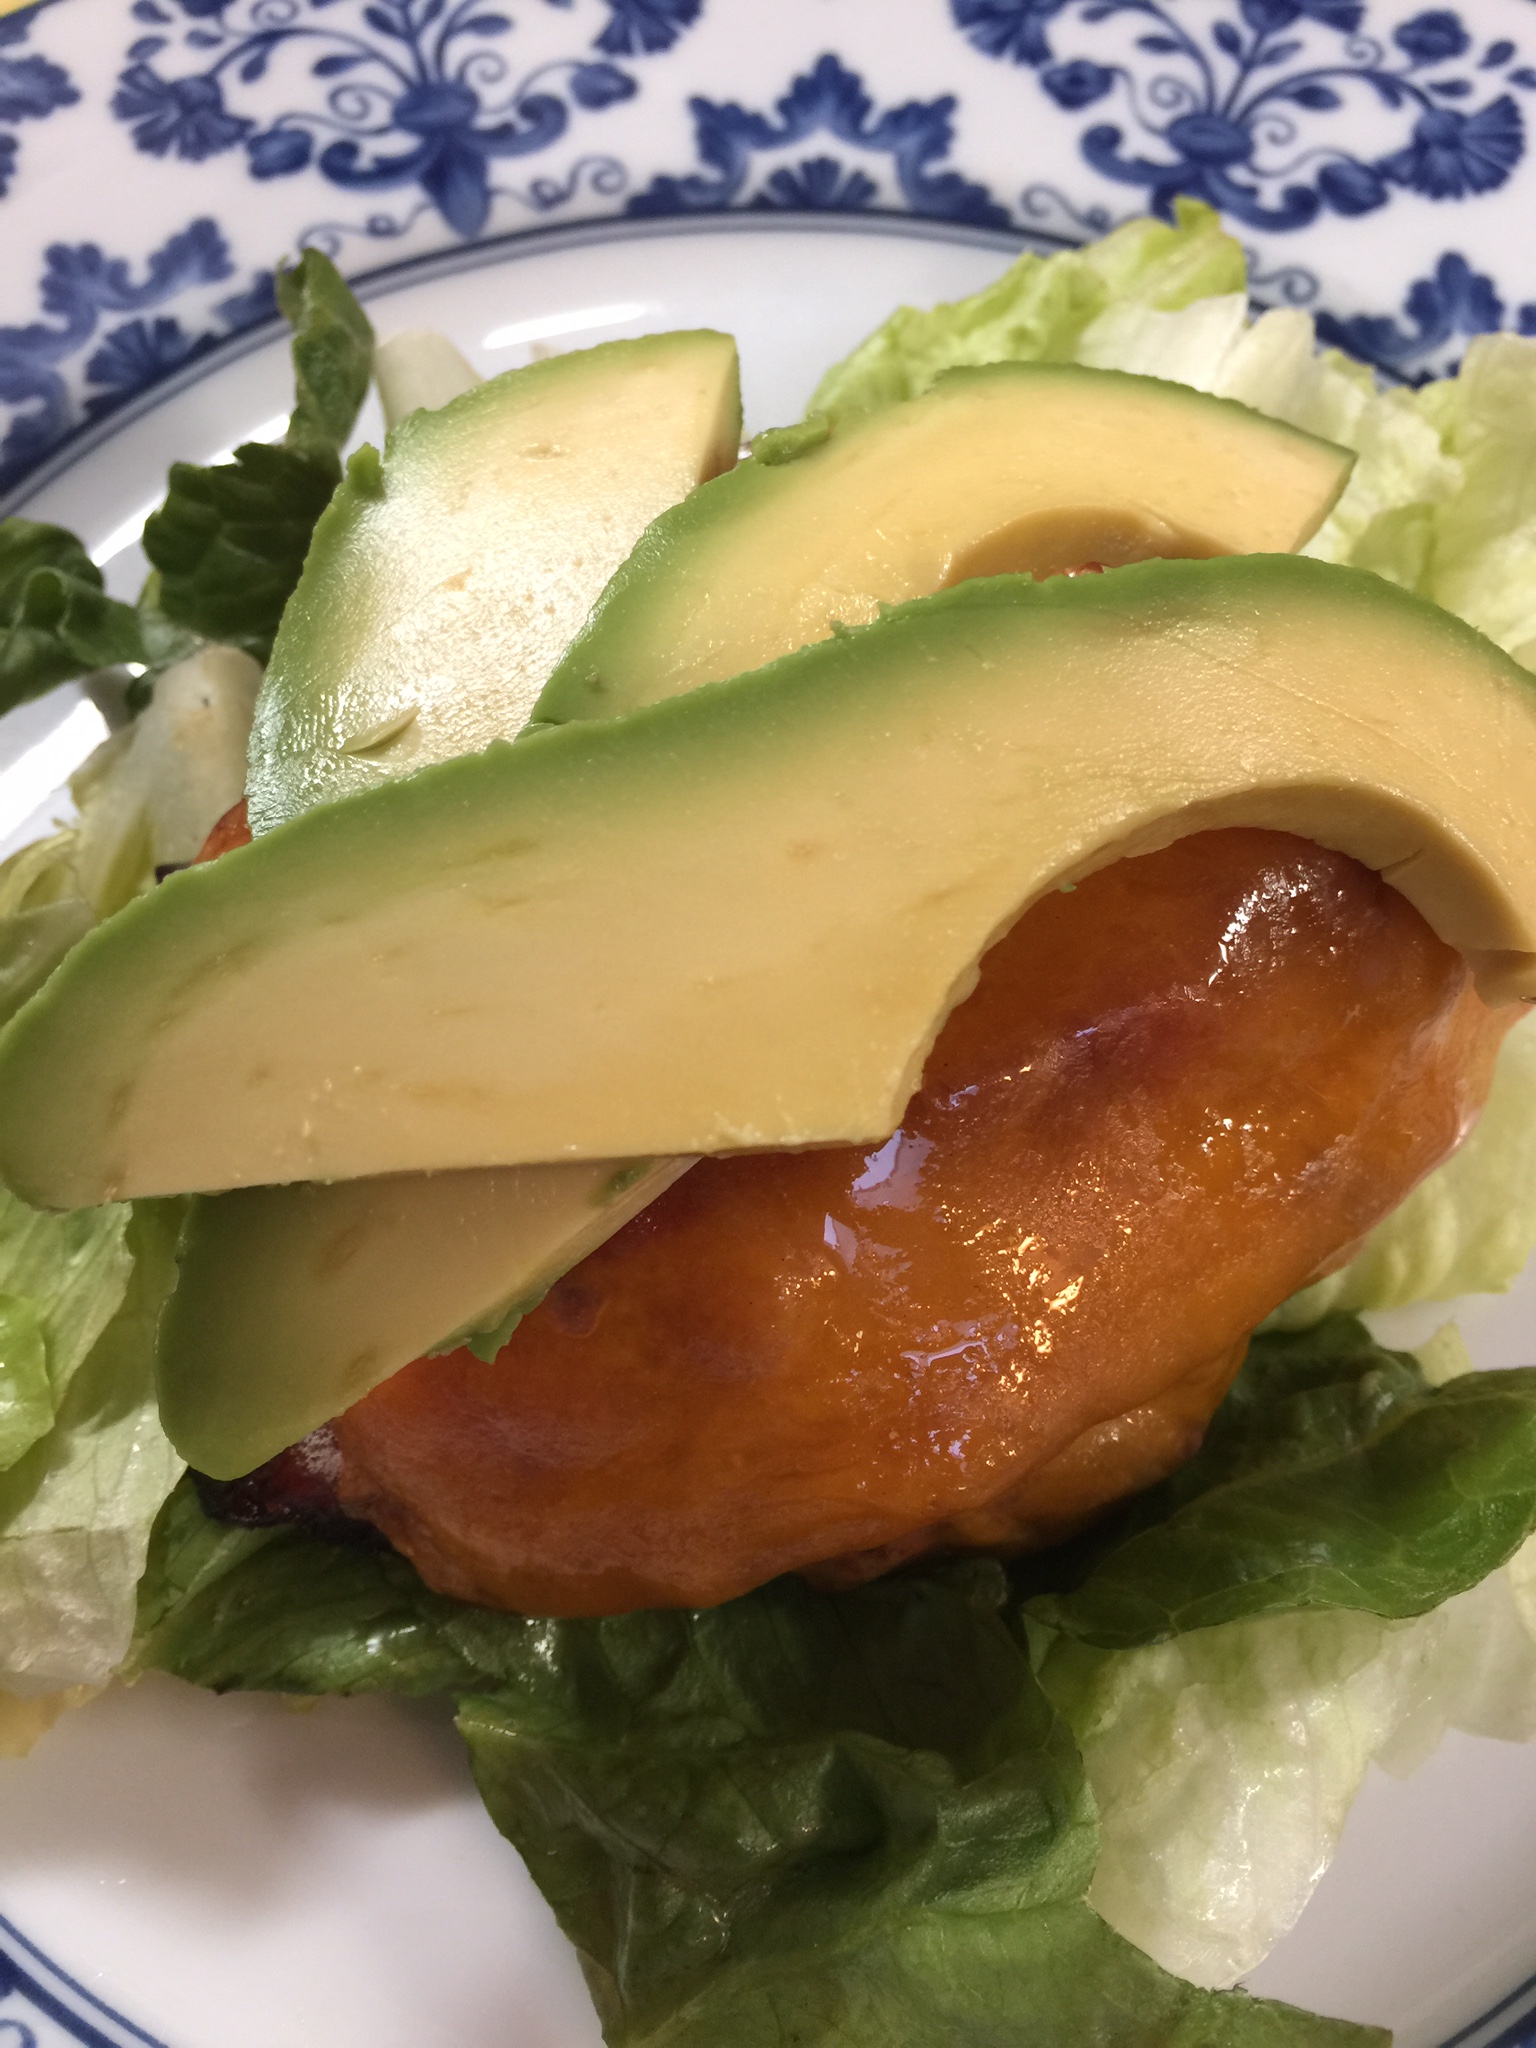
Put it all together, and what do you get…delicious, filling, and crowd pleasing!
No need for a bun.
Every Sunday, I make sheets of bacon to munch on during the week! This allows us to have bacon every morning, even in a pinch. I used to make it in the skillet every morning the old fashioned way, but this way allows me to make much more at a time, save all the bacon drippings, and have more time in the morning.
Cookie Sheet Bacon
Preheat your oven to 375 degrees.
Line a cookie sheet with sides (jelly roll pan) with heavy duty aluminum foil.
Lay your bacon out without the sides touching. I can usually get 10 to 12 pieces on a sheet.The cooking time really depends on how thick your bacon is, how you are going to use it, and how cooked you like it! If you are going to keep cooking it in another dish, I do it par-baked which just means I remove it before it is thoroughly cooked through.
I use pretty thick bacon and usually cook it about 20 minutes. For thinner bacon, start checking it at about 12 to 14 minutes.
This is about 20 minutes for thick bacon:
Remove your bacon to a paper towel lined plate to drain and crisp.
Do not discard your drippings. I almost always try to make a dish using the bacon drippings the day I make bacon such as the Bacon Brussels or Bacon Green Beans. If I am not cooking a dish, I save the drippings in a mason jar. (Yes, just like Grandma used to save hers!) Make sure you strain the bits out if you are using a jar – I use bits and all when preparing a dish the same night.
I reuse the tray over and over until I have enough bacon (and drippings) for my immediate and future bacon needs! Then, when you are finished, drain your drippings and toss the foil!
This evening, we made ABC Burgers AND Bacon Green Beans (post to come) with all of that delicious bacon.
It is super simple, and your family will love you.
ABC Burger
I used 2 lbs of grass-fed 80/20 ground beef, and hand mixed with salt, pepper, and Worcestershire sauce (and any other herbs and spices you like in a normal burger).
Form the meat into patties the size you like. My husband grilled them out back as usual, but about 5 minutes before removing them, adds the bacon and tops with sliced cheddar cheese. After the cheese melts, remove them from the grill.
We place them on a bed of lettuce with mayo (you can use mustard too) and top with sliced avocado. You will realize you never need a bun again!
This is a super easy weeknight meal or a fun weekend meal!
Here is your tip for the week if you need it even easier…Order Up, in San Antonio, makes their own version of an ABC Burger made with grass-fed beef that is delicious! They serve theirs in a lettuce wrap, on request, and serve their delicious Chipotle Mayo on the side. It is fantastic, perfectly Keto, and we love the people there as well.Enjoy!


